Is your RV’s hot water system letting you down? Whether you’re dealing with cold showers or strange noises from your water heater, you’ve come to the right place. Atwood water heaters (now manufactured under the Dometic brand) are common in RVs, but like any appliance, they can develop issues over time. Let’s dive into the most common problems and fix them so you can get back to enjoying your adventures.
Why Your Atwood Water Heater Won’t Light
Nothing’s more frustrating than trying to take a shower only to discover you have no hot water. The most common issue with Atwood water heaters is ignition failure, accounting for about 35% of all reported problems.
Electronic Ignition System Failures
If your water heater isn’t lighting up, the electronic ignition system is likely the culprit. When working properly, you should hear a clicking sound as the system tries to light. If you see the red light on but hear no clicking, your ignition sequence isn’t starting.
The circuit board acts as the brain of your water heater, controlling the ignition process by:
- Sending voltage to the gas valve
- Activating the electrodes for 6-8 seconds
- Entering “lock-out” mode if ignition fails
Common circuit board failures include:
- Loss of output voltage
- Faulty relay circuits
- Corroded connections
Many RVers have found success by replacing the original circuit board with aftermarket options from Dinosaur Electronics, which often come with better warranties and improved reliability.
Thermal Cut-Off Switch Issues
If your water heater suddenly stops working, check the thermal cut-off switch. This safety device sits on the power wire connected to the thermostat and cuts power when it detects excessive heat (around 190°F).
Unlike resettable switches, once a thermal cut-off switch trips, it needs replacement. Look for:
- Completely disabled water heater
- No power reaching the circuit board
- Corroded connections at the switch terminals
The thermal cut-off switch (part #93866) is a common replacement item and relatively easy to swap out with basic tools.
Gas Valve Problems
Your water heater’s gas valve controls propane flow to the burner and requires at least 10.5 VDC to operate correctly. When it fails, you might notice:
- No gas reaching the burner
- Partial gas flow causing weak flames
- Complete failure to ignite
Testing is straightforward: listen for an audible click when the switch activates and check for proper voltage at the terminals. If you need to replace the valve, you’ll likely need to update the entire assembly including the orifice.
Why Your Water Isn’t Getting Hot Enough
If your water heater lights but doesn’t produce enough hot water, you’re experiencing one of the second most common issues (about 28% of reported problems).
Bypass Valve Problems
After winterizing your RV, bypass valves left in the wrong position are often the reason for tepid water. The typical system has three valves:
- Hot water inlet
- Cold water outlet
- Crossover connection
If the valves are positioned incorrectly, cold water might bypass the heating tank completely. Check all valve positions visually before troubleshooting further.
Thermostat Issues
Your Atwood water heater’s thermostat is preset to 140°F and needs direct contact with the tank wall to sense temperature accurately. If the water isn’t getting hot enough, check for:
- Loose thermostat mounting
- Debris between thermostat and tank
- Failed thermostat contacts
The thermostat (part #91447) can be tested with a multimeter for proper operation and replaced if needed.
Electric Element Failures
For combination gas/electric models, the 1400-watt, 120-volt heating element can fail due to:
- Running with an empty tank (dry firing)
- Mineral buildup
- Electrical problems
To test the element, measure resistance between terminals with a multimeter – you should see readings between 10-16 ohms. A reading of infinity means the element has failed open, while continuity to ground indicates a short. The heating element (part #92249) is replaceable with moderate DIY skills.
Electrical Problems Beyond the Circuit Board
About 22% of Atwood water heater issues stem from electrical problems outside the main circuit board.
Wiring and Connection Problems
RVs endure vibration, moisture, and temperature swings that take a toll on electrical connections. Common issues include:
- Corroded spade terminals
- Loose wire connections
- Damaged wiring harnesses
- Poor grounding
Start troubleshooting by checking the 12VDC power supply, then systematically test each connection in the control sequence. The junction box attached to the water heater deserves special attention, as it’s a frequent source of connection problems.
Power Supply Issues
Your Atwood water heater needs stable voltage to operate correctly. Test the power source with a multimeter – you should see:
- At least 12VDC at the circuit board
- Proper voltage output to components
- Clean power without fluctuations
Many electrical issues can be traced to problems with the RV’s converter or battery system rather than the water heater itself.
Gas System Problems and Maintenance
For gas-operated water heaters, proper fuel delivery is crucial for reliable operation.
Gas Pressure Issues
Your Atwood water heater requires a minimum of 11 inches water column pressure at the gas valve inlet. Insufficient pressure can result from:
- Regulator problems
- Undersized gas lines
- Restrictions in the propane system
Testing requires a manometer connected to the test port on the gas valve. For accurate readings, run at least two gas appliances simultaneously to simulate normal load conditions.
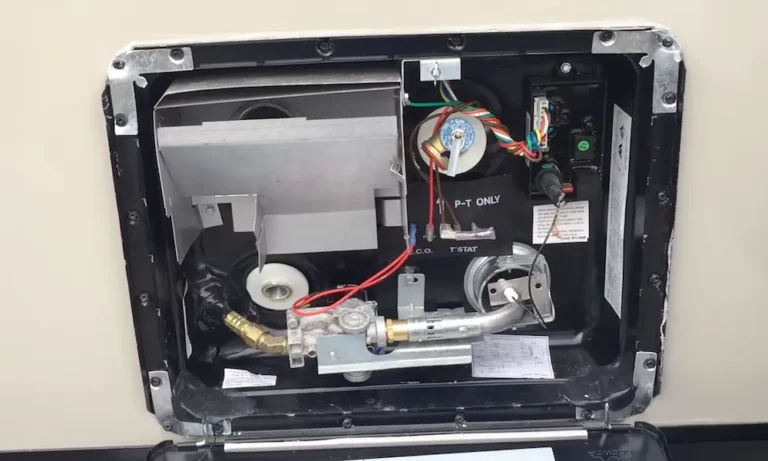
Burner Assembly Maintenance
The burner assembly needs regular cleaning to prevent blockages that cause ignition failures. Common problems include:
- Spider webs in burner tubes
- Insect nests in exhaust passages
- Debris accumulation
The air shutter that controls combustion air should be set to approximately 1/4 open for optimal performance. Regular cleaning and maintenance prevent many gas-related issues.
Electrode Maintenance
The spark electrode that ignites the gas requires proper:
- Cleaning to remove carbon deposits
- Gap spacing of 1/8 inch
- Intact ceramic insulator
Even with a functioning circuit board and gas system, misaligned or damaged electrodes can prevent reliable ignition.
Water System Configuration and Maintenance
Your water heater is part of the larger plumbing system in your RV, and problems can originate outside the unit itself.
Water Pressure Relief Valve Issues
The pressure relief valve is a safety device that prevents excessive pressure and temperature. If it’s leaking, check for:
- System pressure exceeding 150 PSI
- Water temperature above 210°F
- Debris preventing proper valve seating
Many relief valve leaks can be resolved by testing and reseating the valve rather than immediate replacement.
Tank Corrosion and Anode Rod Maintenance
Unlike home water heaters, most Atwood RV models don’t have a replaceable anode rod. Instead, they use an aluminum tank with special coating. However, checking for:
- Signs of corrosion
- Water discoloration
- Tank leaks
can help you catch problems early. Flushing the tank regularly helps remove sediment that can reduce heating efficiency and tank life.
Preventive Maintenance Schedule for Atwood Water Heaters
Following a regular maintenance schedule dramatically reduces the chance of problems developing:
| Maintenance Task | Frequency | Benefit |
|---|---|---|
| Visual inspection | Monthly | Catch early signs of problems |
| Clean burner assembly | Seasonally | Prevent ignition failures |
| Flush tank | Seasonally | Remove sediment buildup |
| Test pressure relief valve | Seasonally | Ensure safety and proper operation |
| Check electrical connections | Seasonally | Prevent electrical failures |
| Full system inspection | Yearly | Identify developing issues |
Essential Monthly Checks
Spend five minutes each month doing these quick checks:
- Examine the exterior compartment for debris or insect activity
- Look for signs of water leaks
- Verify the exhaust vent is clear
- Check flame color (should be blue with minimal yellow tips)
Seasonal Maintenance
Before heavy use periods, perform these more thorough tasks:
- Flush the tank to remove mineral deposits
- Clean the burner assembly and electrodes
- Test the pressure relief valve operation
- Inspect all electrical connections
- Verify proper gas pressure
This seasonal maintenance routine prevents most common failures and extends your water heater’s life.
Winterizing Your Atwood Water Heater
Proper winterization is crucial for preventing freeze damage and ensuring reliable operation when you hit the road again.
Step-by-Step Winterization
- Turn off power to the water heater
- Turn off the propane supply
- Drain the tank completely using the drain plug
- Set bypass valves to the bypass position
- Add RV antifreeze to your water system (but not directly to the water heater tank)
Many water heater problems occur in spring when RVers forget to reset the bypass valves before using the system.
De-Winterizing Procedure
When ready to use your RV again:
- Close the drain plug
- Return all bypass valves to normal position
- Fill and flush the system with fresh water
- Check for leaks
- Restore power and propane
- Test operation before hitting the road
Advanced Troubleshooting Techniques
For persistent problems, these systematic approaches can help identify the root cause:
Testing with a Multimeter
A basic multimeter is your best friend for electrical troubleshooting:
- Test for 12VDC input at the circuit board
- Verify voltage output to gas valve (should be 10.5-13.5 VDC)
- Check component resistance
- Test for proper grounding
The circuit board should receive clean 12VDC power and provide appropriate output to downstream components.
Checking for Gas Flow
If electrical components check out but ignition still fails:
- Listen for gas valve solenoid click
- Check for gas odor at the burner assembly
- Verify adequate gas pressure
- Inspect for physical blockages
Gas flow problems often require specialized tools and professional service, especially if adjustments to the gas system are needed.
Diagnostic Sequence for No Hot Water
When troubleshooting any hot water problem, follow this sequence:
- Verify power supply (12VDC for controls, 120VAC for electric element)
- Check bypass valve positions
- Test thermostat operation
- Examine ignition system components
- Inspect gas supply system
- Test electrical connections and components
This systematic approach helps pinpoint the failing component without unnecessary parts replacement.
Tools and Parts Every RV Owner Should Have
Being prepared for water heater issues means having the right tools and parts:
Essential Tools
- Digital multimeter
- Screwdriver set
- Socket set with extensions
- Wire brush for cleaning
- Flashlight or headlamp
Recommended Spare Parts
- Thermal cut-off switch (part #93866)
- Thermostat (part #91447)
- Electrode assembly
- Basic electrical connectors and wire
- Teflon tape for plumbing connections
Having these items on hand can save your trip when problems arise in remote locations.
Safety Considerations When Working on RV Water Heaters
Always prioritize safety when working on any propane appliance:
- Disconnect power and propane before servicing
- Allow the unit to cool completely
- Work in well-ventilated areas
- Use proper tools and techniques
- If you smell gas, stop immediately and seek professional help
Water heaters combine electricity, gas, and hot water – all potential hazards if not respected.
When DIY Isn’t Enough
While many Atwood water heater problems can be resolved with DIY repairs, certain situations call for professional service:
- Gas line repairs or modifications
- Main tank or structural repairs
- Persistent problems after multiple DIY attempts
- Safety-related concerns
If you smell gas, hear unusual sounds, or notice any safety concerns, don’t hesitate to call a qualified RV technician rather than risk a dangerous situation.
By understanding these common Atwood RV water heater problems and their solutions, you’ll be better prepared to diagnose issues, perform basic repairs, and know when professional help is needed. Remember that regular maintenance is the best way to prevent problems and ensure reliable hot water for all your RV adventures.