Struggling with your RV’s temperature display? If you’ve accidentally switched your Dometic thermostat between Celsius and Fahrenheit, you’re just a few button presses away from fixing it. This guide covers all Dometic thermostat models and their conversion methods, so you can get back to enjoying your perfectly climate-controlled space without the mental math of temperature conversion.
Why Your Dometic Thermostat Shows the Wrong Temperature Unit
Ever glanced at your RV’s thermostat and done a double-take when you see 21°C instead of the familiar 70°F? This common issue happens when someone accidentally presses certain button combinations on your Dometic thermostat.
The good news? Switching back is simple, though the exact method depends on your specific Dometic model. Let’s break down the conversion process for every popular Dometic thermostat type.
Single Zone LCD Thermostat Conversion Method
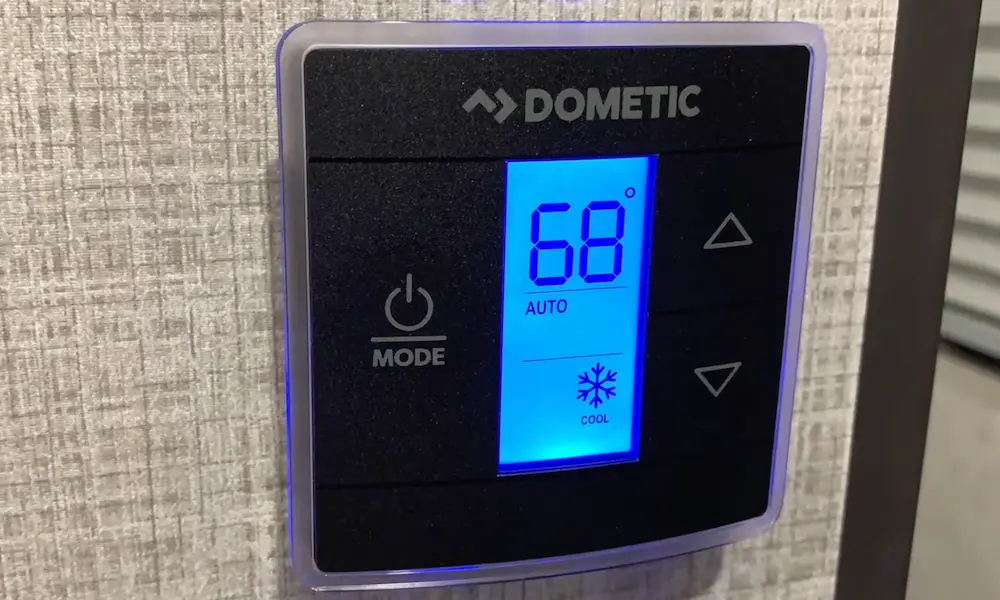
The Single Zone LCD is Dometic’s most common RV thermostat model, featuring a straightforward display with basic temperature control buttons. If you have this model, here’s how to switch between Celsius and Fahrenheit:
- Look for the “+” and “-” buttons (or Up/Down arrows) on your thermostat
- Press and hold both buttons simultaneously for about 3 seconds
- Watch for the temperature display to change from °F to °C (or vice versa)
- Release the buttons once you see the change
This works whether your thermostat is on or off, and in any mode (Cool, Heat, or Fan). You’ll immediately see the temperature reading adjust to your preferred scale along with the corresponding degree symbol.
For example, 72°F will instantly convert to approximately 22°C when switching to Celsius.
CCC2 (Comfort Control Center 2) Thermostat Conversion
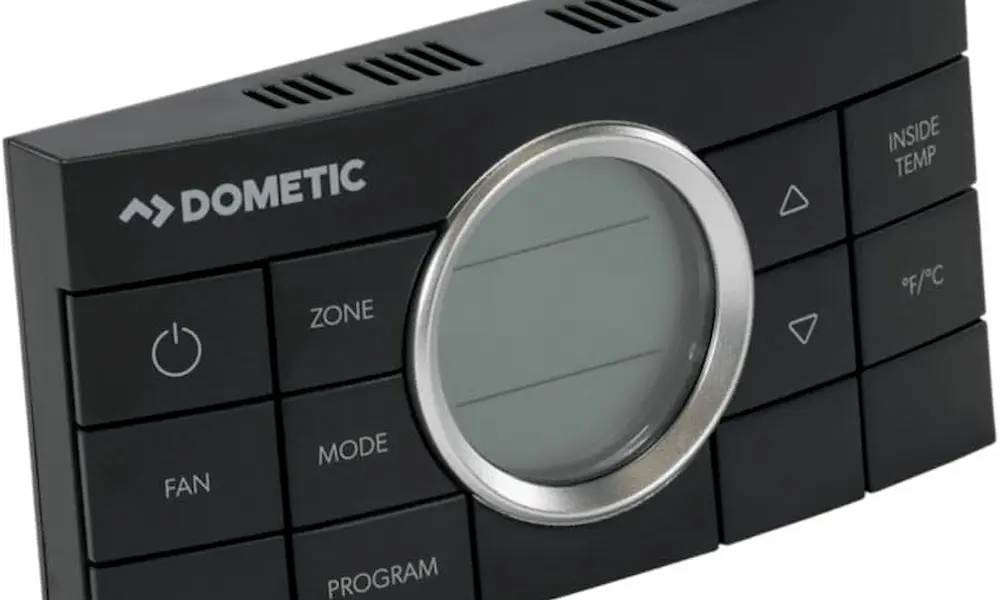
The CCC2 is a more advanced Dometic model with a digital display and multiple control buttons. Converting temperature units on this model is even simpler:
- Find the dedicated “°F/°C” button on the control panel
- Press this button once to toggle between Fahrenheit and Celsius
- The display will immediately update with the new temperature unit
The CCC2 makes switching between temperature scales incredibly easy with its dedicated button – no need to memorize button combinations.
Bluetooth CT (Capacitive Touch) Thermostat Conversion
For newer Dometic Bluetooth-enabled thermostats (model 3316420 series), the conversion process is similar to the basic LCD models:
- Locate the Up (△) and Down (▽) buttons on your thermostat
- Press both buttons simultaneously
- The display will toggle between °F and °C
- Release the buttons when you see your preferred unit
If you’re using the Dometic Climate Control app with your Bluetooth thermostat, you can also change the temperature display units in the app settings. However, this only affects what you see in the app – the physical thermostat display must be changed using the button method above.
Temperature Conversion Chart: Fahrenheit to Celsius
For quick reference, here’s a useful conversion chart for common RV temperature settings:
| Fahrenheit | Celsius |
|---|---|
| 65°F | 18°C |
| 68°F | 20°C |
| 70°F | 21°C |
| 72°F | 22°C |
| 75°F | 24°C |
| 78°F | 26°C |
| 80°F | 27°C |
| 85°F | 29°C |
Most RVers in the US prefer setting their cooling temperature around 72°F (22°C) and heating around 68°F (20°C) for optimal comfort.
Troubleshooting Dometic Thermostat Temperature Display Issues
Thermostat Stuck in Celsius
If your thermostat is stuck displaying Celsius when you prefer Fahrenheit, don’t worry. This common issue happens when buttons are accidentally pressed. The solution is simple – just repeat the same button combination described above for your specific model.
For Single Zone LCD models, press and hold both the “+” and “-” buttons again until the display switches back to Fahrenheit.
No Response When Pressing Buttons
If your thermostat doesn’t respond when trying to change temperature units, the display might be in sleep mode. Try these steps:
- Press any button once to “wake up” the display
- Wait for the screen to fully illuminate
- Then try the temperature conversion button combination for your model
This often resolves the issue since many Dometic thermostats go into power-saving mode when not in use.
Different Model, Same Method
Even if your specific Dometic model isn’t explicitly mentioned above, the simultaneous up/down button press method works across most models. This includes Air Xcel branded units, which Dometic also manufactures.
If your thermostat looks different from the descriptions above, try the simultaneous button press method first – it’s the most universal solution.
Model-Specific Variations and Special Cases
Some older or specialized Dometic thermostat models may require slight variations in the conversion process:
Air Xcel Models
For Air Xcel branded thermostats (made by Dometic):
- Hold both up and down buttons for approximately 5 seconds
- Wait until the display flashes
- The units will switch between °F and °C
Older Single Zone Models
Some older Single Zone models may require:
- Switching the thermostat to “Off” mode first
- Then performing the simultaneous button press
- The display should toggle between temperature units
Initialization Requirements
If you’ve recently installed your thermostat or are having persistent issues, you may need to initialize the system:
- Hold the “+” button and “On/Off Mode” button simultaneously for three seconds
- Wait until the display shows “–“
- Release the buttons
- Then try the temperature conversion method again
Factory Reset Considerations
If you’ve tried all the above methods without success, a factory reset might be necessary. Important things to know:
- Most Dometic thermostats sold in North America default to Fahrenheit after a reset
- Typical factory presets are 72°F for cooling and 68°F for heating
- Consult your specific model’s manual for reset instructions, as they vary by model
Keep in mind that a factory reset will erase any custom settings you’ve programmed, so this should be considered a last resort.
Understanding Dometic’s Temperature Control Systems
Dometic thermostats are designed to control various heating and cooling systems in RVs, including:
- Roof air conditioners
- Furnaces
- Heat pumps
- Dual-zone climate systems
The temperature conversion feature is consistent across all these applications, though the specific button combinations may vary slightly by model.
For multi-zone systems that control separate areas of your RV, you’ll need to change the temperature display units on each zone’s control panel individually.
Dometic App Integration and Temperature Display
Newer Bluetooth-enabled Dometic thermostats offer app control through the Dometic Climate Control app. A few important notes about temperature display in the app:
- The app and physical thermostat can display different temperature units
- Changing units in the app only affects what you see on your mobile device
- To change the physical thermostat display, you must use the button methods described earlier
The app offers other useful features beyond unit conversion, including remote temperature control, scheduling, and monitoring system performance.
Why Dometic Thermostats Support Both Temperature Scales
Dometic includes both Celsius and Fahrenheit options because they sell their products globally. The Celsius scale is standard in most countries, while Fahrenheit remains common in the United States.
This dual-unit support is especially useful for:
- RV travelers crossing borders between the US and Canada/Mexico
- International RV buyers and renters
- Understanding weather forecasts when traveling abroad
While most Americans prefer Fahrenheit, being able to switch to Celsius can be handy when traveling to countries that use the metric system.
Quick Reference: Dometic Thermostat Model Identification
Not sure which Dometic model you have? Here’s how to identify the most common types:
- Single Zone LCD: Basic rectangular display with minimal buttons (usually 4-5 total)
- CCC2: More buttons and a larger display with the Comfort Control Center logo
- Bluetooth CT: Modern design with a capacitive touch interface and Bluetooth symbol
- Air Xcel: Similar to Single Zone but may have Air Xcel branding
The model number is typically printed on a small label on the side or back of the thermostat, often beginning with numbers like 3313, 3316, or similar.
Maintaining Your Dometic Temperature Control System
While changing between Celsius and Fahrenheit is a simple operation, keeping your entire climate control system in good working order requires occasional maintenance:
- Clean or replace air filters every 1-3 months
- Ensure air vents are unobstructed
- Check that the thermostat is properly calibrated
- Keep the thermostat display clean to ensure button functionality
A well-maintained system not only keeps you comfortable but also operates more efficiently, saving energy and reducing strain on your RV’s electrical system.
Understanding Temperature Differences in Various RV Areas
RVs can have significant temperature variations between different areas. If your Dometic thermostat readings seem off, consider:
- Thermostat placement (exposure to sunlight or drafts)
- Distance from air vents
- Insulation quality in different parts of the RV
- Heat generated by appliances or electronics
These factors can create temperature differences of 5°F (about 3°C) or more between areas of your RV, which might explain why the thermostat reading doesn’t match how warm or cool you feel.
Making the Most of Your Dometic Climate Control System
Beyond simply changing temperature units, understanding your Dometic system’s capabilities can improve your comfort and energy efficiency:
- Use programmable features to adjust temperatures based on your schedule
- Take advantage of fan-only mode during mild weather
- Use the “Auto” mode to maintain consistent temperatures
- Set realistic temperature expectations (RV systems may struggle to cool below 68°F/20°C on very hot days)
With the right settings and proper maintenance, your Dometic climate control system will keep you comfortable year-round, whether you prefer to think in Celsius or Fahrenheit.