Ever notice your RV’s temperature control acting up? Maybe the buttons aren’t responding, or the temperature reading seems off. You’re probably facing a Dometic thermostat issue. The good news? Replacing it yourself is totally doable, even if you’re not particularly handy.
This guide walks you through replacing your Dometic thermostat without hiring a professional. I’ll cover everything from safely removing your old unit to testing your new one, with clear instructions for both single-zone and multi-zone systems.
Why You Might Need to Replace Your Dometic Thermostat
Dometic thermostats are common in RVs and typically reliable, but they’re not immune to problems. Here are the telltale signs it’s time for a replacement:
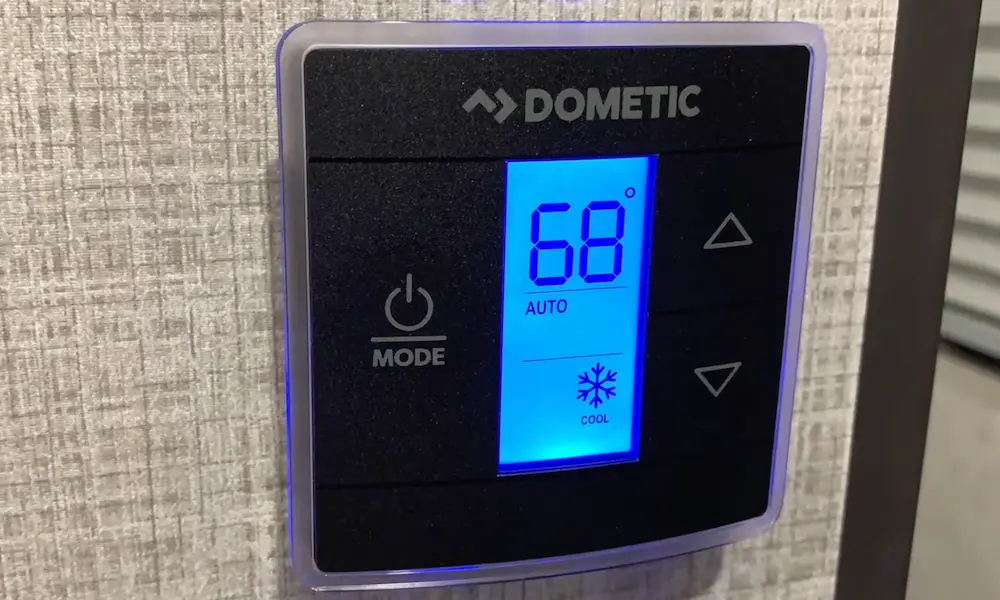
- Unresponsive buttons: The capacitive touch buttons on CT models can wear out over time, making it impossible to adjust settings.
- Erratic temperature readings: If your thermostat shows 65°F when it’s clearly 80°F inside, the sensor might be failing.
- Display issues: Dimming, flickering, or completely dead displays usually signal electronic failure.
- System not responding: When your AC or furnace doesn’t kick on despite the thermostat indicating it should.
- Upgrade desire: Many RVers replace functioning thermostats to gain better features like programmability or WiFi control.
Essential Tools for the Job
Before starting, gather these basic tools:
- Phillips and flathead screwdrivers
- Digital camera or smartphone (for taking reference photos)
- Electrical tape
- Wire labels (optional but helpful)
- Headlamp or flashlight (as you’ll likely need to cut power)
- Voltage tester (recommended for safety)
Safety First: Powering Down Your System
This critical step prevents electrical shock and protects your new thermostat:
- Disconnect your RV from shore power or turn off the generator
- Locate your 12V DC breaker panel or fuse box
- Remove the fuse or switch off the breaker that powers the thermostat circuit
- Use a voltage tester to confirm no power is reaching the thermostat
Pro tip: If you’re unsure which fuse controls the thermostat, turn on the AC and pull fuses one by one until the unit stops running.
Removing Your Old Dometic Thermostat
Now for the actual removal process:
- Gently pull the thermostat faceplate from the wall mount. Most Dometic models have tabs at the top or bottom edge that release when pulled.
- CRITICAL STEP: Take several clear photos of the wire connections from multiple angles. This will be your roadmap for installing the new unit.
- Note the wire colors and their terminal locations. Typical Dometic configurations include:
- 3-wire single-zone systems: Red (power), Black/Green (ground), Blue/Orange (communication)
- Multi-zone CCC systems: Look for RJ-11 telephone-style connectors plus power wires
- Using your flathead screwdriver, loosen each terminal screw and carefully remove the wires one by one.
- Remove the mounting screws (usually two Phillips screws) holding the thermostat housing to the wall.
- Carefully pull the housing away, making sure wires don’t fall back into the wall cavity.
| Thermostat Type | Power Wire | Ground Wire | Communication Wire | Special Features |
|---|---|---|---|---|
| CT Single Zone | Red | Black or Green | Blue or Orange | 3-wire setup |
| CCC2 Multi-Zone | Red | Black | Blue + RJ-11 cables | Zone control capability |
Preparing Your New Thermostat
If your replacement is the same model, installation is straightforward. For upgrades or different models:
- Check the manufacturer’s wiring diagram to confirm compatibility
- For single-zone to multi-zone upgrades, you’ll need to install additional wiring
- Remove any packaging and protective film from the new thermostat
- If your new thermostat has dip switches or jumper settings, configure them before mounting
Installing Your New Dometic Thermostat
Follow these steps to mount and wire your new thermostat:
- Feed the existing wires through the back opening of the new thermostat housing
- Position the housing against the wall, ensuring it’s level
- Secure the housing with the mounting screws
- Connect each wire to its matching terminal using your reference photos:
- Connect the red power wire to the 12V+ or “R” terminal
- Connect the ground wire (black/green) to the ground or “C” terminal
- Connect the communication wire (blue/orange) to the communication or data terminal
- For multi-zone systems, connect the RJ-11 plugs to their appropriate jacks
- Tighten each terminal screw firmly but don’t overtighten
- Gently tug each wire to ensure it’s securely connected
Warning: Never force connections. If wires don’t reach or terminals don’t match, stop and research compatibility issues before proceeding.
Final Connections and Testing
Now it’s time to power up and test your new thermostat:
- Double-check all connections against your reference photos
- Ensure no bare wires are touching other terminals or metal parts
- Snap the thermostat faceplate onto the housing
- Restore power by reinserting the fuse or switching the breaker back on
- The display should illuminate immediately if connections are correct
- Perform a system reset if required by your model:
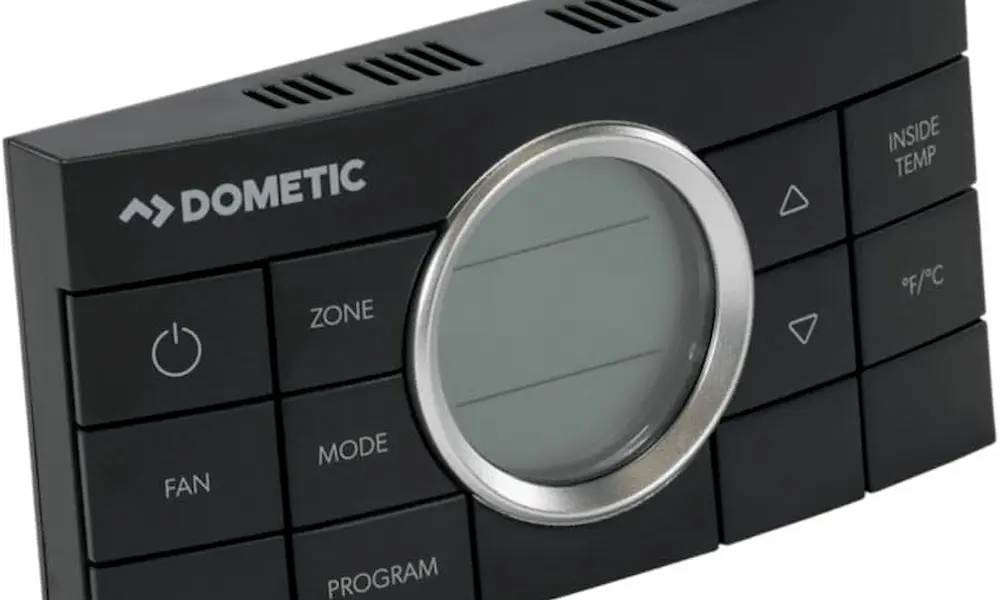
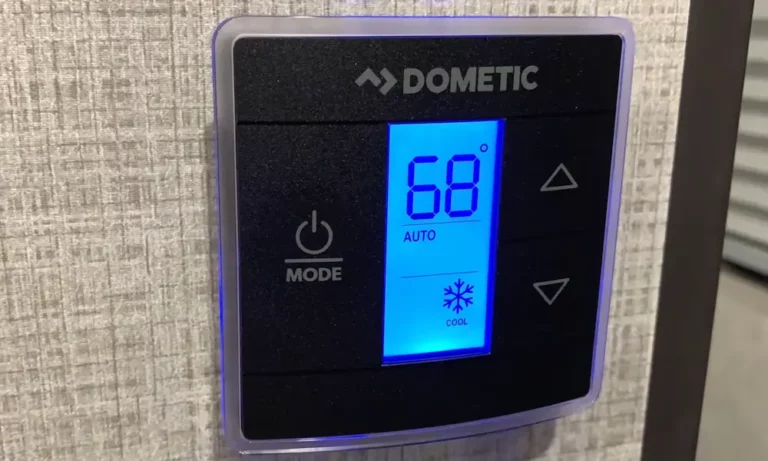
- For CCC2 units: With the system OFF, press and hold MODE + ZONE buttons until “IniT” appears
- Press ON/OFF to exit setup mode
Testing All Functions
Thorough testing ensures everything works properly:
- Cycle through all operation modes:
- COOL mode: Set temperature below ambient and listen for the AC compressor to engage
- HEAT mode: Set temperature above ambient and verify furnace ignition
- FAN mode: Test all available fan speeds (Low, Medium, High)
- Verify temperature sensing by comparing the displayed temperature with a separate thermometer
- For multi-zone systems, repeat testing for each zone
Advanced Configuration Options
Many Dometic thermostats offer customizable settings:
- Temperature display units (°F or °C)
- Fan operation modes (Auto or Continuous)
- Compressor delay settings (to protect from short cycling)
- Zone prioritization (for multi-zone systems)
Consult your model’s operating manual for specific instructions on accessing and changing these settings.
Troubleshooting Common Issues
If you encounter problems after installation:
No Power to Thermostat
- Check the fuse/breaker
- Verify the 12V+ wire is correctly connected
- Ensure the ground wire makes good contact
System Won’t Cool or Heat
- Verify mode selection is correct
- Check that temperature setting is appropriate (below room temp for cooling, above for heating)
- Inspect the communication wire connection
- For multi-zone systems, ensure the correct zone is selected
Erratic Operation
- Reset the thermostat to factory defaults
- Check for loose wire connections
- Ensure the thermostat is properly grounded
Upgrading to Third-Party Options
If you’re considering alternatives to Dometic OEM replacements:
- Micro-Air EasyTouch RV thermostats offer smartphone control and advanced programming
- These units can directly replace most Dometic models while adding features like scheduling and remote control
- Installation follows similar steps but may require additional configuration
Maintaining Your New Thermostat
To extend the life of your new thermostat:
- Clean the display with a soft, slightly damp cloth (never spray cleaners directly)
- Keep battery-powered models fresh with annual battery replacements
- Check wire connections annually for corrosion or loosening
- Update firmware if available (for smart thermostats)
Specialized Installations
Replacing Analog With Digital
If upgrading from an old analog dial to a modern Dometic digital:
- You’ll likely need a control box installation kit
- Additional wiring may be required
- Consider professional installation if you’re not comfortable with wiring modifications
Control Box Considerations
Some Dometic systems have separate control boxes installed near the AC unit:
- If replacing both thermostat and control box, disconnect all power sources before accessing the roof compartment
- Label all control box wires before disconnecting
- Match the control box model to your thermostat for proper communication
Dometic Thermostat Models and Compatibility
Understanding which model you need is crucial:
| Thermostat Series | Compatible With | Features | Wiring Type |
|---|---|---|---|
| CT Single Zone | Most Dometic rooftop ACs | Basic cooling/heating control | 3-wire |
| CCC2 | Multi-zone Dometic systems | Controls up to 4 zones | RJ-11 + Power |
| Capacitive Touch | Newer Dometic systems | Touchscreen interface | 3-wire |
What To Do With Your Old Thermostat
Instead of discarding your old thermostat:
- Keep it as a backup for emergency repairs
- Check if the manufacturer offers a recycling program
- Remove any batteries for proper disposal
Real-World Performance Expectations
After installation, you should notice:
- More accurate temperature control
- Responsive interface and controls
- Proper cycling of heating and cooling systems
- Consistent fan operation at selected speeds
Don’t expect miracles though—a new thermostat won’t fix underlying issues with your AC or furnace units themselves.
By following this guide, you’ve successfully replaced your Dometic thermostat, saving on service calls while gaining the satisfaction of a DIY job well done. The process typically takes 30-45 minutes for a standard replacement, and your RV’s climate control system should now operate reliably for years to come.