Is your garage door stopping short of the finish line? You’re facing one of the most common garage door problems that homeowners encounter. A door that won’t close completely isn’t just annoying—it’s a security risk that leaves your home vulnerable and can drive up your energy bills.
Let’s dive into why this happens and how you can fix it. With a bit of troubleshooting, you might solve the problem yourself without calling in the pros.
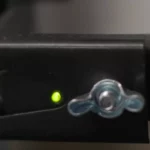
Photo Eye Sensor Problems: The Most Common Culprit
Blocked Sensors
The most frequent reason your garage door refuses to close all the way is something blocking the safety sensors. These small devices sit about 6 inches off the ground on both sides of your garage door opening.
They create an invisible beam between them that, when interrupted, tells your door to reverse—a safety feature designed to prevent the door from closing on people, pets, or objects.
Check for:
- Kids’ toys or sports equipment
- Garbage cans positioned too close
- Garden tools leaning against the wall
- Fallen items that might be blocking the beam
Simply clearing the path often solves the problem immediately.
Dirty Sensor Lenses
Even if nothing obvious is blocking the sensors, dirt and grime build-up can interrupt that invisible beam just as effectively.
Take a soft, clean cloth and gently wipe the lenses of both sensors. You’d be surprised how often this simple maintenance step fixes the issue. Those tiny lenses collect dust, cobwebs, and even moisture that can interfere with proper function.
Misaligned Sensors
If your door starts to close but then immediately reverses, your sensors might be misaligned. When working correctly, both sensors should display steady indicator lights. Blinking or unlit LEDs signal a problem.
Here’s how to realign them:
- Locate the sensors on both sides of the door opening
- Look for the small LED lights on each unit
- If they’re not both steadily lit, loosen the mounting bracket slightly
- Adjust the sensor angle until both lights are steady
- Tighten the bracket without disturbing your adjustment
This simple fix restores the proper alignment so the beam connects properly between sensors.
Track and Hardware Issues That Prevent Complete Closure
Obstructions in the Track
Your garage door runs along metal tracks on both sides. Any debris or damage to these tracks can stop the door from closing completely.
Inspect the entire track for:
- Small objects or debris
- Bent sections of track
- Loose hardware or mounting brackets
- Hardened grease or dirt buildup
Use a level to check that the tracks are properly aligned on both sides of the door. Even small misalignments can cause big problems.
Damaged Rollers and Hinges
The rollers allow your door to glide smoothly along the track. When they become worn, damaged, or sticky, they can prevent proper door operation.
Signs of roller problems include:
- Visible wear or cracks on the rollers
- Door movement that’s noisy or jerky
- Rollers that no longer spin freely
- Rollers that have popped out of the track
Apply a silicone-based lubricant to the rollers (never use WD-40 on garage door components) to help them move more freely. If they’re severely damaged, replacement is often necessary.
Broken Springs or Cables
Garage doors use high-tension springs to offset the door’s weight, making it possible for the opener to lift it. If a spring breaks, the door may become unbalanced and unable to close properly.
Look for:
- Visible gaps in the springs
- Springs that appear stretched out
- Door that seems heavier than normal on manual operation
- Door that hangs crooked when partially open
Caution: Spring replacement is extremely dangerous and should be left to professionals. The high tension can cause serious injury.
Limit Switch Issues: When Your Door Doesn’t Know When to Stop
What Are Limit Switches?
Every garage door opener has limit switches that tell the motor when to stop—both when opening and when closing. If these settings are incorrect, your door might stop before reaching the ground.
Think of limit switches as the “how far” settings for your door’s travel.
How to Adjust the Close Limit Switch
If your door consistently stops a few inches from the ground, the close limit likely needs adjustment. Here’s how to fix it:
- Locate the limit adjustment screws on your opener unit (usually marked “up” and “down” or with arrows)
- Use a ladder to reach the opener safely
- For a door that doesn’t close enough: Turn the “down” or “close” adjustment screw in small increments (usually counterclockwise)
- Test the door after each adjustment
- Continue making small adjustments until the door closes completely
Most openers require about one full turn of the screw for every 3 inches of door travel adjustment.
| Opener Brand | Location of Limit Switches | Adjustment Direction |
|---|---|---|
| Chamberlain/LiftMaster | Side or back of motor unit | Clockwise for less travel, Counter-clockwise for more |
| Genie | Top of motor unit under cover | Clockwise for more travel, Counter-clockwise for less |
| Craftsman | Side of motor unit | Similar to Chamberlain (varies by model) |
Remember to make small, incremental adjustments and test between each one to avoid overcorrecting.
Opener Motor and Electrical Problems
Worn Out Motor Gears
The gears inside your opener can wear down over time, especially in older units. When this happens, the motor may run but fail to move the door completely.
Listen for:
- Motor running but door moving sluggishly or not at all
- Grinding or stripping sounds from the opener
- Inconsistent operation (works sometimes but not others)
Gear replacement kits are available for many opener models, though this repair is best suited for those comfortable with mechanical work.
Electrical Issues and Circuit Board Problems
Sometimes the problem isn’t mechanical but electrical. Circuit board issues can cause erratic behavior in your door system.
Check for:
- Flickering lights on the opener
- Error codes or unusual blinking patterns
- Door reversing or stopping without apparent cause
- Problems that started after a power outage or surge
Try resetting your opener by disconnecting it from power for 30 seconds, then reconnecting. If problems persist, the circuit board may need repair or replacement.
Remote and Wall Button Malfunctions
Sometimes the issue isn’t with the door itself but with how you’re controlling it:
- Replace batteries in your remote controls
- Clean connections on wall buttons
- Check for damaged wires leading to wall controls
- Test the door using different control methods to isolate the problem
Preventive Maintenance: Stop Problems Before They Start
Monthly Checks You Should Perform
Regular maintenance prevents many common garage door problems:
- Clean and check sensor lenses
- Tighten any loose hardware (bolts, brackets, etc.)
- Listen for unusual noises during operation
- Watch the door movement for any jerky or uneven motion
- Test the manual release to ensure it works in emergencies
Seasonal Maintenance Tasks
These tasks should be performed 2-4 times per year:
- Lubricate moving parts (rollers, hinges, springs) with silicone lubricant
- Check weather stripping for damage or wear
- Inspect cables for fraying or damage
- Test the door balance by disconnecting the opener and manually lifting the door
- Verify that safety features like auto-reverse are working properly
When DIY Won’t Cut It: Calling the Professionals
Safety Concerns With DIY Repairs
While many garage door issues can be fixed yourself, some repairs are best left to the pros:
- Spring replacement (extremely dangerous due to high tension)
- Cable repairs (also high-tension components)
- Major track realignment or replacement
- Opener motor replacement
- Structural repairs to the door itself
What to Expect From Professional Service
A professional garage door technician will:
- Perform a complete inspection of your door system
- Identify all issues, not just the obvious ones
- Provide options for repair or replacement
- Complete repairs with proper safety procedures
- Test all functions after repair
- Advise on maintenance to prevent future issues
Cost Considerations: Repair vs. Replace
Sometimes the question becomes whether to repair or replace components:
| Component | Average Repair Cost | Replacement Cost | Expected Lifespan |
|---|---|---|---|
| Sensors | $85-150 | $150-200 | 8-10 years |
| Rollers | $100-200 | $150-300 | 7-10 years |
| Springs | $150-350 | Same (always replace) | 7-10 years/10,000 cycles |
| Opener | $150-250 | $250-500+ | 10-15 years |
| Entire Door | Not applicable | $800-3,500+ | 15-30 years |
The Connection Between Garage Doors and Home Security
Security Risks of a Door That Won’t Close
A garage door that doesn’t close completely creates several security vulnerabilities:
- Provides potential entry point for intruders
- Exposes your belongings to theft
- May allow access to the main house
- Signals to opportunistic thieves that security may be lax
A properly functioning garage door is an essential part of your home’s security system.
Tech Solutions for Garage Door Monitoring
Modern technology offers peace of mind for garage door operation:
- Smart garage door openers that alert you if the door is left open
- Camera systems that let you verify door status remotely
- Automatic closing features that ensure the door closes after a set time
- Integration with home security systems for comprehensive protection
These solutions provide monitoring capabilities that can alert you to problems even when you’re away from home.
Energy Efficiency Considerations
How an Improperly Closing Door Affects Energy Bills
A garage door that doesn’t seal properly wastes energy in several ways:
- Allows heated or cooled air to escape
- Creates drafts that affect adjacent living spaces
- Forces HVAC systems to work harder
- Can lead to moisture problems in the garage
Even small gaps can have a significant impact on your energy bills, especially in extreme weather.
Weatherstripping Options for Better Sealing
Improve your door’s energy efficiency with proper weatherstripping:
- Bottom seal (replaces the rubber gasket at the bottom of the door)
- Threshold seal (applied to the garage floor)
- Side and top seals (fill gaps between the door and jamb)
- Brush seals (ideal for uneven surfaces)
These simple upgrades not only save energy but also keep out pests, water, and debris.
Diagnosing Intermittent Problems
Tracking Patterns in Door Behavior
Intermittent problems can be tricky to solve. Keep track of when issues occur:
- Does the problem happen at specific times of day?
- Is it affected by weather conditions (temperature, humidity)?
- Does it occur after specific uses (like after the car has been parked)?
- Is it getting progressively worse over time?
Documenting these patterns helps identify the underlying cause.
Using Video to Capture Issues
When troubleshooting elusive problems:
- Set up a camera to record door operation
- Capture several cycles, both successful and problematic
- Review the footage carefully, looking for subtle issues
- Share the video with professionals if you need expert help
Visual evidence can reveal problems that are hard to spot in real-time.
By methodically working through these potential issues, you’ll likely identify why your garage door isn’t closing all the way. Remember, garage doors operate under high tension and can be dangerous—don’t hesitate to call a professional if you’re uncomfortable with any repair steps or if the problem persists despite your troubleshooting efforts.