Tired of constantly emptying your RV tanks? If you’re planning to park your recreational vehicle long-term, connecting it permanently to your home’s septic system can save you countless trips to the dump station. This guide walks you through everything you need to know about creating a permanent, reliable connection that works year-round.
Why Consider a Permanent RV-to-Septic Connection
A permanent hookup replaces those flimsy temporary sewer hoses with durable PVC piping that resists UV damage and wear. With the right setup, you’ll enjoy:
- No more awkward trips to dump stations
- Protection against leaks and odors
- A system that works in all seasons
- Peace of mind about proper waste disposal
But before you grab your shovel and pipe cutter, there’s critical information you need to know.
Check Local Regulations First
Before starting any installation, verify what your local authorities allow. Many jurisdictions have specific requirements for RV-to-septic connections:
- Some areas prohibit permanent RV hookups without a fixed structure
- You might need special permits for the installation
- Health codes often dictate specific installation methods
Contact your local health department or building authority to check if you need permits. Breaking regulations could result in hefty fines or being forced to remove your installation.
Understanding Your Septic System’s Capacity
Your home septic system wasn’t necessarily designed to handle an additional RV’s waste. Before connecting:
- Know your tank size and daily processing capacity
- Consider how many people use the main house
- Understand how much waste your RV generates
A typical RV black water tank holds 40-64 gallons, which could overwhelm a smaller residential septic system if dumped all at once. The solution is to empty tanks gradually over 24-48 hours rather than all at once.
Choosing Between Gravity and Pump Systems
The location of your RV relative to your septic tank determines which system works best:
Gravity-Fed Systems
If your RV sits higher than your septic tank inlet, gravity can do the work. This system:
- Needs no electricity
- Has fewer moving parts to maintain
- Requires proper slope (1/8 to 1/4 inch per foot)
- Uses 3-4 inch pipes for proper flow
For example, if your RV sits 70 feet from the septic tank, you’d need at least an 8.75-inch drop in elevation for proper flow.
Macerator Pump Systems
When your RV sits lower than the septic inlet or too far away, a macerator pump is the answer:
- Grinds waste into a slurry that’s easy to pump
- Can push waste uphill when gravity won’t work
- Uses narrower 1-inch discharge lines
- Requires electrical power
Macerator pumps are installed between the RV’s dump valve and the septic inlet, making them perfect for challenging terrain.
Materials You’ll Need
For a proper permanent installation, gather these essential components:
For Gravity Systems:
- 3-4 inch Schedule 40 PVC pipe (enough for your run length)
- PVC cement and primer
- 90° elbows and necessary fittings
- Fernco couplings or similar flexible connectors
- Valterra termination adapter for RV connection
- Backflow preventer
- Cleanout tees
- PVC pipe stands or gravel for bedding
Additional Items for Pump Systems:
- Macerator pump
- 1-inch discharge hose
- Stainless steel hose clamps
- Clear elbow adapter (for monitoring flow)
- Check valve
Step-by-Step Installation Guide
1. Site Assessment and Planning
Start by mapping out your installation:
- Locate your septic tank’s cleanout pipe (typically a 4-inch PVC line with a screw cap near the tank)
- Determine the best route from your RV to the septic system
- Measure the distance and calculate required slope (minimum 1/8 inch per foot)
- Mark the trench location with stakes and string
- Call 811 before digging to locate underground utilities
2. Digging the Trench
The trench must maintain proper slope throughout:
- Dig a trench from the RV’s dump location to the septic cleanout
- Make sure it’s deep enough to be below the frost line in your area
- The bottom should have a consistent downward slope (use a level to check)
- Add gravel bedding at the bottom to support pipes and maintain grade
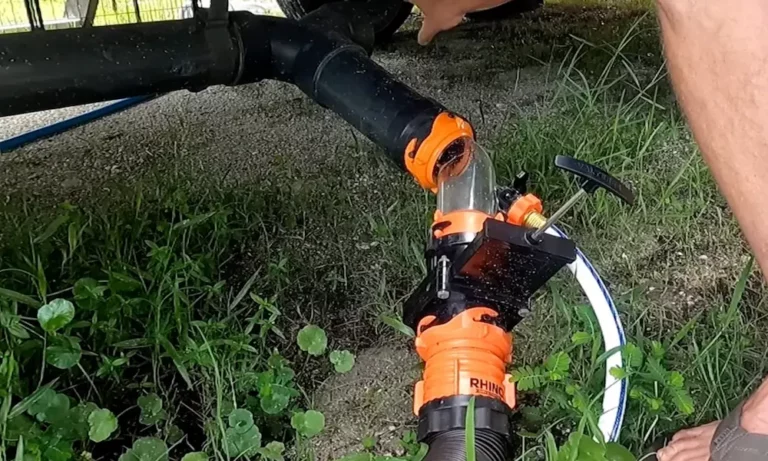
3. Installing the Pipe Network
For a gravity-fed system:
- Connect the RV’s 3-inch bayonet fitting to a Valterra termination adapter
- Install a 90° elbow and Fernco coupling to transition to PVC piping
- Lay the PVC pipe in the trench, maintaining proper slope
- Use pipe stands or properly compacted gravel bedding to prevent sagging
- For runs longer than 50 feet, segment the pipe with 3-inch couplings for easier adjustments
For a macerator pump system:
- Install the pump downstream of the RV dump valve
- Connect the pump’s outlet to 1-inch discharge hose
- Secure all connections with stainless steel clamps
- Run the discharge line to the septic inlet
4. Connecting to the Septic Tank
This critical connection must be done correctly:
- Insert a 3-inch tee fitting into the septic tank’s inlet line
- Ensure waste enters before the baffle to prevent drainfield clogging
- Add an anti-siphon vent pipe near the septic tank to equalize pressure
- Install a backflow preventer to keep septic gases from entering the RV
5. Testing the System
Before covering everything up:
- Block the septic inlet temporarily and fill the pipe with water to check for leaks
- Unblock and dump 10-20 gallons of gray water to verify proper drainage
- Check all connections for leaks or seepage
- Fix any issues before proceeding
6. Finalizing the Installation
Once everything is working correctly:
- Cover the pipe with 6-12 inches of soil, being careful not to damage it
- Mark the location of any cleanouts or access points
- Consider insulating exposed pipes in cold climates
- Create a simple diagram of your installation for future reference
Common Problems and Solutions
Dealing with Pipe Clogs
Clogs are frustrating but preventable:
- Use RV-specific toilet paper that breaks down easily
- Never flush wipes, feminine products, or paper towels
- Install cleanouts at strategic points for easier access
- Consider using septic-safe enzymes monthly to keep things flowing
Preventing Freezing in Cold Weather
Winter can wreak havoc on exposed pipes:
- Wrap exposed PVC with foam pipe insulation
- Use heat tape on vulnerable sections during freezing weather
- Maintain a slight water flow during extreme cold
- Consider burying pipes deeper in cold climates
Avoiding Septic System Overload
Too much waste at once can damage your septic system:
| Prevention Strategy | Implementation Method |
|---|---|
| Gradual emptying | Empty tanks over 24-48 hours instead of all at once |
| Spaced out laundry | Limit washing to 1-2 loads per day |
| Water conservation | Install low-flow fixtures in the RV |
| Regular maintenance | Schedule biennial pumping for full-time RV use |
Maintenance Tips for Long-Term Success
Keeping your system running smoothly requires regular attention:
- Inspect couplings and connections annually for wear or leaks
- Clear vent pipes of debris to maintain proper airflow
- Schedule septic tank pumping every 2-3 years (more often with full-time RV use)
- Use only septic-safe products in your RV plumbing
- Keep records of maintenance and pumping for future reference
Boosting Septic Performance
Your septic system works through bacterial action. Help it along by:
- Using septic-safe enzymes that boost bacterial activity
- Avoiding antibacterial soaps and harsh chemicals
- Limiting use of bleach and other disinfectants
- Never pouring grease, oil, or paint down RV drains
| Product Type | Safe for Septic? | Alternative |
|---|---|---|
| Bleach | Limited use only | Vinegar & baking soda |
| Antibacterial soap | No | Regular soap |
| Commercial RV chemicals | Check label | Enzyme-based treatments |
| Drain cleaners | No | Mechanical augers |
Is a Permanent Hookup Right for You?
While convenient, permanent hookups aren’t for everyone. Consider these factors:
Good candidates for permanent hookups:
- Stationary RVs used as guest houses or permanent residences
- Properties with adequate septic capacity
- Areas where regulations permit such installations
- Situations where proper slope can be maintained
Might want to reconsider if:
- You have a small or struggling septic system
- Local codes prohibit permanent RV connections
- Your property has challenging terrain
- You plan to move your RV frequently
Final Thoughts
A properly installed permanent RV-to-septic hookup transforms your RV experience by eliminating one of the least pleasant aspects of RV living. While the initial installation requires careful planning and some investment, the convenience and peace of mind make it worthwhile for many RV owners.
By following proper installation techniques, maintaining your system, and respecting your septic system’s limitations, you’ll enjoy trouble-free waste disposal for years to come.