Stuck with a Craftsman garage door opener that won’t respond to your commands? You’ve come to the right place. Programming these devices is actually simpler than most people think, and I’m going to walk you through every step of the process. Whether you’re setting up a new opener or troubleshooting an existing one, this guide covers everything you need to know.
What Makes Craftsman Garage Door Openers Work?
Craftsman openers use radio frequency technology to communicate between your remote controls and the main unit. Think of it as a conversation between two devices that need to speak the same language. When properly programmed, your remote sends a specific code that only your opener recognizes.
The main components include:
- The ceiling-mounted opener unit with a receiver inside
- Remote controls, keypads, or car-based systems
- A “Learn” button (typically red) that allows programming
Each opener has a unique frequency code, which is why programming is necessary – you’re essentially teaching your devices to recognize each other.
When You’ll Need to Program Your Opener
You’ll likely need to program your Craftsman garage door opener in these situations:
- Setting up a brand new opener
- After changing remote batteries
- Adding a new remote or keypad
- When your remote mysteriously stops working
- Following power outages
- After losing a remote (or if one was stolen)
- When adding car-based opener systems
How to Program a Craftsman Remote Control
Let’s start with the most common task – programming a standard remote control.
What You’ll Need:
- A step ladder
- Your Craftsman remote
- About 1 minute of time
- A helper (optional but makes things easier)
Step-by-Step Programming Process:
- Position your ladder safely under the opener unit. Safety first!
- Locate the “Learn” button on your opener. This is typically a red button on the unit, sometimes hidden behind a light cover that you’ll need to remove.
- Press and hold the “Learn” button until the indicator light turns solid (about 2-3 seconds). This activates programming mode.
- Press your remote button within 30 seconds of releasing the Learn button. If you have a multi-button remote, choose which one you want to use for this door.
- Watch for confirmation. The light on the opener will blink or you might hear clicking sounds. This is your signal that programming worked.
- Test the remote by moving away from the unit and pressing the button. Your door should respond.
The entire process typically takes less than a minute. If it doesn’t work the first time, try again and make sure you’re completing step 4 within the 30-second window.
Programming Multiple Remotes
Need to set up remotes for the whole family? No problem.
Simply repeat the process for each remote, one at a time:
- Press the Learn button until the light becomes solid
- Press the button on the new remote within 30 seconds
- Confirm the light blinks on the opener
- Test the new remote
Most Craftsman models can store multiple remote codes, so everyone in your household can have their own.
Setting Travel Limits on Your Craftsman Opener
If your door isn’t opening or closing properly, you might need to adjust the travel limits. This tells your opener exactly where to stop when opening or closing.
Understanding Travel Settings:
Travel limits control how far your door moves in each direction. Too high, and your door opens unnecessarily far. Too low, and it might not close completely.
How to Program Travel Settings:
- Access program mode by pressing and holding the black button on the opener for about 2 seconds until the LED light flashes.
- Know your controls:
- Black button: controls upward movement
- Purple button: controls downward movement
- Set the upper limit by pressing and holding the black button. Release when the door reaches your desired open height.
- Lock in the upper limit by pressing your remote button once.
- Set the lower limit by using the purple button to adjust downward movement. The door should make full contact with the floor without excessive pressure.
- Test your settings by running the door through a complete cycle.
This procedure may vary slightly depending on your specific Craftsman model, so consulting your manual can be helpful.
Programming a Craftsman Keypad
Want keyless entry to your garage? Here’s how to set up a keypad:
- Access your opener unit using your ladder.
- Press the “Learn” button on the opener until the indicator light blinks.
- Go to the keypad and enter your chosen PIN code (typically 4 digits), then press the Enter button.
- Watch for confirmation from the opener – usually a flashing light or clicking sound.
- Test the code by entering it on the keypad to verify operation.
A keypad is perfect for kids coming home from school or times when you need to let someone into your garage without giving them a remote.
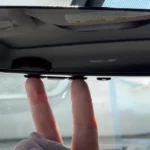
Programming Car-Based Systems
Many modern vehicles have built-in garage door controls. Here’s how to sync them with your Craftsman opener:
- Position your car near the garage with the engine running.
- Locate the garage door buttons in your vehicle (usually on the overhead console or visor).
- Put your car system in learning mode according to your vehicle’s instructions.
- Press the “Learn” button on your Craftsman opener unit.
- Press and hold the desired button in your car until you get confirmation.
- Test the system by pressing the car button to operate your door.
This feature eliminates the need for a separate remote cluttering up your car.
Common Programming Issues and Solutions
| Problem | Possible Solutions |
|---|---|
| Remote won’t program | • Replace batteries • Ensure you’re within the 30-second window • Verify remote compatibility • Move closer to the opener during programming |
| Learn button unresponsive | • Verify power to the opener • Check for damaged wires • Ensure light covers are properly removed • Reset by disconnecting power for 30 seconds |
| Travel limits incorrect | • Follow proper button sequence • Check for obstructions in the door track • Verify door is balanced and moves freely • Ensure opener is securely mounted |
When the Remote Won’t Program
If your remote stubbornly refuses to program:
- Fresh batteries are often the simplest fix
- Make sure you’re using a compatible Craftsman remote
- Try standing directly beneath the opener when programming
- Verify you’re pressing the correct Learn button (some units have multiple buttons)
When Programming Button Doesn’t Respond
If the Learn button seems dead:
- Check that the opener has power
- Look for any damaged wires or connections
- Make sure you’ve removed any light covers completely
- Try resetting the opener by unplugging it for 30 seconds
Programming Older Craftsman Models
Older Craftsman openers might use different programming methods. If your unit was manufactured before 1993, it likely uses DIP switches instead of a Learn button.
For DIP Switch Models:
- Locate the DIP switches on both the opener and remote. These are small switches that can be toggled up or down.
- Match the pattern by setting the switches on your remote to match the exact pattern on the opener.
- Test the remote after matching all switches.
This older technology requires physical matching rather than electronic programming.
Maintaining Your Craftsman Garage Door Opener
Regular maintenance helps keep your opener functioning properly:
- Replace remote batteries annually
- Test safety reverse features monthly
- Lubricate moving parts of the door mechanism twice yearly
- Check and tighten hardware every 6 months
- Listen for unusual noises that might indicate problems
Proper maintenance not only extends the life of your opener but also reduces the need for reprogramming.
Security Considerations for Your Opener
Modern Craftsman openers use rolling code technology, which changes the transmission code after each use for enhanced security. However, there are still some security practices worth following:
- Never leave garage door remotes in vehicles parked outside
- Change keypad codes periodically
- Consider disabling your garage door opener when away for extended periods
- Be cautious about who you share access codes with
Taking these precautions helps protect your home from unauthorized access.
Additional Features Worth Programming
Many Craftsman openers come with extra features you might not know about:
Light Controls
You can program some remotes to control just the opener’s light without activating the door. This is handy for using your garage as a workspace.
Vacation Mode
Some models offer a vacation or lock mode that disables all remotes until deactivated – perfect when you’re away from home.
Temporary Access Codes
Certain keypad models allow you to create temporary access codes for service workers or guests that automatically expire.
Upgrading Your Craftsman Opener
If your opener is more than 15-20 years old, consider these benefits of upgrading:
- Enhanced security features with rolling code technology
- Quieter operation with belt drive systems
- Smart home integration options
- Battery backup during power outages
- More energy-efficient operation
Newer models also tend to have more user-friendly programming processes.
Smart Home Integration Options
Modern Craftsman openers can connect to various smart home systems:
- MyQ technology allows smartphone control
- Voice command capabilities through Alexa or Google Home
- Integration with home security systems
- Real-time alerts when your door opens or closes
- Remote access management for family members
These features add convenience and security beyond basic programming.
Programming for Specific Craftsman Models
Different Craftsman models have slight variations in their programming procedures. Here are some model-specific notes:
For 1⁄2 HP Chain Drive Models (139.53753):
- Press and hold the square “Program” button until the LED lights up
- Press remote button within 30 seconds
- Light will flash to confirm successful programming
For Belt Drive Models (139.54931):
- Locate the round “Learn” button on the back panel
- Press until indicator light activates
- Press remote button within 30 seconds
- Opener will click to confirm programming
For Smart Control Models:
- Use the mobile app for initial setup
- Follow in-app instructions to connect to your home network
- Add additional remotes through the app interface
Troubleshooting Complex Issues
For those tough problems that standard solutions don’t fix:
If Your Door Reverses Before Closing Completely:
- Adjust the close force setting
- Check and clean the safety sensors
- Verify sensor alignment (LED lights should be solid, not blinking)
If Programming Works But Operation Is Inconsistent:
- Look for potential frequency interference from nearby devices
- Check for physical obstructions in the door track
- Inspect door springs and hardware for damage
- Test with a new remote to rule out remote problems
If Multiple Programming Attempts Fail:
- Reset the opener completely by pressing and holding the Learn button for 6+ seconds
- Disconnect and reconnect power to the unit
- Check for circuit board issues indicated by irregular LED patterns
Final Programming Tips
To ensure success when programming your Craftsman garage door opener:
- Always stand close to the opener unit during programming
- Complete each step within the specified time window
- Have fresh batteries in all remotes before starting
- Keep your manual handy for model-specific instructions
- Test all programmed devices from various distances
Following these tips will make the programming process smooth and ensure reliable operation for years to come.