Are your Hyundai’s check engine light flashing with those dreaded P0325 codes? Or maybe you’re hearing that telltale pinging sound from under the hood? A failing knock sensor might be the culprit. I’ll walk you through everything you need to know about replacing this critical engine component, from identifying symptoms to getting the job done right with proper torque specs.
What Is a Hyundai Knock Sensor and Why It Matters
A knock sensor is essentially your engine’s early warning system. This small piezoelectric device detects abnormal vibrations (that “knocking” sound) caused by improper combustion in your engine cylinders. When working correctly, it sends signals to your Hyundai’s Engine Control Module (ECM), which then adjusts timing to prevent engine damage.
Think of it as your engine’s guardian angel – when it fails, your engine becomes vulnerable to potentially serious damage. Located on the engine block (usually under the intake manifold), this sensor plays a crucial role in keeping your Hyundai running smoothly and efficiently.
How to Spot a Failing Knock Sensor in Your Hyundai
Your car will typically give you several warning signs when a knock sensor starts to fail:
Check Engine Light Illumination
The most obvious sign is an illuminated check engine light with specific diagnostic trouble codes. If your scanner shows codes P0325, P0326, P0327, or P0328, you’re likely dealing with a knock sensor issue. These codes specifically point to circuit malfunctions or performance problems with the sensor.
Distinctive Engine Knocking Sounds
If you hear metallic pinging or knocking noises, especially during acceleration or when your engine is under load, your knock sensor might not be detecting and correcting these abnormal combustion events. This distinctive sound is your engine crying for help.
Performance Issues
With a faulty knock sensor, you’ll likely notice:
- Sluggish acceleration
- Reduced engine power
- Decreased fuel economy
- Possible “limp mode” activation (a protective measure by your ECM)
Your Hyundai’s computer will often default to a conservative timing setting to protect the engine when it can’t get reliable knock sensor data, resulting in these performance problems.
Finding Your Hyundai’s Knock Sensor: Location Guide
The knock sensor location varies slightly between Hyundai models, but there’s one consistent truth: they’re usually tucked away in hard-to-reach places. Here’s where to find yours:
Accent and Rio (1.6L)
Located underneath the intake manifold on the back side toward the firewall. Some technicians can access it from underneath without completely removing the intake.
Elantra Models
Positioned behind the intake manifold, typically requiring complete manifold removal for access.
Sonata and Tucson (2.4L GDI)
Found under the fuel rail/intake manifold system. In some cases, you may only need to remove the fuel injector for cylinder #3 rather than the entire intake assembly.
No matter your model, expect to remove at least some portion of the intake system to properly access the sensor.
Essential Tools for Knock Sensor Replacement
Before starting this job, gather these tools to make your life easier:
Must-Have Tools
- 10mm socket and ratchet (for brackets and splash shields)
- 12mm socket and ratchet (for the knock sensor bolt)
- Torque wrench (absolutely critical for proper installation)
- Flat blade screwdriver (for connector removal)
- Basic hand tools (pliers, extensions, etc.)
Helpful Additions
- Trim removal tools for plastic components
- Jack and jack stands (if accessing from underneath)
- Penetrating oil (for stubborn bolts)
- Clean rags and brake cleaner (for cleaning mounting surfaces)
That torque wrench isn’t optional—it’s essential. Improper torque is the #1 cause of replacement sensor failures, as we’ll discuss later.
Step-by-Step Hyundai Knock Sensor Replacement Guide
Let’s break down the replacement process into manageable steps:
Step 1: Preparation
First, ensure your engine is cool. Disconnect the negative battery terminal to prevent electrical issues. For better access, consider removing the front splash shield using 10mm bolts on some models.
Step 2: Remove Intake Components
This is typically the most time-consuming part. Depending on your Hyundai model, you’ll need to:
- Disconnect air intake hoses and electrical connectors
- Remove the throttle body connections
- Unbolt and carefully remove the intake manifold
Take photos as you go and keep track of all bolts and connections. This will make reassembly much easier.
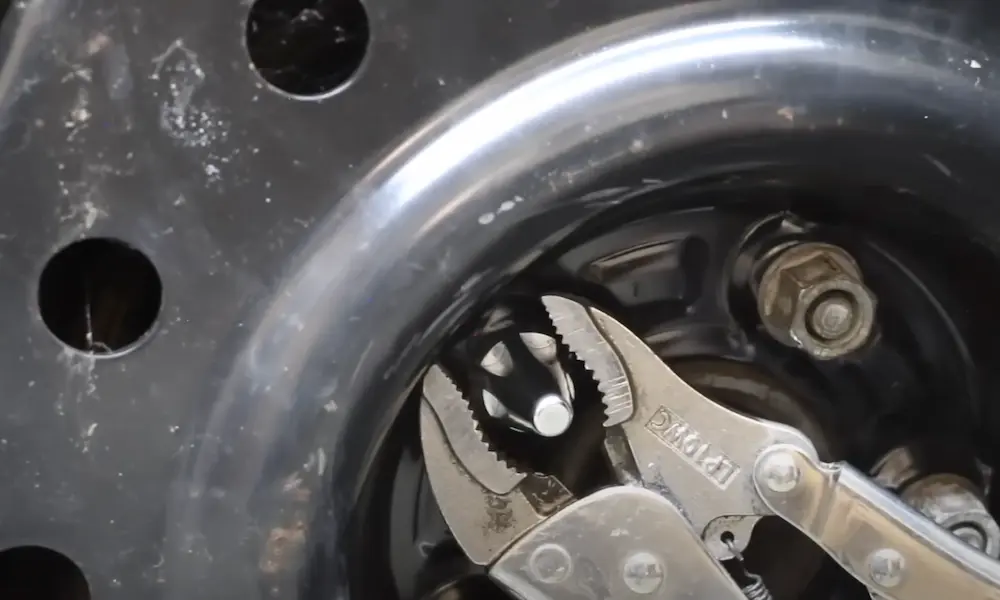
Step 3: Access and Identify the Knock Sensor
With the intake removed, you should now see the knock sensor on the engine block. It looks like a small bolt with a wire connector. Carefully disconnect the electrical connector by squeezing the release tabs and pulling it apart.
Step 4: Remove the Old Sensor
Use your 12mm socket to carefully remove the knock sensor mounting bolt. Don’t force it—the threads can be delicate. If it’s stuck, a bit of penetrating oil might help.
Step 5: Install the New Sensor
Clean the mounting surface thoroughly using brake cleaner and a rag. Any oil or debris can cause sensor malfunction. Thread in the new sensor by hand first to avoid cross-threading, then tighten with your torque wrench to the exact specification.
Step 6: Reconnect and Reassemble
Reconnect the electrical connector until it clicks, then reassemble all intake components in reverse order. Double-check all connections before reconnecting the battery.
The Critical Importance of Proper Torque
This cannot be stressed enough: proper torque is absolutely essential for knock sensor installation. According to Hyundai specifications, knock sensors should be torqued to 18.6-24.5 N⋅m (13.7-18.1 lb-ft).
Why Torque Matters So Much
- Over-tightening can crack the internal piezoelectric crystal, causing immediate failure
- Under-tightening allows sensor vibration that triggers false knock detection
Most professional technicians aim for the middle of the range, around 20 N⋅m (15 lb-ft) for optimal results. Skip the torque wrench, and you’re almost guaranteeing a repeat repair.
Hyundai Knock Sensor Replacement Costs
What should you expect to pay? Here’s a breakdown:
Parts Cost
- OEM Hyundai sensor: $100-200
- Aftermarket sensor: $50-100
Labor Cost
- Professional installation: $150-300 (varies by model and shop rates)
Total Cost Range by Model
| Hyundai Model | Typical Cost Range |
|---|---|
| Accent/Rio | $174-233 |
| Elantra | $200-350 |
| Sonata | $231-394 |
| 2006 Sonata (notably complex) | $759-1,122 |
According to RepairPal estimates, most Hyundai models fall in the $200-400 range for a complete knock sensor replacement. DIY can save you the labor costs if you have the right tools and skills.
Model-Specific Considerations
Different Hyundai models present unique challenges:
2006-2011 Accent/Rio (1.6L)
Good news: this is one of the easier models. Labor time is approximately 0.4 hours (24 minutes) for a professional. You can often access the sensor from underneath rather than removing the entire intake.
2011-2018 Elantra
Plan for a more involved repair, as complete intake manifold removal is necessary. Budget 2-3 hours for the complete job. The 1A Auto guide offers helpful model-specific details.
2013+ Sonata/Tucson (2.4L GDI)
The knock sensor location under the fuel rail system makes this tricky. A time-saving tip: you might be able to access it by removing only the fuel injector for cylinder #3 rather than the entire intake, as demonstrated in this helpful video guide.
Preventing Future Knock Sensor Problems
Want to avoid doing this repair again? Here are some preventive measures:
Fuel Quality Matters
Always use the recommended octane fuel for your specific Hyundai model. Lower octane than specified can increase engine knock and stress the sensor.
Regular Maintenance
Keep up with engine oil changes to prevent carbon buildup, which can create hot spots that lead to pre-ignition and knocking.
Address Issues Promptly
Don’t ignore check engine lights or unusual engine sounds. Early intervention can prevent more serious problems.
Be Cautious with Modifications
Performance modifications that increase compression or boost can increase knock tendency, putting more stress on the sensor system.
DIY vs. Professional Replacement
Should you tackle this yourself? Consider these factors:
DIY Pros:
- Save $150-300 in labor costs
- Learn more about your vehicle
- Satisfaction of completing the repair
DIY Cons:
- Requires moderate mechanical skills
- Access is challenging on most models
- Proper torque is critical and requires a specific tool
- Risk of damaging intake components during removal
This repair falls in the moderate difficulty range. If you’re comfortable removing intake components and have a torque wrench, it’s within reach for a DIY mechanic. Otherwise, considering the critical nature of proper installation, a professional might be your best bet.
Labor time typically ranges from 1-3 hours depending on your specific Hyundai model and sensor accessibility. The most complex is the 2006 Sonata, which can take up to 5 hours due to its unique engine design.
Real-World Experiences
Many Hyundai owners report immediate improvements after replacing a faulty knock sensor:
“After replacing my knock sensor on my 2014 Elantra, the engine runs smoother, my acceleration is back to normal, and my fuel economy improved by almost 3 MPG!” – Hyundai Forums user
Another common sentiment from Reddit discussions is that while the repair seems daunting at first, the performance improvement makes it worthwhile.
With proper tools and attention to torque specifications, your Hyundai knock sensor replacement should provide years of trouble-free operation, better performance, and improved fuel economy.