Your Jeep’s temperature gauge is sitting near the cold peg. The heater blows lukewarm air. Your fuel economy tanked. Sound familiar? A failing thermostat is likely your culprit — and it’s a fix you can actually handle yourself. This guide covers every Wrangler generation, the exact torque specs you need, and the one bleeding mistake that’ll overheat your engine anyway. Read on.
How Your Thermostat Actually Works
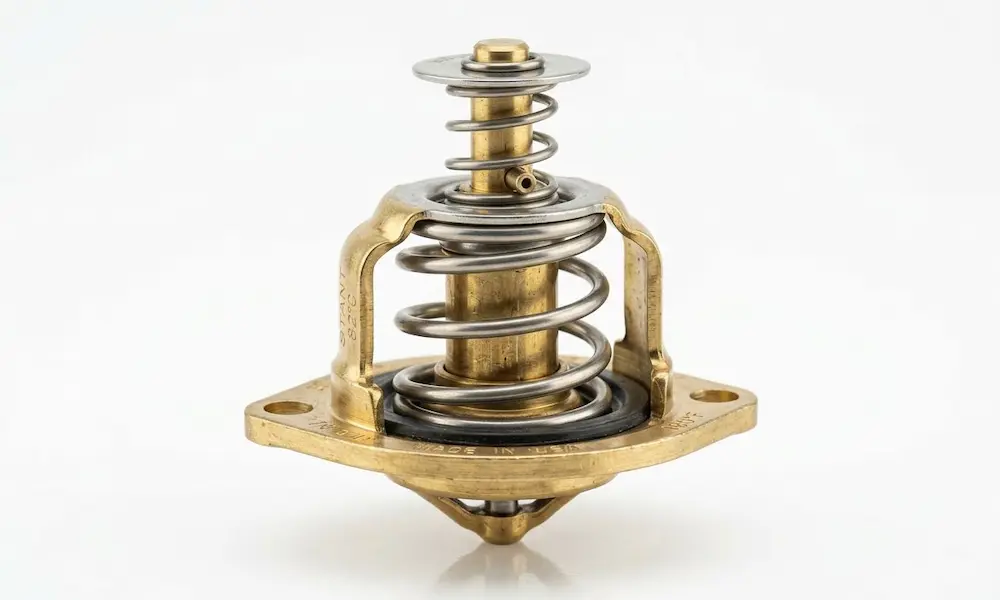
Your thermostat is a spring-loaded, wax-filled valve. It doesn’t use electricity. As coolant heats up, the wax expands, pushes a piston outward, and forces the valve open. This sends hot fluid to the radiator and pulls cool fluid back in.
When it works, your engine stays in a tight temperature band regardless of the weather or load. When it doesn’t, things go sideways fast.
Two Ways a Thermostat Fails
Stuck Closed: The Dangerous One
A thermostat stuck shut traps heat inside the engine block. Coolant boils. Pressure spikes. You’ll get warped cylinder heads, a blown head gasket, and possibly a seized engine if you don’t kill the ignition immediately.
This is the less common failure mode — but it’s catastrophic.
Stuck Open: The Common One (Hello, P0128)
This is the failure most Wrangler owners actually deal with. The valve jams open, cold coolant constantly circulates through the radiator, and the engine never warms up properly.
Your Powertrain Control Module (PCM) expects the engine to hit around 203°F within a set timeframe. When it doesn’t, it stores a P0128 code and lights up the check engine light.
Symptoms of a stuck-open thermostat:
- Temperature gauge hovering near cold even after highway driving
- Weak, lukewarm cabin heat in winter
- Noticeably worse fuel economy
- P0128, P0117, or P0118 diagnostic codes
The fuel economy hit is real. A cold engine runs a richer fuel mixture to warm up the catalytic converters. If the thermostat is stuck open, the engine never exits that inefficient mode.
Which Engine Do You Have? (It Changes Everything)
Jeep Wrangler thermostat replacement isn’t a one-size-fits-all job. The procedure, parts, and access points all differ by generation.
| Engine | Generation (Years) | Housing Material | Opens At | Torque Spec | Key Note |
|---|---|---|---|---|---|
| 4.0L Inline-6 | TJ (1997–2006) | Cast Metal | 195°F | 105 in-lbs | Separate housing; requires gasket scraping |
| 3.8L V6 | JK (2007–2011) | Metal/Plastic | 195°F | 105 in-lbs | Block-mounted at top front |
| 3.6L Pentastar V6 | JK/JL (2012–present) | Plastic (glass-reinforced) | 203°F | 105 in-lbs | Fully integrated housing; plastic cracks with age |
| 2.0L Turbo I4 | JL (2018–present) | Composite Plastic | 203°F | Application-specific | Dual cooling loops; secondary turbo reservoir present |
4.0L Inline-6 (TJ: 1997–2006)
The 4.0L is straightforward. The thermostat sits at the front of the cylinder head under a separate cast-metal dome. Remove the dome, swap the thermostat, replace the gasket. Clean the mating surfaces thoroughly — old gasket material left behind causes leaks. Torque the housing bolts to exactly 105 inch-pounds.
3.8L V6 (JK: 2007–2011)
The 3.8L follows a similar approach. The thermostat housing sits at the top front of the block, secured with bolts torqued to the same 105 inch-pounds. Nothing tricky here.
3.6L Pentastar V6 (JK/JL: 2012–Present)
This engine is where most Jeep Wrangler thermostat replacement jobs happen today. The thermostat isn’t a separate piece — it’s permanently integrated into a plastic housing assembly. If the valve fails, you replace the entire unit.
The plastic housing is the weak point. Thermal cycling makes it brittle over time. Most failures show up between 90,000 and 100,000 miles — cracks at the seam, coolant seeping around the block, or the internal plastic struts holding the spring snapping.
2.0L Turbo I4 (JL: 2018–Present)
The turbocharged four-cylinder is the most complex job on this list. OEM part numbers 05048424AD and 05048714AA cover this engine, and you’ll need to move several brackets to reach the housing.
The critical thing to know: this engine has a secondary cooling loop for the turbocharger, with its own separate black coolant reservoir near the rear of the engine bay. You must bleed both loops independently. Confusing them or ignoring the secondary reservoir causes persistent overheating and turbo bearing failure.
Tools You’ll Need (3.6L Pentastar)
| Tool | Spec/Type | What It’s For |
|---|---|---|
| Ratchet & Sockets | 3/8-inch drive, 10mm, T30 Torx | Intake bolts and thermostat housing bolts |
| Torque Wrench | 1/4-inch drive, inch-pound range | Hitting exactly 105 in-lbs without stripping aluminum |
| Hose Clamp Pliers | Ratcheting or cable-operated | Compressing spring clamps on the radiator hose |
| Flathead Screwdriver | Standard | Loosening intake boot clamps |
| Drain Pan | 2-gallon, low-profile | Catching coolant when the housing seal breaks |
| Surface Prep Tools | Plastic scraper, lint-free cloths | Cleaning the aluminum mating surface |
| Bleeding Funnel Kit | Spill-proof with locking adapter | Bleeding trapped air from the system |
| Safety Gear | Safety glasses, nitrile gloves | Coolant is toxic — protect yourself |
The Torque Spec That Breaks Engines
105 inch-pounds. That’s the correct torque for the thermostat housing bolts on the 4.0L, 3.8L, and 3.6L engines.
Some online forums and outdated repair manuals incorrectly list 250 inch-pounds. That number is wrong and will snap your bolts. Small-diameter steel bolts threading into soft aluminum will yield and snap at around 140 inch-pounds of force. Extracting a broken bolt from an aluminum block means center-drilling, reverse extraction tools, and potentially installing a thread insert. A one-hour job becomes a multi-day nightmare.
Don’t guess. Use a calibrated inch-pound torque wrench. If you don’t have one, snug the bolt firmly against the housing and add no more than a quarter turn.
Step-by-Step: Jeep Wrangler Thermostat Replacement on the 3.6L Pentastar
Step 1: Safety First
Let the engine go completely cold. The system runs at over 15 PSI when hot — cracking it open while hot causes a scalding coolant geyser. Disconnect the negative battery terminal before you start moving wiring harnesses around.
Step 2: Remove the Intake Tract
Pull the decorative engine cover off. Remove the two 10mm bolts holding the plastic intake tube to the radiator crossmember. Loosen the clamps on both ends of the intake tube — one at the airbox, one at the throttle body.
Before you pull the tube out, unplug the intake air temperature sensor underneath it. Press the locking tab and slide the connector straight back. Then unclip the overflow hose from the intake brackets and push it aside.
Step 3: Position Your Drain Pan
With the intake gone, the thermostat housing is right in front of you at the top of the engine. Put your drain pan directly below it. You don’t need to fully drain the system — the housing sits high, so a strategic pan catches most of the spill.
Use hose clamp pliers to squeeze and slide the spring clamp back down the upper radiator hose. Twist the hose to break the seal, then pull it off the housing neck.
Step 4: Remove the Housing
The housing uses two T30 Torx bolts. Remove both completely. The old rubber gasket may bond the housing to the block — gently rock it from the bottom edge to break the seal. When it releases, a rush of coolant from the engine block will spill out. Have that pan ready.
Step 5: Clean the Mating Surface
This step matters more than most people think. Use a plastic scraper and lint-free cloths to clean the aluminum block mating surface completely bare. Any leftover rubber, scale, or debris breaks the seal on the new housing and causes a pressure leak under load. Don’t use metal scrapers — they gouge soft aluminum.
Step 6: Install the New Housing
Align the new housing with its integrated gasket against the block. Thread both T30 Torx bolts in by hand first. Cross-threaded bolts in aluminum are a serious problem. Once hand-tight, alternate between the top and bottom bolt with your torque wrench, working up to exactly 105 inch-pounds. Alternating keeps the plastic housing flat against the block.
Slide the radiator hose back onto the housing neck and lock the spring clamp in place behind the flared lip.
Step 7: Reassemble the Intake
Plug the air temperature sensor back in — you’ll hear it click. Seat the intake boots onto the throttle body and airbox, and tighten the clamps. Reinstall the 10mm crossmember bolts, clip the overflow hose back, and snap the engine cover on.
Bleeding the Cooling System: Don’t Skip This
This is where DIY Jeep Wrangler thermostat replacements go wrong most often. When you remove the housing, air rushes into the upper water jackets and radiator hose. Trapped air doesn’t absorb heat — it insulates against it. A large air pocket near the water pump causes cavitation: the impeller spins through air instead of fluid, circulation stops, and the engine overheats even though the reservoir looks full.
You have two solid options.
Option 1: Vacuum Filler (Best Method)
A Venturi vacuum tool attaches to the radiator neck and connects to an air compressor. It pulls a deep vacuum on the entire cooling system — you’ll see the radiator hoses collapse flat. If the gauge holds steady, your new housing isn’t leaking.
Then you open the coolant valve. The vacuum pulls fresh coolant in and fills every passage instantly. No air pockets possible. A procedure that normally takes an hour takes five minutes.
Option 2: Spill-Proof Funnel (No Compressor Needed)
A locking funnel adapter seals to the radiator neck and raises the fluid column above the engine’s highest point. Park on a ramp or incline to keep the radiator neck as high as possible.
Loosen the small bleeder screw on top of the new Pentastar thermostat housing. Pour coolant slowly into the funnel. As fluid fills from the bottom up, air escapes through the bleeder screw. Once a steady stream of liquid (no bubbles, no hissing) flows from the screw, tighten it.
Fill the funnel halfway and start the engine. Set the cabin heat to maximum with the fan on high — this opens the heater core loop. As the engine reaches 203°F, you’ll see large air bubbles erupt into the funnel. Keep adding coolant as the level drops. Rev the engine to 2,000 RPM occasionally to help dislodge pockets stuck in the block.
Bleeding is complete when:
- The cabin heater blows hot air
- The temperature gauge sits steady in the center
- No more bubbles rise in the funnel
Top off the overflow reservoir to the MAX line. The system will self-purge tiny residual bubbles over the next few days of driving.
Should You Upgrade While You’re In There?
If your Pentastar housing cracked from age, consider upgrading instead of replacing like-for-like.
Aluminum housing (Mishimoto, TRQ): Cast aluminum housings won’t warp, crack, or embrittle regardless of mileage. They’re a direct bolt-on replacement using the same 105 in-lb torque spec. If you’re already in there, this is worth the extra cost.
180°F thermostat: These open 23 degrees cooler than the stock 203°F unit, giving heavily modified rigs more thermal headroom during rock crawling or desert towing. The trade-off: the PCM runs richer fuel mapping at lower temps, slightly reducing mileage. In cold climates, cabin heat output drops noticeably. These are best suited for hot-climate, heavily modified builds — not daily drivers in northern states.
Use the Right Coolant — This Actually Matters
Putting the wrong coolant in a modern Wrangler isn’t just an efficiency issue. It’s a component-destroying mistake.
2013 and newer (3.6L Pentastar): The manufacturer strictly requires Organic Additive Technology (OAT) coolant, meeting material standards MS.90032 (concentrate) or MS.12106 (pre-diluted). This formula lasts 10 years or 150,000 miles.
Never mix OAT with older Hybrid OAT (HOAT) coolant. The two chemistries react violently, dropping the corrosion inhibitors out of suspension and turning your coolant into thick, brown gel. That gel blocks the radiator tubes and heater core. You’re looking at replacing the entire cooling system.
When mixing concentrate, use distilled water only — never tap water. Tap water contains calcium and magnesium that form hard scale deposits inside the radiator under heat. Distilled water has none of those minerals.
FAQs
Will a stuck-open thermostat break my air conditioning?
Not directly — a stuck-open thermostat doesn’t disable the A/C compressor. But if the PCM stores a P0128 code and detects abnormal temperature readings, it may shut off the A/C clutch as a protective measure. Fixing the thermostat often restores normal A/C operation as a side effect.
Does upgrading to a big aftermarket aluminum radiator mean I need a different thermostat?
No. A larger radiator increases heat capacity and shedding efficiency, but it doesn’t change the operating temperature your engine needs. The factory thermostat functions perfectly with an upgraded radiator — it just holds fluid a bit longer before opening on cold starts.
How does high altitude affect all of this?
At altitude, atmospheric pressure drops and coolant boils at lower temperatures. Your pressurized radiator cap compensates by keeping the system at 15–18 PSI. If the thermostat sticks closed at elevation — say, in the Rockies — the fluid boils much faster than at sea level, leaving you far less time to shut down before the engine warps.
Can a bad water pump mimic a stuck-closed thermostat?
Yes, the symptoms are nearly identical. If the water pump impeller fails, fluid stops circulating even if the thermostat opens perfectly. The diagnostic test: when the engine is hot, feel the upper radiator hose. Hot and pressurized means the thermostat opened and fluid is moving. Cool and limp despite an overheating engine points to a water pump or blockage failure.
Is old coolant hazardous to dispose of?
Yes — in every U.S. state, engine coolant is classified as toxic waste. Its sweet smell attracts pets, but ingestion causes rapid kidney failure. Don’t pour it down drains or onto soil. Seal it in a container and take it to an auto parts store, a certified recycler, or a municipal hazardous waste facility.