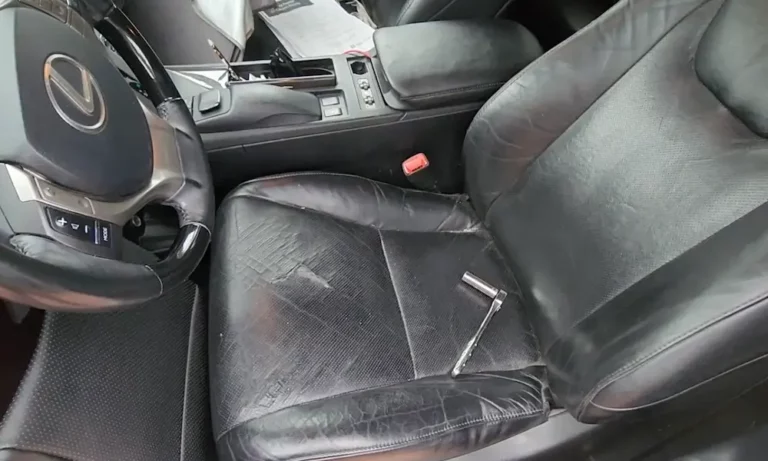
Your driver’s seat bolster looks rough. The leather’s worn through, maybe cracked, and you’re sitting on what feels like sandpaper. A dealer quote for replacement just made your stomach drop—$1,500 for one seat. Here’s the truth: you can handle most Lexus leather seat repair yourself for under $100, and it’ll look factory-fresh when you’re done. Stick with me through this guide and you’ll save a pile of cash.
What You’re Actually Sitting On (It Might Not Be Leather)
Before you grab any repair kit, you need to know what material you’re fixing. Most Lexus owners think they have leather seats. They don’t.
The NuLuxe Reality Check
If you own a base or mid-level Lexus (IS, ES, NX, RX in standard trim), you’re probably sitting on NuLuxe—Lexus’s fancy name for high-end synthetic material. It’s polyurethane over a fabric backing, and it’s actually pretty brilliant. It doesn’t stain like real leather, stays cooler in summer, and weighs less, which helps fuel economy.
The catch? Repair it wrong and you’ll make it worse.
Real Leather: Two Types
When Lexus uses actual cowhide, it comes in two flavors:
Pigmented (Standard) Leather
This is what’s in most “Luxury” packages. The hide gets buffed smooth, then coated with colored urethane paint. You’re essentially sitting on painted plastic over leather. When this wears out, you’re fixing the paint layer, not the hide underneath.
Semi-Aniline Leather
Reserved for Ultra Luxury trims (top-tier LS, LX models), this is the real deal. Minimal coating, natural pores, buttery soft. It’s also porous, which means it’ll absorb coffee spills and jean dye like a sponge.
The Five-Second Material Test
Press your finger firmly into the seat and watch what happens:
- NuLuxe: Smooth, rounded depression—no wrinkles
- Leather: Spider-web pattern of tiny creases radiating from your finger
- Water bead test: Drop a bit of water. NuLuxe repels it forever. Leather absorbs it (eventually)
Still unsure? Check your VIN and trim code on the driver’s door jamb. That code tells you exactly what material you have.
Why Your Seats Look Terrible (And How to Stop It)
Understanding what killed your seats prevents you from doing it again after repair.
The Driver’s Seat Bolster Death March
That outer edge of your driver’s seat gets hammered. Every time you slide in and out of the car, your body weight drags across that vertical surface like sandpaper.
On coated leather, this friction grinds through the urethane paint layer. Once that protective coating breaks, the raw leather underneath absorbs dirt and oil, turning dark and crusty. On NuLuxe, repeated compression can delaminate the polyurethane skin from the backing fabric, causing bubbling or peeling.
The Perforation Problem
Heated and ventilated seats need holes. Those holes are stress concentration points. When you kneel on the seat to grab something from the back, the pressure doesn’t spread evenly—it focuses on the material between holes.
Result? Tears that connect the dots from hole to hole. These are nightmare repairs because you can’t just glue the edges together without blocking ventilation.
Light-Colored Interior Disaster Cycle
Own a Lexus with Ecru, Parchment, or Cashmere interior? You know the pain.
Blue jean dye transfers to the seat. You panic and scrub it with a magic eraser or harsh cleaner. The dye comes off, but so does the protective clear coat. Now your seat is porous and tacky, attracting dirt faster than before. You clean it again, stripping more coating. The cycle repeats until the surface is destroyed.
The Melting Dashboard Connection
If you have a 2006-2014 Lexus (IS, ES, LS), your dashboard might be sticky and reflective. This is polymer hydrolysis—the plastic is chemically decomposing from heat and humidity.
Lexus issued a Warranty Enhancement Program (ZLZ) to fix this, but coverage has expired on most vehicles. If your dash is melting, your armrests probably are too. The good news? Armrest repair is cheap and easy (we’ll cover it).
What Professional Repair Actually Costs
Let’s talk money before you commit to DIY.
OEM Replacement Reality
A single seat cover (just the leather skin, not foam or frame) from Lexus runs $700-$1,300. Add dealership labor ($300-$500) to remove the seat, strip the old cover while preserving heating elements, and install the new one.
Total: $1,500-$2,000 per seat
For a 12-year-old Lexus worth $15,000, that’s insane.
Upholstery Shop Panel Replacement
A skilled upholstery shop can cut out the damaged section and sew in new matching leather. This costs $300-$450 per section.
Pros: Structural integrity fully restored
Cons: Color matching is rarely perfect unless they recover the entire seat
Mobile Restoration Services
Companies like Fibrenew send techs to your driveway. They use airbrush equipment to apply fillers and dyes. Cost runs $150-$350 per seat.
Best for: Surface scratches, color fading, minor cracks
Won’t fix: Deep tears, structural foam collapse
DIY Kits
Quality kits from Seat Doctors or Leather World Technologies cost $50-$100.
Viability: Excellent for bolster wear and surface damage
ROI: You’re paying 5% of dealer cost for 90% of the visual result
The Right Products (And the Garbage to Avoid)
Not all repair kits work the same. Chemistry matters.
Water-Based Urethane Dyes: The Professional Standard
Modern automotive leather finishing uses water-borne polyurethane. The best repair systems match this chemistry.
Recommended brands:
These aren’t dyes—they’re flexible paints. They bond chemically to existing urethane coating, flex with the material without cracking, and come color-matched to your specific trim code.
Acrylic Balms: The Trap
Products like Clyde’s Recoloring Balm rely on heavy pigment in a thick cream base. They sit on top of the surface rather than bonding to it.
User reports consistently mention peeling, plastic-like feel, and poor adhesion on automotive surfaces. They might work on porous furniture leather but fail on the sealed urethane of a Lexus seat.
Bottom line: Skip these for high-friction areas like bolsters.
Fillers: Two Types
Air-dry fillers (Leather World Tech soft filler): Acrylic paste that dries by evaporation. Easy to use, sandable, flexible. Perfect for leather cracks.
Heat-cure fillers (Permatex, Viper): Vinyl plastisol compounds that stay liquid until you hit them with heat (250°F+). They fuse into solid vinyl.
Use these for deep scratches in NuLuxe where you need structural integrity.
Step-by-Step: Fixing Worn Bolsters and Surface Damage
This method works for the most common problem: worn color and micro-cracking on driver’s seat bolsters.
Phase 1: Strip Everything Back
The number one reason DIY dye jobs fail is oil contamination. Your skin puts body oil on that seat every single day.
Step 1: Deep clean
Mix Woolite and warm water (1:10 ratio). Scrub the damaged area hard with a stiff brush. Wipe dry completely.
Step 2: Deglaze (critical)
This is the point of no return. Use leather prep solvent or denatured alcohol on a grey Scotch-Brite pad. Scrub until the surface feels tacky and you see color transferring to the pad.
What you’re doing: Removing factory clear coat and body oils to expose the chemical “pores” of the urethane. Without this step, dye won’t stick.
Step 3: Sand smooth
Use 600-800 grit sandpaper lightly. Smooth crack edges and feather the transition between worn and good areas.
Phase 2: Fill and Level
If you can feel cracks with your fingernail, they need filling.
Step 1: Apply filler
Use a palette knife or credit card to work flexible filler into cracks. Don’t glob it on—thin layers work better.
Step 2: Dry and sand
Hair dryer speeds this up. Once dry, sand with 600 grit. Repeat until perfectly level.
Step 3: Texture matching (advanced)
If the filler left a smooth bald spot, stipple the final wet layer with a damp sponge to replicate surrounding grain.
Phase 3: Color Application
This makes or breaks the repair.
Step 1: Shake like your life depends on it
Water-based dyes settle. Shake the bottle for a full minute to disperse matting agents.
Step 2: Dab, don’t wipe
Use a high-density sponge. Put dye on the sponge, then dab it onto the repair area. Dabbing builds texture and blends naturally. Wiping leaves streaks.
Step 3: Build thin layers
Apply 3-5 coats. Dry each coat immediately with a hair dryer on low heat. Heat helps cure the urethane.
Step 4: Feather the edges
Blend dye outward into the surrounding good leather so there’s no visible line.
Fixing Perforated Leather Tears (Hard Mode)
Tears connecting perforation holes are tough because you can’t just glue edges together—you’ll block ventilation.
The Backing Patch Method
Step 1: Insert reinforcement
Cut a piece of durable fabric (canvas or denim) slightly larger than the tear. Use tweezers to insert it through the tear, flattening it against the underside of the leather.
Step 2: Glue it down
Apply flexible leather glue between the patch and the leather’s underside. Press firmly and let cure.
Filling Without Clogging Holes
This is the technical challenge.
Step 1: Apply filler to the tear
Work it in carefully.
Step 2: Clear the holes immediately
Before the filler cures, use a toothpick or needle matching the perforation size to clear filler from each hole. Do this hole-by-hole. It’s tedious but necessary.
Step 3: Dry-sponge dyeing
When applying color, squeeze most of the dye out of your sponge first. You want it almost dry. Lightly drag it over the surface—this deposits color without flooding liquid into holes.
Step 4: Air blast
Use canned air to clear any dye bridging the holes before it dries.
Deep Scratches in NuLuxe
NuLuxe is thermoplastic, which creates unique repair opportunities and risks.
Heat Cure Vinyl Repair
Step 1: Heat management
Use a heat gun carefully to soften scratch edges. Too much heat melts the grain permanently into shiny plastic.
Step 2: Fill with vinyl compound
Apply heat-cure vinyl filler to the gouge.
Step 3: Texture imprinting
Place grain paper (textured release paper) over wet filler. Apply a heating iron to the paper’s back. The heat cures the filler and stamps the grain pattern simultaneously.
Model-Specific Problems and Fixes
Lexus IS Series (2006-2013): Melting Armrests
The XE20 IS250/350 armrests turn to sticky goo. Chemical stripping is messy and rarely works.
The solution: Armrest skinning. Pre-sewn leather skins are available on eBay for $30. Unscrew the armrest assembly, strip the melted vinyl, then staple or glue the new skin in place.
Time: 30 minutes per armrest
Difficulty: Low
Lexus LS Series: Ecru Leather Care
The gorgeous Ecru interior (LS430/460) yellows with age and shows every speck of dirt.
The dirt illusion: What looks like worn leather is often just embedded dirt. A deep scrub with a soft brush and Woolite solution frequently reveals intact leather underneath.
Color matching: If you need to re-dye, generic “beige” looks terrible against the creamy Ecru. Use trim-code-specific dye.
Lexus GX & LX: Vinyl Side Panels
The GX470/460 often uses real leather on seating surfaces but painted vinyl on side panels. This paint flakes off over time.
The fix: Seat Doctors dye adheres exceptionally well to these vinyl panels. Clean, deglaze, and apply following the bolster repair protocol above.
How to Keep It Looking Good After Repair
You just invested hours into restoration. Don’t ruin it with bad maintenance.
Stop Using Leather Conditioner (Probably)
Most Lexus leather has a urethane coating. Oil-based conditioners (neatsfoot oil, lanolin) can’t penetrate this plastic layer. They sit on the surface, attract dust, and create an abrasive grinding paste that accelerates wear.
Exception: Semi-aniline leather in Ultra Luxury trims is porous. It benefits from hydration using products like Leatherique Rejuvenator Oil.
The Woolite Standard
Lexus service manuals and professional detailers consistently recommend Woolite and warm water (1:10 ratio).
Why it works: pH neutral, no harsh degreasers that strip urethane coating, effectively suspends dirt.
Method: Spray solution onto a microfiber towel (never directly on the seat to avoid soaking foam). Wipe gently. Follow with a dry towel.
UV Protection: The Real Killer
Sun causes polymer degradation—cracking dashes, fading dye, brittle leather.
Chemical barrier: Use water-based UV protectant like 303 Aerospace Protectant. It contains UV inhibitors that act like sunscreen for your interior.
Avoid: Silicone-based “shiny” dressings (original Armor All formula). These can amplify UV damage through a lens effect and create windshield fog.
Quick Reference: Material vs. Repair Method
| Material | Identify By | Best Repair Chemistry | Critical Step |
|---|---|---|---|
| NuLuxe | No wrinkles when pressed; water beads forever | Vinyl heat-cure filler + urethane dye | Don’t over-sand; grain is surface-only |
| Pigmented Leather | Spider-web wrinkles; feels like leather | Water-based urethane dye | Deglaze thoroughly or dye won’t stick |
| Semi-Aniline | Soft, porous, absorbs water quickly | Translucent aniline dyes | Avoid opaque fillers; ruins natural look |
| Vinyl Panels | Harder feel; painted surface | Vinyl dye or aerosol | Check for stickiness; replace skin if melting |
Cost Comparison Reality Check
| Solution | Cost | Durability | Best For |
|---|---|---|---|
| OEM Replacement | $1,500+ | 10+ years | Collectible/classic vehicles only |
| Upholstery Shop | $400-$1,500 | 10+ years | Structural foam collapse, massive tears |
| Mobile Pro | $200-$350 | 3-5 years | Difficult color matching, multiple tears |
| DIY Kit (Seat Doctors) | $50-$100 | 2-4 years | Bolster wear, fading, surface scratches |
For a daily driver with typical wear, DIY restoration delivers 90% of the visual result for 5% of dealer cost.
Maintenance Schedule to Lock In Your Work
| Frequency | Task | Product | Target |
|---|---|---|---|
| Monthly | Light cleaning | Woolite/water (1:10) | All materials |
| Quarterly | UV protection | 303 Aerospace Protectant | Dashboard, door tops, NuLuxe |
| Every 6 Months | Deep clean | Leather Master or Gyeon | Pigmented leather |
| Yearly | Hydration | Leatherique Rejuvenator | Semi-aniline only |
Your Lexus interior represents Japanese craftsmanship at its finest. The $1,500 dealer quote for a single seat isn’t your only option. With the right materials, proper technique, and a few hours of your time, you’ll restore that worn bolster or scratched seat to near-factory condition.
The key is matching your repair chemistry to your specific material, preparing the surface properly (deglazing is non-negotiable for dye adhesion), and building color in thin layers. Whether you’re dealing with NuLuxe in your ES350 or Ecru leather in your LS430, the fundamental process remains the same: clean, prep, fill, dye, protect.
You’ve got this.