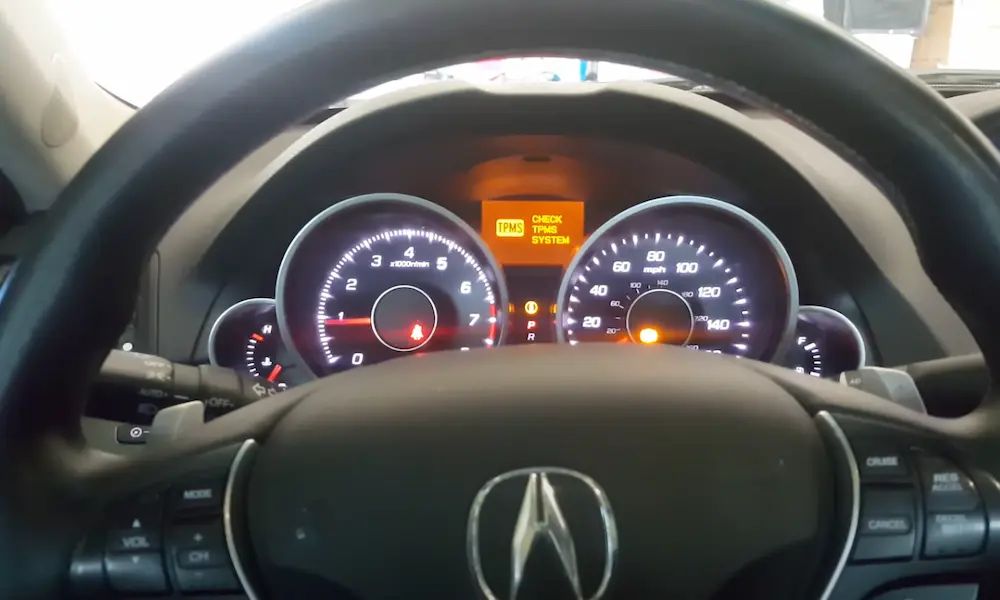
Is that mysterious “Check Emission System” light glowing on your Acura TSX dashboard? Don’t panic. While it’s tempting to ignore dashboard warnings, this particular alert is signaling potential issues with your vehicle’s emissions control system. The good news? Many emission problems have straightforward fixes you can handle yourself. This guide walks you through everything you need to know about this common Acura TSX issue, from diagnosis to resolution.
What Does the “Check Emission System” Light Mean on an Acura TSX?
When your Acura TSX displays the “Check Emission System” warning, it means the onboard computer has detected a problem with components that control your vehicle’s emissions. This system works to reduce harmful pollutants released by your car.
Unlike regular maintenance reminders, this warning indicates something isn’t functioning correctly. Your car’s computer constantly monitors emissions-related components and triggers this alert when it detects values outside normal parameters.
The emission system in your TSX includes multiple components working together:
- Oxygen sensors monitoring exhaust composition
- Catalytic converter cleaning exhaust gases
- EVAP system preventing fuel vapor leaks
- Engine components affecting combustion efficiency
Common Causes of Check Emission System Light in Acura TSX
Loose or Damaged Gas Cap
Believe it or not, a simple gas cap issue is among the most common triggers for emission warnings. The cap creates a seal that prevents fuel vapors from escaping into the atmosphere.
Signs of a gas cap problem include:
- Emission light appearing shortly after refueling
- Cap feeling loose when you touch it
- Visible damage to the cap or seal
The fix is typically simple: tighten your gas cap until it clicks three times. If the cap is damaged, replace it—they’re inexpensive and available at most auto parts stores.
Oxygen Sensor Failures
Oxygen (O2) sensors monitor the amount of unburned oxygen in your exhaust system. Your TSX has multiple sensors—typically two to four depending on the model year.
When these sensors fail, they can cause:
- Poor fuel economy (sometimes dropping 10-15%)
- Rough idling or hesitation when accelerating
- Failed emissions tests
- Additional damage to other components if left unaddressed
Replacing oxygen sensors ranges from moderately difficult to complex depending on sensor location and your mechanical experience.
Catalytic Converter Issues
The catalytic converter transforms harmful gases into less toxic substances. When it fails, you’ll often notice:
- Decreased performance and acceleration
- Rattling noises from under the vehicle
- Sulfur smell (like rotten eggs) from the exhaust
- Failed emissions tests
Catalytic converter problems frequently trigger specific diagnostic codes like P0420 or P0430. These issues are particularly common in TSX models with higher mileage.
Catalytic converter replacements are expensive ($1,700+ for parts and labor) and best handled by professionals unless you have significant mechanical experience.
Engine Misfires
Engine misfires occur when one or more cylinders fail to properly ignite the fuel-air mixture. Common causes include:
- Worn spark plugs
- Failed ignition coils
- Damaged spark plug wires
- Fuel delivery problems
Signs of misfires include:
- Engine running roughly
- Hesitation during acceleration
- Reduced power and performance
- Increased fuel consumption
If your emission light is flashing (not just steadily lit), this typically indicates an active misfire that could damage your catalytic converter—requiring immediate attention.
EVAP System Problems
The Evaporative Emission Control System (EVAP) prevents fuel vapors from escaping into the atmosphere. Common EVAP issues include:
- Faulty purge valves
- Cracked vacuum lines
- Damaged EVAP canister
- Faulty vent valves
These problems typically don’t affect drivability but will trigger the emission system light and potentially cause your vehicle to fail emissions testing.
How to Diagnose Acura TSX Emission System Issues
Check the Gas Cap First
Before anything else, check your gas cap:
- Turn off the engine
- Remove the gas cap
- Inspect the cap and seal for cracks or damage
- Reinstall the cap, turning until it clicks three times
- Drive normally for 1-3 days to see if the light clears
This simple check resolves a surprising number of emission warnings in TSX models.
Use an OBD2 Scanner
If the gas cap check doesn’t help, the next step is connecting an OBD2 scanner to retrieve the specific diagnostic trouble codes (DTCs).
The OBD2 port in Acura TSX models is located under the dashboard on the driver’s side, typically near the hood release lever.
Recommended OBD2 scanners for Acura TSX include:
| Scanner Model | Features | Price Range |
|---|---|---|
| Innova 5610 | Professional-grade, full-feature | $120-180 |
| Foxwell NT510 Elite | Honda/Acura specific | $150-200 |
| VeePeak Bluetooth OBD2 | Connects to smartphone app | $20-40 |
The diagnostic codes retrieved will point to specific components or systems causing the problem. For example:
- P0171/P0174: Fuel system running lean
- P0420/P0430: Catalytic converter efficiency below threshold
- P0301-P0304: Cylinder misfire (specific cylinder indicated by last digit)
- P0442/P0456: EVAP system leak detected
Visual Inspection Based on Codes
Once you have diagnostic codes, perform a targeted visual inspection:
- For oxygen sensor codes: Check sensor wiring for damage or loose connections
- For EVAP codes: Inspect visible vacuum lines for cracks or disconnects
- For misfire codes: Check for oil-fouled spark plugs or damaged ignition coils
- For fuel system codes: Look for leaks or damaged fuel lines
DIY Fixes for Common Acura TSX Emission Problems
Replacing the Gas Cap
If your gas cap is damaged:
- Purchase a replacement cap (ensure it’s designed for your specific TSX model year)
- Remove old cap
- Install new cap, turning until it clicks three times
- Drive normally for 1-3 days
Changing Oxygen Sensors
For oxygen sensor replacement:
- Identify which sensor needs replacement based on the diagnostic code
- Purchase the correct oxygen sensor for your TSX
- Allow the engine to completely cool
- Locate the sensor (typically in the exhaust manifold or exhaust pipe)
- Disconnect the electrical connector
- Remove the old sensor using an oxygen sensor socket
- Install the new sensor and reconnect the electrical connector
- Clear the diagnostic codes
For the upstream (Bank 1 Sensor 1) oxygen sensor, the job is moderately difficult. The downstream sensor replacement can be more challenging due to tight access.
Fixing Spark Plug and Ignition Coil Issues
For misfire-related codes:
- Purchase correct spark plugs for your TSX (NGK or Denso recommended)
- Remove the engine cover
- Disconnect the ignition coil electrical connectors
- Remove the ignition coils
- Remove and inspect spark plugs
- Install new plugs at the manufacturer-recommended torque
- Reinstall ignition coils and reconnect electrical connectors
- Clear diagnostic codes
This job is relatively straightforward on the TSX’s 4-cylinder engine, though the rear plugs can be more difficult to access.
How to Reset the Check Emission System Light
Using an OBD2 Scanner
The most reliable way to reset the light after repairs:
- Connect the OBD2 scanner to the diagnostic port
- Turn the ignition to the “on” position (don’t start the engine)
- Follow the scanner menu to clear DTCs
- Disconnect the scanner
- Start the engine and check if the light returns
Battery Disconnect Method
If you don’t have a scanner:
- Ensure the engine is off and cool
- Disconnect the negative battery terminal
- Wait 15-30 minutes (this allows the computer to reset)
- Reconnect the battery
- Start the engine and check if the light returns
Note that this method will also reset other systems like your radio presets and clock.
Navigation System Reset Method
For TSX models with navigation systems:
- Turn ignition to position 2 (accessory position, don’t start engine)
- Press and hold the Cancel, Map, and Menu buttons simultaneously for 5 seconds
- This enters the diagnostic mode for the infotainment system
- Navigate through menus to clear stored messages
- Exit diagnostic mode and restart the vehicle
TSX Emission System Maintenance Tips
Regular Maintenance to Prevent Issues
Preventive maintenance significantly reduces emission system problems:
- Change engine oil and filter at recommended intervals
- Replace air filter every 15,000-30,000 miles
- Use high-quality fuel
- Replace spark plugs according to maintenance schedule
- Perform periodic fuel injector cleaning
Driving Habits That Help Emission Systems
How you drive affects emission system health:
- Avoid frequent short trips that don’t allow the engine to reach operating temperature
- Maintain steady speeds rather than rapid acceleration and braking
- Don’t let your vehicle idle for extended periods
- Address check emission system warnings promptly
Cost Estimates for Acura TSX Emission Repairs
Understanding potential costs helps with planning:
| Repair | DIY Cost (Parts) | Professional Repair (Parts + Labor) |
|---|---|---|
| Gas Cap Replacement | $15-25 | $25-50 |
| Oxygen Sensor | $142-233 | $240-400 |
| Spark Plugs | $40-80 (set) | $150-300 |
| Ignition Coils | $60-120 each | $250-400 |
| Catalytic Converter | $800-1,200 | $1,700+ |
| EVAP Canister | $339-379 | $500-700 |
Professional diagnostic fees typically range from $61-$90 before any repairs begin.
Known TSX Emission System Issues by Model Year
Different model years have specific known issues:
- 2004-2008: More prone to oxygen sensor failures and EVAP system problems
- 2009-2014: Increased reports of catalytic converter issues around 100,000+ miles
- All years: Gas cap problems remain consistently common
The National Highway Traffic Safety Administration has documented specific recalls related to emission components in certain model years. Check if your TSX is affected by an open recall by entering your VIN at the official Acura owners website.