Ever wondered why some Chevy 350 engines last forever while others fail prematurely? The secret often lies in something seemingly simple: proper torque specifications. Whether you’re rebuilding a classic small block or maintaining your trusty V8, getting these specs right is the difference between an engine that purrs for 200,000 miles and one that leaves you stranded.
I’ve seen too many shade-tree mechanics guess their way through torque values. Let’s change that. This guide breaks down every critical torque spec for your Chevy 350, with expert tips to ensure your engine build goes smoothly.
Why Proper Torque Specs Matter for Your Chevy 350
Torque specifications aren’t just random numbers in a manual. They’re carefully calculated values that ensure your engine components seal properly and distribute stress evenly.
Overtighten a head bolt? You might warp your cylinder head.
Undertighten your main caps? Your bearings could spin and destroy your crankshaft.
The Chevy 350 small block is forgiving in many ways, but it’s absolutely unforgiving when it comes to improper torque values. Using the right specs:
- Prevents gasket failures and leaks
- Ensures proper bearing clearances
- Prevents parts from loosening during operation
- Avoids warped components from uneven clamping force
Essential Tools for Accurate Torquing
Before diving into specific values, make sure you have the right equipment:
- Quality torque wrench – Spend the money on a good one and calibrate it yearly
- Torque angle gauge (for certain applications)
- Assembly lube – Different from regular motor oil
- Anti-seize compound – For exhaust components
- Thread sealant – For water jacket holes
- Clean shop rags – To keep fasteners and threads clean
A digital torque wrench might be worth the investment for critical engine builds. They’re more precise and easier to read than their clicking counterparts.
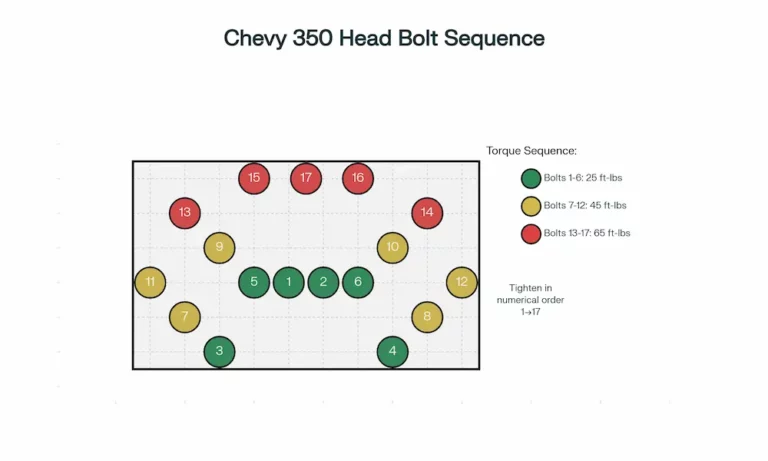
Cylinder Head Torque Specs and Sequence
The head bolts are arguably the most critical fasteners in your entire engine. They maintain the seal between your cylinder head and block while withstanding enormous pressure and temperature changes.
Head Bolt Torque Values
For standard Chevy 350 head bolts, follow this three-step torque sequence:
- First pass: 25 ft-lbs
- Second pass: 45 ft-lbs
- Final pass: 65 ft-lbs
Tightening Pattern
Always follow the correct tightening sequence, starting from the center and working outward in a spiral pattern. This prevents warping by distributing clamping force evenly across the head gasket.
Special Considerations
- Vortec heads may require different torque values (typically 65 ft-lbs with a slightly different sequence)
- Aftermarket fasteners like ARP head studs come with their own specifications (often 70-75 ft-lbs with special lubricant)
- Aluminum heads sometimes use slightly lower torque values – always check manufacturer specs
Remember: thread preparation is crucial. Use thread sealant on bolts that penetrate into water jackets, and light oil on all other threads.
Main Bearing Cap Torque Specifications
Your main bearings support the crankshaft and take enormous loads during engine operation. Getting these torque values right is essential for bearing life and proper oil clearances.
2-Bolt Main Blocks
For standard two-bolt main caps on the Chevy 350:
- Torque all main cap bolts to 70 ft-lbs
4-Bolt Main Blocks
Four-bolt main blocks have additional outer bolts that require different specs:
- Inner bolts: 70-75 ft-lbs
- Outer bolts: 65 ft-lbs
Always apply assembly lube to the threads and use a cross-pattern tightening sequence, starting with the center main cap (#3) and working outward.
Connecting Rod Bolt Torque Specs
Rod bolts hold your connecting rods to the crankshaft and experience tremendous stress during operation. The correct torque here prevents bearing damage and catastrophic engine failure.
Torque specifications for connecting rod bolts depend on the bolt diameter:
- 11/32″ bolts (early engines): 35-44 ft-lbs
- 3/8″ bolts (most common): 40-45 ft-lbs
Apply light engine oil to the threads before torquing. After tightening each rod cap, verify the crankshaft still turns freely. Any binding indicates improper installation.
Intake Manifold Torque Specifications
The intake manifold requires careful installation to prevent vacuum leaks and ensure proper gasket sealing. Incorrect torque can lead to coolant leaks, vacuum leaks, and poor engine performance.
Standard Intake Manifold Specs
For cast iron heads with standard manifolds:
- Final torque: 25-30 ft-lbs
Tightening Procedure
Use this multi-step approach:
- First pass: 10 ft-lbs following the sequence
- Second pass: 20 ft-lbs following the sequence
- Final pass: 25-30 ft-lbs following the sequence
The tightening pattern typically starts in the center and works outward in a criss-cross pattern. Apply anti-seize compound to the threads to prevent galling.
Special Applications
- Aluminum manifolds: Follow manufacturer specifications (often lower than cast iron)
- Vortec heads: Some applications require only 11 ft-lbs
- Aftermarket intakes: Always check supplied instructions
Exhaust Manifold Torque Values
Exhaust manifolds operate at extreme temperatures and require proper torque to prevent leaks and cracking. The exact specs depend on your specific manifold, but here are the standard values:
- Cast iron manifolds: 20-25 ft-lbs
- Center bolts: Use the higher end (25 ft-lbs)
- End bolts: Use the lower end (20 ft-lbs)
Always apply anti-seize compound to exhaust manifold bolt threads. This prevents them from seizing due to heat cycling, making future removal much easier.
Oil System Torque Specifications
Oil Pan Installation
Oil pan bolt torque varies by bolt size:
- Small bolts (1/4″ and 5/16″): 12 ft-lbs (84 in-lbs)
- Large corner bolts (1/2″): 22 ft-lbs
Tighten oil pan bolts in a center-outward pattern in multiple steps to prevent pan warpage. Use light oil on threads and make sure your gasket is properly positioned before tightening.
Oil Pump and Pickup
- Oil pump mounting bolts: 30-35 ft-lbs
- Oil pump pickup tube bolts: 65-80 in-lbs (5.4-6.7 ft-lbs)
Make sure your oil pump pickup is properly spaced from the pan bottom (typically 3/8″ to 1/2″ clearance).
Accessory Component Torque Specs
Timing Cover
Timing cover bolts require very light torque to prevent leaks:
- Timing cover bolts: 6-12 ft-lbs
Valve Covers
Valve cover bolts also need careful torquing to prevent leaks without warping:
- Steel valve covers: 5-7 ft-lbs
- Aluminum valve covers: 3-5 ft-lbs (lower to prevent warping)
Harmonic Balancer
The harmonic balancer bolt is critical for proper crankshaft timing and requires:
- Balancer bolt: 60-85 ft-lbs with thread locker
Water Pump
For proper coolant sealing and function:
- Water pump bolts: 30 ft-lbs with thread sealant
Flywheel and Flexplate Torque Specs
Your flywheel or flexplate connects your engine to the transmission and must be secured properly to prevent catastrophic failure.
- Flywheel/flexplate bolts: 65-70 ft-lbs
- Use blue Loctite thread locker on all threads
- Tighten in a star pattern in multiple steps
Torque Spec Quick Reference Table
Here’s a handy table summarizing all the key torque values for your Chevy 350:
| Component | Torque Value | Special Notes |
|---|---|---|
| Cylinder Head Bolts | 65 ft-lbs (3-step) | Follow proper sequence |
| Main Bearing Caps (2-bolt) | 70 ft-lbs | Use assembly lube |
| Main Bearing Caps (4-bolt inner) | 70-75 ft-lbs | Use assembly lube |
| Main Bearing Caps (4-bolt outer) | 65 ft-lbs | Use assembly lube |
| Connecting Rod Bolts (3/8″) | 40-45 ft-lbs | Oil threads |
| Intake Manifold | 25-30 ft-lbs | Multi-step, anti-seize |
| Exhaust Manifold | 20-25 ft-lbs | Anti-seize compound |
| Oil Pan (small bolts) | 12 ft-lbs | Light oil on threads |
| Oil Pan (large bolts) | 22 ft-lbs | Light oil on threads |
| Timing Cover | 6-12 ft-lbs | Light torque |
| Valve Covers | 3-7 ft-lbs | Lower for aluminum |
| Harmonic Balancer | 60-85 ft-lbs | Thread locker |
| Water Pump | 30 ft-lbs | Thread sealant |
| Flywheel/Flexplate | 65-70 ft-lbs | Blue Loctite |
Proper Torquing Techniques for Perfect Results
Following the right sequence and method is just as important as using the correct torque values.
The Multi-Step Approach
For critical components, always use a multi-step approach:
- Set all fasteners to finger-tight
- Torque to 30% of final spec
- Torque to 70% of final spec
- Torque to final specification
This gradual tightening ensures even clamping force and proper gasket seating.
Bolt Lubrication Matters
Your torque readings will be inaccurate if you don’t properly lubricate fasteners:
- Dry bolts will read higher torque while applying less actual clamping force
- Over-lubricated bolts can lead to over-tightening
- Different fasteners require different lubricants
Retorquing Consideration
After initial assembly, allow the engine to sit for 24-48 hours, then re-check critical torque specifications. This accounts for gasket settling and ensures long-term sealing.
Special Considerations for Aftermarket Components
Aftermarket parts often require different torque specifications than OEM components. Always follow the manufacturer’s recommendations for:
- Aftermarket cylinder heads (especially aluminum)
- Performance intake manifolds
- High-performance fasteners like ARP bolts and studs
- Racing oil pans and windage trays
The torque values for these components can vary significantly from stock specs. Never assume stock specifications apply to aftermarket parts.
Common Torque-Related Problems and Solutions
Problem: Oil Leaks Around Pan
- Likely cause: Uneven torque or over-torquing
- Solution: Clean surfaces, use new gasket, torque in correct sequence to proper specs
Problem: Head Gasket Failure
- Likely cause: Improper torque sequence or values
- Solution: Ensure clean surfaces, follow exact sequence and values, consider upgraded gaskets for performance applications
Problem: Exhaust Manifold Leaks
- Likely cause: Improper torque or lack of anti-seize
- Solution: Use anti-seize compound, torque to proper specs, consider studs for problematic applications
Problem: Connecting Rod Knock
- Likely cause: Improper rod bolt torque
- Solution: Replace bearings, verify rod straightness, follow exact torque specs with proper lubrication
Maintenance Torque Specs
Even during maintenance, proper torque values remain important:
- Spark plugs: 13-15 ft-lbs (cast iron heads), 10-12 ft-lbs (aluminum heads)
- Oil drain plug: 20-25 ft-lbs
- Oil filter: 3/4 turn after gasket contact (or per filter instructions)
- Carburetor mounting: 8-12 ft-lbs (vacuum leaks can result from over-torquing)
Don’t forget these seemingly minor specs – they can cause significant problems if ignored.
Final Verification Before First Start
After completing your assembly and verifying all torque specifications, perform these final checks:
- Rotate the crankshaft through at least two complete revolutions by hand
- Verify there’s no binding or resistance
- Double-check critical fasteners with your torque wrench
- Verify all accessories are properly mounted and tensioned
- Pre-lube the engine before first start
Taking these extra steps ensures your Chevy 350 will run smoothly and reliably for years to come.
Following these torque specifications and procedures will ensure your Chevy 350 build goes smoothly and results in an engine that performs reliably for thousands of miles. The small block Chevy has earned its reputation for durability – but only when assembled correctly.