Ever tried to pinpoint that pesky oxygen sensor on your Ford F150, only to find yourself lost in a maze of engine components? You’re about to discover exactly where that elusive Bank 1 Sensor 2 is hiding, saving you hours of frustration and potentially hundreds in mechanic fees.
What Is Bank 1 Sensor 2 On A Ford F150?
Bank 1 Sensor 2 is an oxygen sensor located on the passenger side of your Ford F150 (that’s the Bank 1 side), positioned after the catalytic converter (making it Sensor 2). This sensor isn’t just some random part – it’s crucial for monitoring your catalytic converter’s efficiency and helping your truck maintain proper fuel economy.
When this sensor works correctly, it measures oxygen levels in your exhaust after gases pass through the catalytic converter, sending this data to your engine’s computer. When it fails, your check engine light often illuminates, accompanied by poor performance.
Bank 1 vs. Bank 2: Understanding The Difference
Before diving into the specific location, you need to understand what these bank designations actually mean on your F150:
Bank 1: Always refers to the passenger side of your Ford F150. This side contains cylinder #1 and the odd-numbered cylinders (1-3-5-7).
Bank 2: Located on the driver’s side with cylinder #2 and the even-numbered cylinders (2-4-6-8).
As for the sensor numbers:
Sensor 1: These are the “upstream” oxygen sensors positioned before the catalytic converter, closer to the engine.
Sensor 2: These “downstream” sensors sit after the catalytic converter, further back in the exhaust system.
Exact Location Of Bank 1 Sensor 2 On Ford F150
To find the Bank 1 Sensor 2 on your Ford F150, follow these specific directions:
- Look on the passenger side of your truck
- Locate the exhaust pipe that runs from the engine
- Follow it until you reach the catalytic converter
- The sensor is positioned just after this catalytic converter
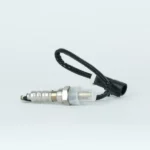
You’ll need to access this from underneath your vehicle in most cases. The sensor resembles a plug with wires coming out of it, protruding from the exhaust pipe.
Model Year Specific Locations
| F150 Model Years | Engine | Bank 1 Sensor 2 Location |
|---|---|---|
| 2009-2014 | 5.4L | Center of passenger-side catalytic converter |
| 2015-2020 | V8 engines | Underneath the truck, after passenger-side catalytic converter |
| 2004-2008 | All engines | Passenger side, approximately 12-18 inches after the catalytic converter |
How To Visually Identify Bank 1 Sensor 2
The Bank 1 Sensor 2 oxygen sensor has several distinguishing features:
- Electrical connector with multiple wires (typically 3-4)
- Threaded metal housing that screws into the exhaust pipe
- Located after the catalytic converter (unlike Sensor 1)
- Usually has a heat shield nearby
When you’re under your truck looking at the passenger side exhaust system, follow the pipe from the engine until you see the larger catalytic converter unit. The sensor will be screwed into the pipe just after this unit.
Common Symptoms Of A Failing Bank 1 Sensor 2
How do you know if your Bank 1 Sensor 2 needs attention? Watch for these telltale signs:
- Check engine light illumination
- Diagnostic trouble codes P0136, P0141, or P0420
- Decreased fuel economy (you’re making more trips to the gas station)
- Rough idle or hesitation during acceleration
- Failed emissions test
- Strange exhaust smell or black smoke
Your truck’s computer relies on this sensor to adjust fuel mixtures properly. When it fails, your engine can’t maintain optimal efficiency.
Tools Needed To Replace Bank 1 Sensor 2
If you’re planning a DIY replacement, gather these tools first:
- Oxygen sensor socket (22mm is common for Ford F150)
- Ratchet and extension
- Penetrating oil (for stubborn, rusted sensors)
- Anti-seize compound (for new sensor threads)
- Jack and jack stands or ramps
- Safety glasses and gloves
- Wire brush (to clean connector areas)
A specialized oxygen sensor socket is worth the investment – it has a slot to accommodate the wiring while gripping the sensor body.
Step-By-Step Replacement Guide
Ready to replace that sensor yourself? Here’s your roadmap:
- Preparation: Ensure the engine is completely cool. Hot exhaust components can cause severe burns.
- Gain Access: Safely raise and secure your F150 on jack stands or ramps.
- Locate Sensor: Find Bank 1 Sensor 2 on the passenger side after the catalytic converter.
- Disconnect Electrical: Carefully unplug the electrical connector by pressing the release tab and pulling gently.
- Remove Old Sensor: Spray penetrating oil on threads if necessary. Use your oxygen sensor socket to unscrew the sensor counterclockwise.
- Prepare New Sensor: Apply a small amount of anti-seize compound to the threads of the new sensor (avoid getting any on the sensor tip).
- Install New Sensor: Thread the new sensor by hand first, then tighten with your socket to manufacturer specifications (typically 30-35 ft-lbs).
- Reconnect Electrical: Plug in the electrical connector until you hear/feel it click.
- Reset Codes: Use an OBD-II scanner to clear any fault codes.
- Test Drive: Take your truck for a drive to ensure proper operation.
Why Bank 1 Sensor 2 Location Matters For Diagnostics
Understanding the precise location of Bank 1 Sensor 2 is critical for proper diagnostics. When your check engine light comes on with code P0136 (O2 Sensor Circuit Malfunction – Bank 1 Sensor 2) or P0141 (O2 Sensor Heater Circuit Malfunction – Bank 1 Sensor 2), you need to test the correct sensor.
Testing the wrong oxygen sensor wastes time and could lead to unnecessary parts replacement. The downstream position after the catalytic converter means this sensor specifically monitors converter efficiency, not just exhaust composition.
Special Considerations For Different F150 Generations
12th Generation F150 (2009-2014)
On these models, particularly those with the 5.4L engines, the Bank 1 Sensor 2 is positioned in the center of the passenger-side catalytic converter, making it somewhat easier to access than in some other generations.
13th Generation F150 (2015-2020)
For these newer models with V8 engines, all oxygen sensors including Bank 1 Sensor 2 are located underneath the truck. The exhaust system design changed slightly, but the basic positioning principles remain the same – passenger side, after the catalytic converter.
11th Generation F150 (2004-2008)
These models have the sensor in similar positions, but the exhaust configuration differs slightly. You’ll find the Bank 1 Sensor 2 on the passenger side, approximately 12-18 inches downstream from the catalytic converter.
Preventing Future Sensor Problems
Want to avoid premature sensor failure? Consider these preventative measures:
- Use high-quality fuel to reduce contaminants
- Maintain regular oil changes to prevent engine oil consumption
- Address exhaust leaks promptly
- Avoid using fuel additives not recommended by Ford
- Don’t ignore check engine lights, even if they’re intermittent
- Keep your engine properly tuned
Oxygen sensors typically last between 60,000-100,000 miles, but environmental factors and driving conditions can reduce this lifespan.
Troubleshooting Before Replacement
Before rushing to replace Bank 1 Sensor 2, consider these troubleshooting steps:
- Scan for specific diagnostic trouble codes using an OBD-II scanner
- Check the sensor’s electrical connector for corrosion, damage, or loose connections
- Inspect the wiring harness for damage
- Test the sensor’s heater circuit resistance (should be between 7-15 ohms)
- Verify there are no exhaust leaks before or around the sensor
- Confirm your catalytic converter isn’t the actual problem
Sometimes what appears to be a sensor issue is actually a failing catalytic converter or an exhaust leak affecting sensor readings.
The Impact Of Bank 1 Sensor 2 On Your F150’s Performance
A properly functioning Bank 1 Sensor 2 contributes significantly to your F150’s:
- Fuel economy (potentially saving hundreds in fuel costs annually)
- Emissions compliance
- Engine longevity
- Smooth operation
- Power delivery
This small component plays an outsized role in your truck’s overall performance and environmental impact. When it fails, your engine management system loses valuable feedback, often defaulting to a “rich” fuel mixture that wastes gas and increases emissions.
Choosing The Right Replacement Sensor
When selecting a new oxygen sensor, consider these factors:
- OEM vs. aftermarket (Ford Motorcraft sensors are designed specifically for your F150)
- Sensor technology (wideband vs. narrowband)
- Warranty coverage
- Wire length compatibility
- Connector type match
While aftermarket sensors may save you money upfront, OEM sensors often provide better durability and perfect fit. A quality sensor will typically cost between $50-$150, with OEM versions on the higher end of that range.
Working With Bank 1 Sensor 2 In Challenging Situations
Sometimes access to Bank 1 Sensor 2 can be complicated by:
- Rust and corrosion on the threads
- Limited workspace
- Heat shields and nearby components
- Seized sensors that won’t unscrew
In cases of severely stuck sensors, additional techniques may be necessary:
- Apply heat with a propane torch to the sensor base (carefully avoiding wires)
- Use a penetrating oil soak overnight
- Employ a breaker bar for additional leverage
- Consider a split oxygen sensor socket if space is extremely tight
Remember that patience is key when dealing with stubborn sensors – forcing the issue often leads to broken bolts or damaged exhaust components.