That check engine light is on, your scanner just showed Ford P1401, and now you’re wondering what’s actually wrong. Good news — this code has a clear cause, a clear fix, and you don’t need to guess your way through it. Read this from start to finish and you’ll know exactly what to do next.
What Is the Ford P1401 Code?
The Ford P1401 code means your Differential Pressure Feedback EGR (DPFE) sensor is sending a signal that’s too high. Your Powertrain Control Module (PCM) reads that signal and flags it as a fault.
This is a Ford-specific code. It’s not the same as the generic P0401. The DPFE system is Ford’s way of measuring actual exhaust gas flow — not just valve position. When the voltage goes out of range, the PCM shuts the feedback loop down and logs P1401.
You’ll see this code most often on:
- Ford F-150 (1994–2004)
- Ford Ranger (1994–2003)
- Ford Explorer (1996–2003)
- Ford Mustang (1994–2004)
- Ford Expedition (1997–2004)
How the DPFE System Actually Works
Before you diagnose anything, you need to understand the system. It’s simpler than it sounds.
Your engine recirculates a small amount of exhaust gas back into the intake manifold. This is called Exhaust Gas Recirculation (EGR). It lowers peak combustion temperatures and reduces nitrogen oxide emissions.
Ford’s DPFE system monitors how much exhaust gas is flowing. Here’s how it does it:
- Exhaust gas travels through a metal orifice tube from the exhaust manifold to the EGR valve
- A fixed restriction inside that tube creates a pressure drop
- Two small hoses tap into the tube — one upstream, one downstream of the restriction
- Those hoses connect to the DPFE sensor, which measures the pressure difference
- The sensor converts that pressure into a voltage signal and sends it to the PCM
When everything works, the PCM knows exactly how much exhaust gas is flowing. When P1401 appears, that voltage signal is stuck too high — and the PCM doesn’t trust the data anymore.
What Causes the Ford P1401 Code?
There are three main culprits. Most P1401 repairs fall into one of these categories:
1. Clogged Pressure Sampling Ports (Most Common)
The small brass fittings where the hoses connect to the orifice tube clog with carbon over time. When the downstream port blocks up, pressure gets trapped. The sensor reads that trapped pressure as a high signal — even when the EGR valve is closed.
This is the most common cause on high-mileage trucks and SUVs.
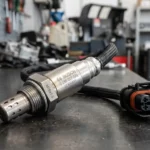
2. Failed DPFE Sensor
The sensor itself can fail internally. Early aluminum-housing sensors are especially prone to this. Condensation inside the sensor creates acid that corrodes the internal components, causing the voltage output to spike and stick high.
3. Wiring or Circuit Fault
A short in the signal wire, a bad ground, or corrosion at the connector can push the voltage signal above the PCM’s accepted threshold. The PCM sees this as a “circuit high” fault and logs P1401.
| Cause | Frequency | DIY Fix? |
|---|---|---|
| Clogged brass fittings/orifice tube | Very Common | Yes |
| Failed DPFE sensor | Common | Yes |
| Damaged/collapsed hoses | Moderate | Yes |
| Wiring short or bad ground | Less Common | Requires DVOM |
| Faulty EGR vacuum solenoid | Less Common | Yes |
Symptoms You’ll Notice
Don’t ignore a P1401. Your engine is already compensating in ways that hurt performance and longevity.
Here’s what drivers typically report:
- Check engine light (obvious, but worth confirming it’s P1401)
- Rough idle or unstable RPM — the PCM fights conflicting sensor data
- Hesitation or stumble on acceleration
- Poor fuel economy — the PCM pulls timing advance as a safety measure
- Failed emissions test — this is a federal emissions-related code
- Engine ping or knock under load — less timing advance means more knock risk
The rough idle happens because the PCM thinks there’s too much EGR flow. It adjusts the idle air control and fuel trim to compensate, which creates a tug-of-war between systems.
How to Diagnose Ford P1401 Step by Step
Don’t start throwing parts at it. Run through this sequence first.
Step 1: Check the Hoses
Pull the two small rubber hoses off the DPFE sensor and the orifice tube fittings. Inspect them for:
- Cracks or splits
- Internal collapse (squeeze them — they shouldn’t stay flat)
- Carbon buildup blocking the inner passage
Replace any hose that looks compromised. These are cheap and often overlooked.
Step 2: Test the Brass Fittings
With the hoses removed, try pushing a stiff wire into each brass fitting on the orifice tube. It should pass through into the exhaust stream.
If it won’t move, the fitting is packed with carbon. That’s your problem.
Step 3: Check DPFE Sensor Voltage (KOEO)
Use a digital voltmeter and back-probe the DPFE connector without unplugging it.
- Reference voltage pin (Vref): Should read a steady 5 volts
- Ground pin: Should read less than 0.1 volts relative to battery negative
- Signal pin:
- Aluminum sensor at rest: ~0.45–0.55V
- Plastic sensor at rest: ~0.55–0.65V
A reading near 5V on the signal wire with the engine off points to an internal sensor short or a wiring fault.
Step 4: Vacuum Test the Sensor
Apply vacuum to the upstream port using a hand vacuum pump. The voltage should rise smoothly as vacuum increases. A healthy sensor hits roughly 4.5V at about 10–15 inches of mercury (in-Hg).
If the voltage sticks, jumps erratically, or doesn’t move, the sensor is bad. Replace it.
Clearing Carbon from the Orifice Tube Fittings
If the brass fittings are clogged, you don’t necessarily need a new orifice tube. Experienced technicians use a mechanical reaming method that works extremely well.
Here’s the process:
- Get an old speedometer cable — the flexible outer wound wire is perfect for this
- Chuck one end in a variable-speed drill
- Insert the other end into the clogged brass fitting
- Run the drill at low speed while working the cable in and out
- Spray carburetor cleaner into the fitting to soften the carbon deposits
- Keep going until compressed air blows through freely into the exhaust manifold
One important note: Don’t use cleaners with heavy silicone content. Silicone residue can contaminate your oxygen sensors downstream and create a whole new set of problems.
This method preserves the original orifice tube, which is usually better quality than aftermarket replacements.
Aluminum vs. Plastic DPFE Sensor: Which One Do You Have?
Ford updated the DPFE sensor design over the years. Knowing which type is on your vehicle matters for diagnosis and replacement.
| Feature | Original Aluminum Sensor | Upgraded Plastic Sensor (4U7Z-9J460-AA) |
|---|---|---|
| Housing material | Aluminum | Polymer/Plastic |
| At-rest voltage | ~0.45–0.55V | ~0.55–0.65V |
| Corrosion resistance | Low | High |
| Moisture handling | Poor | Improved internal baffles |
| P1401 vulnerability | High | Lower |
The aluminum sensors failed frequently because exhaust condensate turns acidic inside the sensor chambers. That acid corrodes the internal piezo element, causing false high-voltage readings.
Ford’s plastic-bodied replacement (part number 4U7Z-9J460-AA) solved this. If you’re replacing an aluminum sensor, go straight to the upgraded plastic version. It’s a direct-fit improvement, not just a like-for-like swap.
When you install the new sensor, also check the EGR vacuum regulator solenoid. If it leaks vacuum, it can crack the EGR valve open slightly at idle. That creates a real pressure differential — and the sensor will correctly report it as high voltage. You’ll log P1401 even with a brand-new sensor.
What Happens If You Ignore the P1401 Code?
Leaving this code unaddressed costs you more than just a failed inspection. Here’s what degrades over time:
Catalytic converter damage: Without EGR, NOx levels rise significantly above design specs. The catalytic converter works harder to process it, generates excess heat, and can literally melt the internal ceramic substrate. That creates an exhaust restriction that kills performance and requires a very expensive repair.
Engine knock and valve damage: Less ignition timing advance (a PCM fail-safe response to P1401) means higher combustion temperatures. Exhaust valves overheat, expand beyond tolerances, and eventually the valve seats deteriorate. That leads to compression loss and a cylinder head job.
Worsening carbon buildup: A misbehaving EGR system accelerates carbon fouling on intake valves. The PCM’s fuel trim adjustments compound the problem.
| Component | What P1401 Does to It | End Result |
|---|---|---|
| Catalytic converter | Excess NOx load and heat | Substrate melt, exhaust restriction |
| Exhaust valves | Overheating from no EGR cooling | Valve recession, compression loss |
| Spark plugs | Elevated cylinder temps | Premature fouling and misfires |
| Oxygen sensors | Higher NOx exposure | Slow response, inaccurate trims |
| Fuel economy | PCM pulls timing, richens mix | 10–15% reduction in MPG |
What Does the Repair Actually Cost?
Here’s an honest breakdown. Most people don’t need the full orifice tube replacement unless the tube itself is damaged.
| Repair Scope | Parts Cost | Labor (Shop Rate ~$120/hr) | Total |
|---|---|---|---|
| DIY sensor replacement only | $40–$100 | $0 | $40–$100 |
| Shop diagnosis + clean fittings + new sensor + hoses | $120–$180 | ~$240 (2 hrs) | $360–$420 |
| Full orifice tube + EGR valve + sensor replacement | $350–$600 | ~$420 (3.5 hrs) | $770–$1,020 |
Most vehicles land comfortably in the middle tier. The key to a lasting repair isn’t just the new sensor — it’s restoring the pneumatic pathways that feed it accurate data. A new sensor on clogged fittings will throw P1401 again within weeks.
One More Thing to Check: Your PCV System
Here’s a detail most guides skip. If your P1401 keeps coming back after you’ve replaced the sensor and cleaned the fittings, look at your PCV valve.
A restricted PCV valve lets oil vapor accumulate in the crankcase and migrate toward the EGR orifice tube. That oil vapor mixes with exhaust soot and bakes into hard carbon deposits under exhaust heat. It’s the same carbon you just cleaned out — and it’ll be back in a few thousand miles if the PCV isn’t working properly.
A PCV valve is a $5–$15 part. If you’re already under the hood fixing P1401, swap it out. It’s cheap insurance against a repeat repair.