Your Camry’s battery light just came on, or maybe the headlights are doing something weird. Could be the alternator. This guide walks you through everything — diagnosis, replacement steps by engine type, costs, and common mistakes that kill brand-new alternators. Read to the end before you grab a wrench.
How to Know Your Camry’s Alternator Is Actually Failing
Don’t swap the alternator until you’ve confirmed it’s the problem. A dead battery or corroded ground wire can mimic a failing alternator perfectly.
Here are the signs that point specifically to the alternator:
- Battery warning light — shaped like a battery or labeled “ALT/GEN.” It triggers when voltage drops below roughly 13 volts while the engine runs.
- Dimming or flickering headlights — especially noticeable at idle or when you turn on accessories.
- Slow power windows or sluggish accessories — the alternator can’t keep up with the electrical load.
- Whining or growling noise — pitch changes with engine speed, which points to worn internal bearings or a bad overrunning pulley. This is a classic early warning sign.
- Burning rubber smell — the alternator pulley may have seized, causing the belt to slip and overheat.
If you’ve got two or more of these happening at once, it’s time to test.
Test It With a Multimeter Before You Touch Anything
Grab a digital multimeter and run this three-step check. It takes five minutes and saves you from replacing the wrong part.
| Testing State | Expected Voltage | What It Means |
|---|---|---|
| Battery static (engine off) | 12.4V – 12.8V | Battery is healthy and charged |
| Engine running, no load | 13.8V – 14.7V | Alternator is working normally |
| Engine running, accessories on | 13.0V – 13.5V | Minimum acceptable under load |
| Marginal reading | 13.5V – 13.7V | Unit may fail under heat or heavy load |
| Critical failure | Below 13.0V (running) | Alternator is not charging the battery |
If the voltage drops below 13.0V with the engine running, your alternator needs replacement. If the battery reads fine at rest but the alternator output is weak, that confirms the charging unit — not the battery — is the culprit.
Also run a voltage drop test on the cables from the alternator to the battery. Heavy corrosion inside those wires creates resistance that makes a good alternator look like a bad one.
How Engine Type Changes Everything
Toyota Camry alternator replacement difficulty depends almost entirely on whether you have a four-cylinder or V6 engine. These two jobs aren’t even close to the same thing.
Four-Cylinder (2.4L and 2.5L) — The Easy One
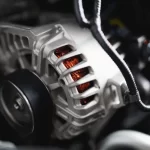
On the 2.4L 2AZ-FE and the newer 2.5L A25A-FKS engines, the alternator sits right at the top-front of the engine bay. You can see it the moment you open the hood. Two main mounting bolts hold it in place, and nothing major blocks access.
Labor time runs 1.0 to 1.5 hours in a shop. For a capable DIYer with basic tools, budget two to three hours.
V6 (3.0L and 3.5L) — The Frustrating One
The V6 engines pack a wide, tall motor into the same engine bay. The alternator hides low on the front cylinder bank, with the radiator fan assembly sitting between you and it.
Toyota’s official service manual says to remove the radiator fan assembly — and in some cases the radiator itself — to extract the alternator. That pushes labor time to 3.8 to 4.0 hours. There’s a well-known shortcut, though — more on that below.
Tools You Need Before You Start
Don’t start this job halfway. Get everything ready first.
- Metric socket set: 10mm, 12mm, 14mm, and 19mm
- 3/8″ drive ratchet with extensions: You’ll need several lengths for the lower bolts on V6 engines
- Breaker bar: For rotating the automatic belt tensioner
- Torque wrench: Non-negotiable — the alternator housing is cast aluminum and cracks if you overtighten
- Digital multimeter: For pre- and post-install voltage checks
- Safety glasses and gloves: The B+ terminal is a live, unswitched connection to the battery even with the key out
The Critical Safety Step Everyone Forgets
Disconnect the negative battery cable first. Always.
The main power wire on the back of the alternator connects directly to the battery 24/7 — no switch, no relay, no protection. If a wrench touches that terminal and a metal engine part at the same time, you’ll blow the engine control module, melt your tools, or worse.
After you remove the negative cable, tuck it away or tape it so it can’t spring back and touch the battery post. One accidental reconnection mid-repair can destroy your ECM.
Step-by-Step: 2006–2011 Four-Cylinder Camry
This covers the 2.4L engine, and the O’Reilly Auto Parts guide is a solid visual reference for this generation.
- Disconnect the negative battery terminal with a 10mm wrench.
- Locate the automatic belt tensioner on the passenger side. Use a 19mm socket and breaker bar, rotate it clockwise to release tension, and slip the serpentine belt off the alternator pulley.
- Pull back the rubber boot on the B+ terminal. Remove the 10mm nut and release the main power wire.
- Depress the tab on the plastic regulator connector and unplug it.
- Remove the 10mm bolt holding the wiring harness bracket to the alternator body.
- Remove the 14mm top mounting bolt and the 12mm bottom mounting bolt. The bottom bolt sits above the A/C compressor — it’s hard to see but easy to reach with a short extension.
- Wiggle the alternator out of the bracket. A small pry bar helps if the mounting bushing grips it tight.
- Thread the top bolt on the new unit first to support its weight, then align and thread the bottom bolt.
Step-by-Step: 2007–2011 V6 Camry — The Shortcut Method
Skipping radiator removal saves an hour of labor. This shortcut is widely used by experienced shops on the 3.5L 2GR-FE.
- Disconnect the negative battery terminal.
- Remove the two bolts securing the radiator fan assembly to the upper core support. Don’t disconnect any fan wiring — just unbolt the bracket.
- Have a second person tilt the fan assembly forward gently toward the radiator. This creates just enough gap between the engine and the fan shroud.
- Remove the serpentine belt using a 19mm socket on the tensioner.
- Disconnect the B+ terminal wire and the harness connector on the alternator.
- Remove the mounting bolts and maneuver the alternator out through the gap while your helper holds the fans forward.
You need two people for this method. It’s awkward, but it beats draining coolant and pulling a radiator.
Step-by-Step: 2018–2024 Camry (2.5L Dynamic Force Engine)
The 2.5L A25A-FKS is the most DIY-friendly generation for alternator work.
- Park on a level surface. Let the engine cool. Disconnect the negative battery terminal.
- Use a 14mm wrench on the tensioner pulley bolt. Rotate it counter-clockwise (toward the front of the car) to release the serpentine belt.
- Remove the 10mm nut from the power terminal. Unplug the control harness — this connects the alternator to the ECM’s smart charging system.
- Remove the wiring harness bracket bolt with a 10mm socket.
- Remove both 14mm mounting bolts and lift the alternator straight out.
- On installation, make sure the harness connector clicks fully into place. A loose connection causes intermittent charging faults and dashboard error messages on these smart-charging systems.
Torque Specs That Actually Matter
The aluminum alternator housing cracks under overtightening. Loose bolts cause vibration that wears out the mounting ears. Use a torque wrench on every fastener.
| Fastener Location | Years | Torque Spec |
|---|---|---|
| Top mounting bolt (14mm) | 2006–2011 | 38 ft-lbs |
| Bottom mounting bolt (12mm) | 2006–2011 | 16 ft-lbs |
| Main mounting bolts (14mm) | 2018–2024 | 18 ft-lbs |
| Power terminal nut (10mm) | All years | 6–7.5 ft-lbs (70–90 in-lbs) |
The power terminal nut deserves extra attention. The stud sits in a plastic insulator. Over-torque it and the insulator snaps, creating a permanent internal short in your brand-new alternator. Hand-tight plus a small snug turn is all it needs.
The Overrunning Alternator Pulley — Don’t Ignore It
Since 2012, most Camry alternators use an overrunning alternator pulley (OAP) instead of a solid steel pulley. It contains a one-way internal clutch that lets the rotor keep spinning when engine speed suddenly drops.
Here’s why it matters:
- Belt life: It eliminates the sharp belt “slap” during deceleration, which causes premature belt wear.
- Noise: Without it, you get chirping and squealing every time the engine decelerates.
- Efficiency: The freewheeling rotor reduces inertial drag on the engine during decel.
Some budget aftermarket alternators substitute a solid pulley to cut costs. It fits and charges fine, but it increases vibration and can damage the belt tensioner over time. Always verify your replacement unit includes the correct OAP.
What It’s Going to Cost You
Prices vary by engine, part tier, and whether the shop uses book time or the shortcut method.
| Engine | Part Cost | Labor Cost | Total Range |
|---|---|---|---|
| Four-cylinder (gas) | $150 – $340 | $159 – $234 | $309 – $574 |
| V6 (gas) | $250 – $575 | $234 – $600 | $484 – $1,175 |
| Camry Hybrid | N/A | N/A | Uses motor-generator, not an alternator |
On part tiers:
- New OEM (Toyota/Denso): Best quality, exact match, $280–$420.
- New aftermarket (BBB Industries, MPA): 20–30% cheaper than OEM, meets original specs.
- Remanufactured (Duralast, Wilson): Most popular option. Rebuilt with new bearings, brushes, and regulators. Requires a core deposit refunded when you return your old unit. AutoZone carries several options for the Camry.
The V6 price range is wide because some shops quote full radiator-removal book time while others bill the shortcut method. It’s worth asking specifically before you commit.
Three Mistakes That Kill New Alternators
1. Charging a Dead Battery With the New Alternator
Don’t install a new alternator and immediately try to jump-start the car to let it charge a dead battery. An alternator maintains a charged battery — it doesn’t recover a dead one. Running a new alternator at full output to charge a flat battery can fry the voltage regulator or diodes within the first hour. Charge the battery fully with an external charger before you start the car.
2. Skipping the Belt and Tensioner Inspection
The serpentine belt has to come off anyway. Check it for cracks, glazing, and rib wear while it’s off. Check the tensioner for smooth, consistent operation. A sticky tensioner causes belt slippage on the new alternator pulley — poor charging performance and early belt failure follow quickly.
3. Dirty or Corroded Terminals
Clean the B+ terminal and all ground connections before reconnecting. Corrosion creates resistance that mimics a weak alternator. Some technicians apply a small amount of dielectric grease to the plastic harness connectors to prevent moisture intrusion, but keep it away from the metal mating surfaces on the high-current terminals.
A Note on the Camry Hybrid
If you drive a Camry Hybrid, you don’t have a traditional alternator. The hybrid system uses two motor-generators (MG1 and MG2) inside the transaxle. They handle charging during regenerative braking and engine operation. A DC-to-DC converter steps the high-voltage traction battery power down to 12 volts for the auxiliary battery. This architecture eliminates belt-driven charging entirely — which is great for maintenance, but makes electrical repairs far more specialized.
If your hybrid’s 12V battery keeps dying, the issue is likely the DC-DC converter or a problem with the hybrid battery — not an alternator.