Figuring out when to remove the newborn insert from your car seat feels confusing — and getting it wrong has real consequences. This guide breaks it all down: the warning signs, the brand-specific rules, and what to do after you pull that padding out.
Why the Newborn Insert Exists in the First Place
Newborns are tiny. Their shoulders are narrow, their torsos are short, and their neck muscles can’t hold their head up yet. A standard car seat shell is built for a wide range of sizes — not just a seven-pound baby fresh from the hospital.
That’s where the insert comes in.
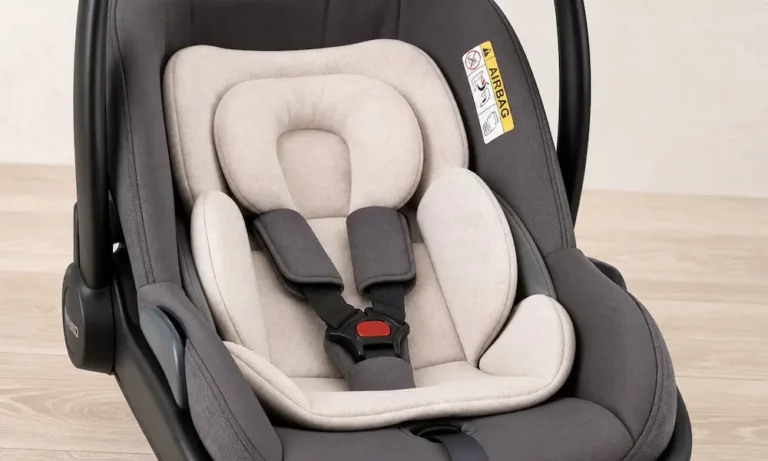
The padding lifts your baby’s pelvis up so the harness straps sit at the right height. It fills in the gaps on the sides so your baby doesn’t slump sideways. And it cradles the neck and head to keep the airway open and straight.
Without it, small babies can slide around, and their harness won’t sit where it’s supposed to. That’s dangerous. But here’s the flip side — keeping the insert in too long is just as risky.
According to NHTSA car seat safety guidelines, car seats must be used correctly every single time. That includes using — and removing — the inserts exactly as the manufacturer intends.
The Real Danger of Keeping the Insert in Too Long
Here’s what most parents don’t realize: a soft insert compresses during a crash.
When your baby outgrows the insert but it’s still in the seat, that compression creates sudden slack in the harness straps. In a high-speed collision, your baby’s body can shift forward, which increases head and neck trauma — or worse.
There’s also the airway problem. A head support that’s too thick for your growing baby will push their head forward, pressing their chin down to their chest. That chin-to-chest position compresses a newborn’s airway, and because babies can’t lift their heads to fix it, it can cause silent suffocation.
Babies don’t need to be tilted at a weird angle for this to happen. A single overstuffed pad behind their head is enough.
5 Physical Signs It’s Time to Remove the Insert
Don’t wait until you hit a weight number. Watch your baby’s fit first. Physical fit is the most reliable guide for when to remove the newborn insert from a car seat.
| What You See | What It Means | What to Do |
|---|---|---|
| Baby is sitting on the crotch buckle or it’s digging into their thighs | Insert is pushing baby too far forward | Remove the lower body insert |
| Shoulder straps sit above your baby’s shoulders | Baby has grown past the insert’s height range | Remove body insert, adjust harness to correct slot |
| Baby looks squeezed or their back is arched | Insert is now too narrow for their body | Remove insert to restore a natural posture |
| Baby’s chin is tilting toward their chest | Head support is pushing their head forward | Remove head insert immediately |
| You can’t get a snug harness no matter how tight you pull | Insert is taking up harness slack | Remove insert to regain proper strap length |
If you’re seeing any of these, it’s time — regardless of weight.
When to Remove the Newborn Insert by Brand
Every manufacturer crash-tests their insert separately from the seat shell. That means the weight limits aren’t interchangeable between brands. Here’s what each major brand says.
Graco
For Graco infant-only seats like the SnugRide, keep the body support insert in until your baby reaches 12 lbs — or until their shoulders rise above the lowest harness slot. For 3-in-1 and convertible seats, the head and body supports must be used together and can stay until 20 lbs.
One key rule: if your baby’s shoulders are still below the lowest slot, keep the insert in — regardless of weight. Removing it too early will cause the harness to ride up too high.
Chicco
Chicco’s body insert for the KeyFit, KeyFit 30, and KeyFit 35 is approved for babies between 4 and 11 lbs — hard stop. Don’t go over 11 lbs.
The head insert is a separate piece. You can keep using it after you remove the body insert, but only until the harness needs to move to the top slot. Once you’re there, both pieces come out.
Nuna
The Nuna Pipa series uses a two-piece organic cotton insert. The body insert and its attached low-birth-weight pillow both must come out at 11 lbs. If you can get a snug harness fit before 11 lbs, you can remove the pillow early — but 11 lbs is the absolute cutoff.
UPPAbaby
UPPAbaby’s Mesa and Aria inserts are rated for 4–11 lbs. But here’s UPPAbaby’s exception: if your baby is slightly over 11 lbs and still fits properly, you can continue using it. The true trigger for removal is the crotch buckle fit — if the buckle is digging into your baby’s thighs, remove the insert immediately.
Britax
Britax splits it into two pieces. The Infant Positioning Pillow must come out at 11 lbs. But the Head Pad can stay in from 4 lbs all the way up to 30 lbs.
For the Poplar convertible seat, the lower insert is mandatory in rear-facing mode for babies under 22 lbs — and it must come out before switching to forward-facing.
Evenflo
Evenflo’s rules depend on when your seat was manufactured. For LiteMax and SafeMax seats made on or after January 1, 2018, the insert is mandatory for babies weighing 3–6 lbs. After 6 lbs, it’s optional. For seats made before that date, it’s required only for 3–4 lbs.
Here’s a neat detail that shows why this matters: in the LiteMax NXT, the lowest harness slot sits at 4.5 inches with the insert installed, versus 6.5 inches without it. That 2-inch difference is why small babies need it — and why babies who’ve grown don’t.
Maxi-Cosi
The Mico Luxe and Mico Pro inserts are mandatory for babies under 5 lbs. Once your baby passes 5 lbs, the insert becomes optional. For the rotating Mica 360 S, a separate newborn inlay is available and approved up to approximately 15 lbs or 3 months old.
Doona
Doona recommends removing the newborn insert at around 11 lbs or 3 months. But they add one exception: if your baby’s shoulders still sit below the lowest harness slot without the insert, keep it in. The separate Doona head support should stay in as long as possible for side-impact protection.
Cybex
The US version of the Cybex Cloud T insert is rated for 4–11 lbs. Some US Cybex models don’t list a strict weight limit — removal is based entirely on harness fit. European i-Size Cybex models, like the Aton B2, use height instead: remove the insert once your baby reaches 61 cm (about 3 months).
Clek Liing
Clek works differently. For babies under 11 lbs whose shoulders are below the lowest harness slot, both the body support cushion and headrest are required. Over 11 lbs, the cushion can stay until the baby’s shoulders reach the top harness slot. For seats made after February 1, 2024, the headrest stays in for the life of the seat.
Peg Perego and Baby Jogger
Peg Perego uses a two-stage system. Stage 1 is for 4–7 lbs and most babies outgrow it by 8 lbs. The signal to remove it? Shoulder straps sliding off or the buckle tongues digging into the thighs. Stage 2 can stay until around 20 lbs, or until your baby’s torso fills the full space between the crotch buckle and shoulder slots.
Brand-by-Brand Insert Weight Limits at a Glance
| Brand | Insert Component | Maximum Weight Limit |
|---|---|---|
| Graco (infant seat) | Body Support | 12 lbs |
| Graco (convertible) | Head & Body Support | 20 lbs |
| Chicco KeyFit | Body Insert | 11 lbs |
| Chicco KeyFit | Head Insert | Until top harness slot |
| Nuna Pipa | Body Insert & Pillow | 11 lbs |
| UPPAbaby Mesa/Aria | Infant Insert | 11 lbs (fit-dependent) |
| Britax Willow/Cypress | Positioning Pillow | 11 lbs |
| Britax Willow/Cypress | Head Pad | 30 lbs |
| Britax Poplar | Lower Insert | 22 lbs (rear-facing only) |
| Evenflo LiteMax (post-2018) | Infant Insert | Optional after 6 lbs |
| Maxi-Cosi Mico | Infant Insert | Optional after 5 lbs |
| Doona | Newborn Insert | 11 lbs |
| Cybex Cloud T (US) | Newborn Insert | 11 lbs |
| Clek Liing | Body Support Cushion | Until top harness slot |
| Peg Perego | Stage 1 Cushion | ~8 lbs |
| Peg Perego | Stage 2 Cushion | ~20 lbs |
What to Do Right After You Remove the Insert
Removing the insert changes how your baby sits in the seat. Without that padding, they sit lower and slightly differently. Don’t skip this checklist.
Recheck the harness slot height. In rear-facing mode, straps must come out at or below your baby’s shoulders. If removing the insert caused the straps to now sit above the shoulders, move the harness down to the next slot.
Do the pinch test. Buckle your baby in and tighten the harness fully. Try to pinch the webbing horizontally at the collarbone. If you can grab any fabric between your fingers, the harness is too loose. Tighten until you can’t pinch anything.
Position the chest clip correctly. It should sit flat against the sternum, right at armpit level — not on the belly, not on the neck.
Reposition the crotch buckle. Most infant seats have multiple buckle slots. Move it to the slot closest to your baby’s body without sitting underneath them. This keeps them from slouching forward.
Recheck the recline angle. Removing the insert shifts your baby’s center of gravity. A seat that’s too upright can cause the head to fall forward even without any padding. Check the bubble or angle indicator on the seat and adjust to stay within the manufacturer’s approved range for your baby’s current weight.
Still seeing head wobble? Don’t buy an aftermarket head pillow. Aftermarket accessories aren’t crash-tested with your specific seat and can create a dangerous slip-plane during impact. Instead, roll two small receiving blankets tightly and place them along both sides of your baby’s body — not behind the head, not under the harness straps. Just snug alongside the torso and up to the ears.
The One Rule That Overrides Everything
Manufacturer guidelines are the final word. Every insert is tested with a specific seat model under specific crash conditions. The weight limits aren’t conservative suggestions — they’re the maximum loads the padding was designed to handle.
Never add aftermarket inserts or head pillows that didn’t come in your car seat’s original box. They’re not regulated, they haven’t been crash-tested with your seat, and they can make an otherwise safe seat dangerous.
If you’re still unsure after checking everything, find a certified Child Passenger Safety Technician (CPST) near you. They’ll check the install, the harness fit, and the insert situation for free — and they’ll catch things you might miss.