Got the “Adaptive Headlight Malfunction” warning staring you down from your dashboard? You’re dealing with one of BMW’s most impressive — and most frustrating — systems to repair. This guide walks you through exactly what’s broken, why it broke, and how to fix it without handing your dealer a blank check. Read to the end — the cost breakdown alone could save you thousands.
What BMW Adaptive Headlights Actually Do
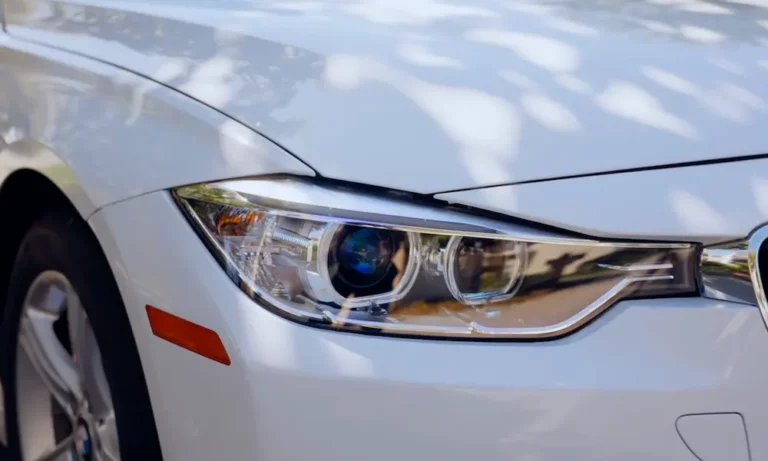
BMW’s Adaptive Headlight system (also called Adaptive Light Control or AHL) physically swivels your headlight beams into corners as you turn the steering wheel. It’s not just a software trick — the projectors literally move left and right based on real-time data from your steering angle sensor, yaw rate sensor, and vehicle speed sensor.
The result? You see the road ahead through curves instead of staring into a dark wall while your lights point straight. At highway speeds on winding roads, this genuinely matters for safety.
The system also handles vertical aim automatically. Ride-height sensors on your suspension detect load changes — passengers, cargo, heavy braking — and adjust the beam up or down to avoid blinding oncoming drivers.
Which Module Controls Everything?
The answer depends on your BMW’s age:
| Chassis Generation | Primary Control Module | Location |
|---|---|---|
| E60 / E90 (2004–2013) | Light Module (LM) or Footwell Module (FRM) | Left footwell / behind dashboard |
| F10 / F30 (2010–2019) | Frontal Light Electronics (FLE) or BDC | Attached to headlight unit |
| G20 / G05 (2019–present) | Body Domain Controller (BDC) | Central electronics hub |
Inside each headlight housing, a localized module handles the physical movement. Older E-series cars use a Stepper Motor Controller (SMC). Newer F and G-series cars use a Top Mount Solution (TMS) or integrated Headlight Driver Module. These translate electrical commands into millimeter-precise mechanical movement.
All of this communicates over a LIN bus — a high-speed data line connecting the central brain to each headlight. Cut that connection with corroded pins or a broken wire, and the whole system defaults to a fixed, lowered safe mode.
How to Spot an Adaptive Headlight Problem
Every time you start your BMW with the light switch in “Auto,” the headlights run a self-test. They sweep left, right, up, and down in sync. Any obstruction triggers an immediate fault code.
Physical Warning Signs
Watch for these specific symptoms:
- The “lazy eye” — one projector stays stuck in a turned or lowered position while the other sweeps normally
- Both beams aim at the pavement — vertical control has failed, drastically shortening your sight distance
- Flickering — usually means moisture or vibration has compromised an electrical connection
- Grinding, clicking, or whirring from inside the housing — a stepper motor is fighting a jammed projector, or plastic gears have stripped
Dashboard Warnings and Fault Codes
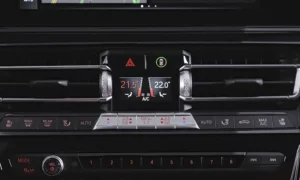
Your iDrive will display a yellow headlight icon with a swivel arrow, plus text like “Adaptive Headlight Malfunction” or “Lighting system: Front right malfunction.”
To go deeper, you need an OBD II scanner that reads BMW-specific manufacturer codes. Generic readers won’t cut it here. These are the codes you’re most likely to find:
| Fault Code | What It Means | Likely Cause |
|---|---|---|
| 800FC3 | Left headlamp driver module initialization fault | Failed TMS/FLE or mechanical jam |
| 800FC2 | Right headlamp driver module initialization fault | Failed TMS/FLE or mechanical jam |
| 800FC7 | LIN bus fault — right side | Corroded pins or broken harness |
| 800FC8 | LIN bus fault — left side | Corroded pins or broken harness |
| 932E | General ALC system failure | Software conflict or ride height sensor failure |
Moisture: The #1 Killer of BMW Adaptive Headlights
Moisture intrusion is the single most common cause of adaptive headlight failure in the US. BMW housings use small Gore-Tex-style vents to breathe as temperatures change. When primary seals fail or the housing cracks, water gets in — and the electronics pay the price.
The placement makes it worse. On F10 5-series models, the LEAR TMS module sits at the very bottom of the housing, exactly where water pools. Standing water causes electrolysis, which corrodes the module’s metallic pins until they burn out or snap off entirely. At that point, you lose adaptive function — and often your DRLs and turn signals too.
Condensation vs. Active Water Ingress — Know the Difference
Light misting on the inside of your lens after a car wash or on a humid morning is normal. It should clear on its own within a few minutes of running the lights.
Visible water droplets or pooling at the bottom of the housing means your seal has failed. That’s not a wait-and-see situation — that’s act-now territory.
Where Water Gets In
- Service cover gaskets — the rubber seals on the back access doors crack and harden with age, letting water in during rain or pressure washing
- Housing cracks — hairline fractures from road debris or minor impacts that are invisible to the naked eye
- Perimeter seal failure — the bond between the polycarbonate lens and ABS housing degrades from UV exposure and temperature cycling
- Clogged vents — blocked ventilation grommets trap moisture inside the unit, turning normal condensation into standing water
How to Fix Moisture Problems
Catch it early, and you can often save the expensive modules without replacing the headlight.
The Official BMW Drying Procedure
BMW issued Technical Service Bulletins B63 03 18 and B63 05 16 specifically for this. Here’s the process:
- Connect the car to a battery charger — you’ll need stable voltage
- Open the headlight service covers
- Run the high beams for approximately 30 minutes
- Check if the mist clears completely and leaves no residue
If it clears cleanly, reseal the covers and monitor. If you see mineral deposits, lime scale staining, or the moisture returns, the headlight needs to come off for a full drying and reseal.
For deeper drying, use a hot air blower — but keep the incoming air below 176°F (80°C) to avoid warping the internal reflectors or damaging the lens coating.
Resealing the Headlight: Butyl vs. Permaseal
BMW headlights use two very different sealant types, and your repair approach depends on which one you have.
Butyl (older models and most aftermarket units):
Butyl stays soft and rubbery as it ages. To open a butyl-sealed headlight, bake the assembly in a preheated oven at around 240°F for 15–20 minutes. The sealant softens enough to pry the lens away carefully with a flathead screwdriver. Clean the old butyl from the channel completely, press in fresh 7mm automotive butyl tape, reheat, and clamp the lens back down until it cools.
Permaseal (LCI/facelift models):
Permaseal is a hard, high-strength sealant that barely responds to heat. Opening these requires a rotary tool with a thin cutting wheel to separate the lens just outside the original seal line. After repairs, reassemble using high-quality rubberized silicone and plastic welding to restore structural integrity.
The Hidden Wiring Problem BMW Won’t Tell You About
Here’s something most guides skip. On BMWs built between 2004 and 2016 — E60, E90, and F10 generations — the internal headlight wiring insulation breaks down from HID bulb heat.
The wire insulation becomes so brittle that simply changing a bulb makes it flake off, exposing bare copper. The consequences range from blown fuses to a permanently locked Footwell Module to, in extreme cases, a fire risk.
Fixing the Internal Harness
BMW doesn’t sell internal headlight wiring as a standalone part. Your options:
- Liquid electrical tape — brush it onto exposed wires through the service hatch. It’s flexible and heat-resistant. Good for early-stage damage.
- Heat shrink tubing — if you can de-pin the connector, slide heat shrink over each wire for a professional-grade fix
- Replacement harnesses — aftermarket vendors now sell complete internal harness kits for F10 5-series and F30 3-series models, allowing a full electrical restoration
Module Replacement and Programming
Replacing a failed TMS, SMC, or FLE module is only half the job. The vehicle’s central computer won’t recognize new hardware automatically — you’ll still see the “Adaptive Headlight Malfunction” warning until you code and calibrate the new module.
Choosing the Right Tool
| Tool | Best For | Difficulty |
|---|---|---|
| ISTA+ | Full dealer-level diagnosis, calibration, module teach-in | High — needs ICOM interface |
| NCS Expert | E-series coding to factory defaults | High — needs K+DCAN cable |
| E-Sys | F/G-series firmware flashing and programming | Very high — specialist territory |
| BimmerCode | Simple feature changes and some module work | Low — user-friendly app |
For E90 3-series owners replacing an SMC: use NCS Expert in Expert Mode, read the VO from the CAS module, select RSMC or LSMC, and run the SG_CODIEREN job to write factory defaults to the new module. The headlight will perform its first calibration sweep automatically on completion.
For G-series owners, ISTA’s “Control Unit Exchange” menu handles everything automatically — it flashes the firmware and mechanically zeros the headlights. Don’t skip this step if your car has anti-dazzle or LED matrix features. Precise calibration prevents blinding oncoming traffic.
What BMW Adaptive Headlight Repair Actually Costs
Here’s the number everyone needs before making decisions:
| Component or Service | New OEM Cost | Used / Aftermarket Cost |
|---|---|---|
| Adaptive LED headlight housing | $3,000–$5,500 | $800–$1,800 |
| Laserlight headlight housing | $6,000–$7,500 | $1,500–$3,500 |
| LEAR TMS / Driver Module | $400–$600 | $185–$300 |
| Ride height sensor | $150–$250 | $50–$100 |
| Bumper removal labor | $300–$600 | Free if DIY |
| ISTA programming and calibration | $150–$400 | Free with right tools |
When buying used, inspect every unit carefully. White chalky residue inside the lens signals previous water damage that may have already destroyed the internal motors. Check mounting tabs too — they’re brittle plastic and snap easily in accidents.
On the aftermarket question: cheap headlights often lack DOT/SAE certification, produce incorrect beam patterns, and throw persistent error codes. Insurance carriers typically require OEM parts for adaptive system repairs for exactly this reason.
Preventive Maintenance That Actually Saves Money
These four habits dramatically reduce your risk of a major adaptive headlight failure:
- Inspect gaskets every 12 months. The rubber seals on your headlight service covers crack over time. A dab of silicone protectant keeps them pliable.
- Clear the vents regularly. Spider webs and road dirt block the ventilation grommets. Blocked vents trap moisture and accelerate internal condensation.
- Act on misting immediately. The first time you see persistent condensation, run the high-beam drying procedure before moisture reaches the TMS module at the bottom of the housing.
- Apply paint protection film to the lens. Stone chips create hairline cracks that let water in. PPF is cheap compared to a $4,000 headlight replacement.
US Coding Options: Unlocking What BMW Blocked
US regulations (FMVSS 108) historically restricted some adaptive headlight features available in Europe. Two modifications are popular with American BMW owners:
Glare-Free High Beams (Anti-Dazzle): European BMWs with adaptive LED or Laserlights keep high beams on permanently while physically “tunneling” around oncoming cars. In the US, this was disabled by default. Using E-Sys or BimmerCode in Expert Mode, many US owners have successfully re-enabled this feature with solid results.
Side marker deletion: US regulations require amber side markers to illuminate with parking lights and headlights. Enthusiasts who prefer the cleaner European look can disable them through the FLE or FEM module using BimmerCode. Keep in mind that any dealership module replacement will wipe custom coding — you’ll need to re-enter it manually.
The Full Repair Sequence in Order
When you’re ready to tackle a moisture-related adaptive headlight failure, work through this sequence:
- Diagnose — pull BMW-specific fault codes with a proper OBD II scanner and confirm the affected side
- Extract — remove the front bumper to access headlight mounting bolts and disconnect the main harness
- Inspect the module — pull the TMS or SMC from the base of the housing and check for green or black corrosion on both the module and internal pins
- Clean and reseal — treat corroded pins with isopropyl alcohol, identify the moisture entry point, and reseal with butyl tape or appropriate automotive sealant
- Fix the wiring — if insulation is crumbling, apply liquid electrical tape or heat shrink before reinstalling
- Calibrate — perform a full system reset and module teach-in using ISTA or NCS Expert so both headlights sweep in sync
BMW’s adaptive system is genuinely impressive engineering. Keep the moisture out, catch wiring problems early, and don’t skip the programming step after module replacement — your headlights will reward you with a level of night visibility most cars simply can’t match.