That clicking noise behind your dashboard isn’t going away on its own. It’s your Chevy’s blend door actuator telling you it’s done. The good news? You can fix it yourself with the right tools and a little patience. Stick around — this guide covers everything from spotting the symptoms to the final calibration step most people skip.
What Is a Blend Door Actuator (And Why Should You Care)?
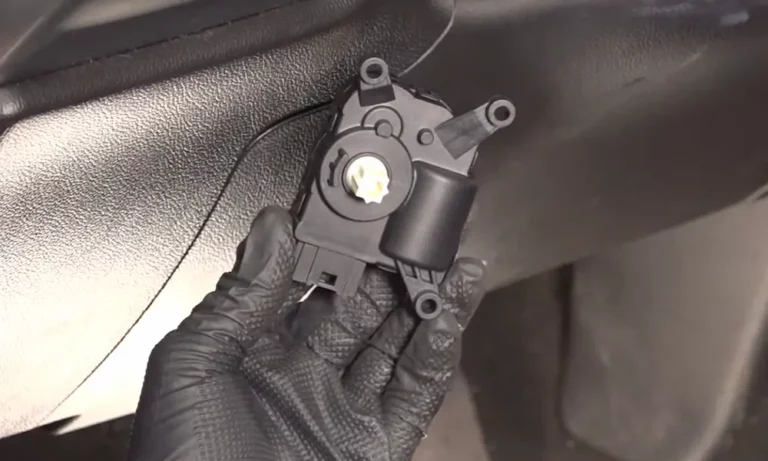
Your Chevy’s HVAC system is smarter than you think. It uses small electric motors called blend door actuators to control flaps inside the dashboard. These flaps mix hot and cold air to hit the exact temperature you set.
Think of each actuator as a tiny robot moving internal flaps that blend heated and cooled air. When one breaks, your climate control either stops working or gets stuck on one temperature.
Most Chevys have more than one actuator. Here’s what each one does:
| Actuator Type | What It Controls | Where It Lives |
|---|---|---|
| Temperature/Blend | Hot vs. cold air mix | Behind center stack or glove box |
| Mode Door | Dash vents, floor, or defrost | Upper/middle HVAC case |
| Recirculation | Outside vs. cabin air | Near the blower motor |
| Driver/Passenger | Independent dual-zone temps | Left and right HVAC sides |
A basic Silverado might only have two actuators. A fully loaded Tahoe with dual-zone climate and rear ventilation can have four or more up front alone.
Signs Your Chevy Blend Door Actuator Is Failing
The Clicking Noise You Can’t Ignore
The most common symptom is a repetitive clicking or knocking sound behind the dashboard. You’ll usually hear it when you first start the car or when you adjust the temperature dial.
Here’s what the sounds actually mean:
| What You Hear | What It Means |
|---|---|
| Rapid light clicking | Small intermediate gear has cracked |
| Heavy thumping under glove box | Main output gear slipping on the door hinge |
| Low droning or humming | Motor seizing or increased internal friction |
The plastic gears inside the actuator go through brutal temperature swings — freezing winters to a scorching dashboard in summer. Eventually, a gear tooth snaps. The motor keeps spinning, but the gears slip at the break point. That’s your clicking.
Temperature Problems That Point to a Dead Actuator
Beyond sound, thermal inconsistency is a clear warning sign. Watch for these:
- Stuck on full hot or full cold — the actuator motor failed or the door is blocked
- Driver side blows cold, passenger side blows hot — one of your dual-zone actuators has quit
- Air won’t switch from floor to defrost — the mode door actuator has failed mechanically
If your Tahoe or Impala has dual-zone climate control and one side stops cooperating, don’t assume it’s the whole HVAC system. Start with the actuator on the problem side.
How to Diagnose the Right Actuator Before You Start
Pull Diagnostic Codes First
Don’t start pulling the dashboard apart before you check for codes. Modern Chevy HVAC modules detect when an actuator draws too much current or when the position sensor reads out of range. A code like B0413 points directly to the driver-side temperature door.
You’ll need a bidirectional scan tool — not a basic code reader — to access HVAC-specific codes. These tools also let you command the actuator to move in real time, so you can confirm whether it’s responding to the module’s signals.
The Physical Test
If the codes don’t give you a clear answer, go hands-on. Remove the suspect actuator, then manually rotate the blend door hinge with your finger. If it rotates smoothly and the air temperature changes, the door itself is fine. The actuator is your problem.
This test also rules out a foreign object jam. Pens, coins, and parking receipts can fall through the defrost vents and physically block the blend door. Always check the door shaft hole with a flashlight before installing anything new.
Tools You Actually Need for This Job
Don’t skip this section. Using the wrong tools is how you strip a screw and turn a one-hour job into a three-hour headache.
| Tool | Size/Type | Why You Need It |
|---|---|---|
| Stubby Ratchet | 1/4-inch drive | Fits in tight spaces behind the glove box |
| Sockets | 5.5mm, 7mm, 10mm | 5.5mm is GM’s go-to size for actuator bolts |
| Finger Ratchet | 1/4-inch drive | Starts screws where a handle can’t swing |
| Trim Tool Set | Non-marring plastic | Pops bezels and knee bolsters without cracking them |
| Torx Drivers | T15, T30 | Essential for 2014–2018 Silverado trim panels |
| Pick Set | Hooked and straight | Releases electrical connectors cleanly |
The 5.5mm socket is the one most people don’t have. GM uses it almost exclusively for HVAC components. Try to use pliers or the wrong socket size, and you’ll strip the head. Buy the socket.
Chevy Blend Door Actuator Replacement: Impala (2006–2016)
The ninth-generation Impala is one of the most common candidates for this repair. It has four actuators total — three grouped on the passenger side and one on the driver side near the steering column.
Passenger-Side Actuators
The passenger side is the easier side. Here’s how to get to it:
- Open the glove box and empty it out
- Press the plastic tabs on the rear of the box inward while pulling the door downward — this lets it drop past its normal stops and hang toward the floor
- With the HVAC case exposed, identify the three actuators — recirculation sits furthest right, temperature and mode are closer to the center stack
- Disconnect the negative battery terminal before touching anything electrical
- Press the locking tab on the electrical connector and pull it free
- Remove the two 5.5mm or 7mm bolts
- Pull the old actuator off, compare the output shaft and pin layout to the new unit, then swap it in
Driver-Side Temperature Actuator
The driver side is tighter. You’ll need to remove the knee bolster — the plastic trim panel under the steering wheel. Once that’s out, the actuator sits on the left side of the HVAC case. Expect to do this lying in the driver-side footwell with limited visibility. It’s awkward but doable.
Chevy Blend Door Actuator Replacement: Silverado & Tahoe
GMT800 and GMT900 (1999–2014)
On 1999–2006 and 2007–2014 models, the driver-side blend door actuator sits on the bottom of the HVAC assembly. It’s the most failure-prone actuator in the truck lineup and the most awkward to reach.
Here’s the process:
- Remove the plastic kick panels and insulators above the pedals — held by 10mm bolts or push-pins
- Locate the actuator secured by two screws
- If a metal bracket or floor duct blocks the screws, use a flex-head ratchet or a stubby screwdriver
- Note the door’s position after removing the old actuator — the new one must be aligned (indexed) to match before bolting it in
K2XX Generation (2014–2018)
The 2014–2018 Silverado has a more integrated dashboard. To reach the driver-side temp actuator, you’ll often need to remove the left instrument panel trim pad and the radio control assembly to clear the upper mounting bolts. This generation uses T15 Torx fasteners heavily throughout the interior. Use plastic pry tools — the dashboard panels crack easily.
Getting the Alignment Right: Don’t Skip This Step
Forcing a new actuator onto a door shaft that’s out of sync with the motor’s position puts constant tension on the gears. You’ll hear clicking immediately, and the new part will fail fast.
Use one of these three methods to align the actuator correctly before bolting it in:
- Manual Door Rotation: Rotate the blend door shaft to its full stop position (full cold or full hot). Temporarily plug in the new actuator, adjust the dash controls until the motor reaches its matching full-stop position, then bolt it down.
- Visual Indexing Marks: Many OEM Chevy actuators have alignment arrows molded into the casing. Line up the flat side of the output shaft with these marks before installing.
- Bench Calibration: Apply power briefly to the motor pins (typically pins 1 and 6) using a 9-volt battery to move the gears to the correct position before you bring the unit to the car. This works well when you’re working blind and can’t see the shaft.
How to Recalibrate After Chevy Blend Door Actuator Replacement
Mechanical installation is only half the job. The HVAC module needs to learn the new actuator’s travel limits through a calibration sweep. Skip this step and the module may over-torque the door, snapping your brand-new plastic gears within days.
The Calibration Sequence
- Turn off the ignition and remove the key
- Disconnect the negative battery terminal or pull the HVAC fuse — wait at least 60 seconds
- Reconnect the battery or fuse
- Turn the ignition to “On” or “Run” — don’t start the engine
- Leave the climate control off and don’t touch any buttons for at least 90 seconds
- Listen for faint whirring as the actuators sweep from stop to stop
- Start the engine and test the full temperature range — smooth transitions with no clicking means success
Here’s where to find the right fuse for your model:
| Chevy Model | Fuse Box Location | Relevant Fuse |
|---|---|---|
| Impala (2006–2016) | Passenger footwell side of dash | HVAC or Battery Fuse |
| Silverado (GMT800) | Engine compartment, driver side | HVAC 1 or Battery |
| Silverado (GMT900) | Left side of interior dash | HVAC/ECAS Fuse |
| Tahoe (K2XX) | Engine compartment or cabin side | HVAC/Climate Control Fuse |
On dual-zone vehicles, this calibration step is even more critical. Both actuators need to re-sync so the left and right temperatures stay balanced.
What to Do When a New Actuator Doesn’t Fix It
The Blend Door Hinge Is Broken
If a brand-new actuator clicks immediately or doesn’t change the air temperature, the internal blend door hinge may be cracked. The plastic socket where the actuator shaft inserts is a high-stress point. If that cracks, the actuator spins freely inside the hole without moving the door. Fixing this means a full dashboard removal and HVAC case disassembly. It’s a big job.
Wrong Control Module
On Chevy Impalas specifically, the HVAC control module is tied to your vehicle’s RPO codes. Manual systems use code C67. Dual-zone automatic systems use CJ2. These modules are not interchangeable. Plug in the wrong one, and it sends incorrect voltage signals to every actuator in the car. Some modern modules also need a software flash from a dealership to communicate correctly with the body control module.
Quick Reference: Do’s and Don’ts for This Repair
Do:
- Use a mechanic’s stethoscope to pinpoint which actuator is clicking before you disassemble anything
- Buy a 5.5mm socket before you start — it’s non-negotiable
- Disconnect the battery as both a safety step and an electronic reset
- Always index the actuator during installation and run the calibration sweep after
Don’t:
- Force the actuator onto the door shaft without checking alignment
- Use a basic OBD2 code reader — HVAC codes need a bidirectional scan tool
- Skip the 90-second wait during calibration
- Assume aftermarket parts match OEM calibration quality — many technicians stick with AC Delco parts for HVAC work because the potentiometers are factory-calibrated to Chevy software
The whole repair is manageable if you work methodically. Identify the right actuator, use the correct tools, align it properly, and run the calibration. That’s what separates a fix that lasts from one that fails before the week’s out.