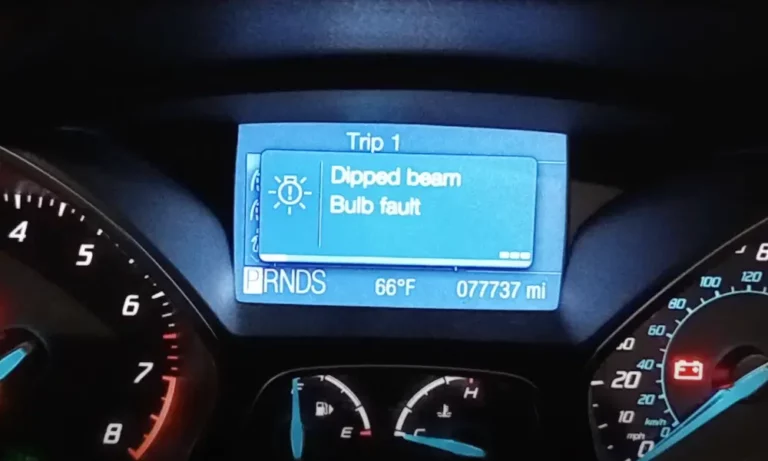
Seeing a “dipped beam bulb fault” message in your car can be frustrating. This often means there’s an issue with your low beams, possibly a burned-out bulb or a power supply problem. Fixing this might involve checking the bulbs or addressing issues with the ballasts. Keep reading to find out how these fixes can help solve your problem and get your headlights working properly again.
Understanding Dipped Beam Bulb Faults
Dipped beam bulb faults can be caused by various issues like damaged bulbs or electrical problems. Recognizing the role of electrical components can help identify and fix these faults effectively.
Common Causes of Faults
One common cause of an error message related to dipped beam bulbs is bulb failure. This happens when the bulb burns out or becomes physically damaged. You should inspect the bulb for any visible cracks or dark spots. Using an incorrect bulb type can also lead to issues. Always double-check your car’s manual to ensure the correct bulb is used.
Dirty lenses can reduce the brightness of your headlights, making them appear faulty. Clean your headlight lenses regularly. Replacing a damaged bulb or cleaning the lenses can often fix the problem. In more complex cases, the issue may be related to the body control module (BCM) or a fault code that requires professional diagnosis.
Electrical Components and Their Role
Several electrical components can affect the dipped beam bulbs. The ballast is essential for proper bulb operation, especially in HID systems. A faulty ballast can cause flickering or prevent the bulb from lighting up. A good relay harness ensures the right current reaches the bulbs, preventing any dimming issues.
Power supply problems can emerge from weak connections or damaged wiring. Checking the connections and ensuring a steady power flow can help maintain optimal headlight performance. Understanding how these electrical parts function can be key in troubleshooting and fixing dipped beam bulb faults on your vehicle.
Diagnosing the Issue
When dealing with a dipped beam bulb fault message, proper diagnosis is key to solving the problem effectively. Look into both electronic fault codes and physical issues to find the root cause. This helps ensure that you fix the issue correctly, whether it involves the left headlight, the bulb type, or another factor.
Reading Fault Codes
Start by checking your vehicle’s onboard diagnostics. Many cars display a fault code when there is an issue with the headlights. Use an OBD-II scanner to access these codes. This will guide you in identifying whether the problem lies with the dipped beam bulb or its electrical system.
Pay attention to any specific codes that reference the left headlight or electrical faults. These codes tell you if there might be issues with components such as faulty ballasts or wiring problems. Knowing how to read these codes can save time and effort by pointing you to the specific issue affecting the headlight.
Physical Inspection of Bulbs and Assembly
After checking the fault codes, do a physical inspection. Open the headlight assembly and examine each bulb for visible damage. Look for damaged bulbs or those that might be the incorrect type for your car. Make sure the bulbs are seated properly and that no connections are loose.
Check the lenses for dirt or other obstructions. Sometimes, dirty lenses can cause dim lighting, making you think there is a bigger problem than there actually is. Clean the lenses to see if this resolves the issue. Paying attention to physical clues can often identify simple problems or point out more complex issues needing further attention.
Fixing Dipped Beam Bulbs on a Ford Focus
Fixing the dipped beam bulbs in your Ford Focus involves selecting the correct replacement bulb and following a set of instructions to change it. Taking the time to do this properly ensures your headlights work as expected.
Choosing the Right Replacement Bulb
First, you need the correct bulb for your Ford Focus’s dipped beam. Check your vehicle manual for the specific bulb type. Common options include halogen, HID, or LED bulbs. Using the wrong bulb can lead to further issues, so make sure to match the specifications exactly.
Visit a reliable auto parts store and verify the bulb’s compatibility. It’s also wise to compare prices and read reviews to find a balance between quality and cost. Good research ensures that you purchase a bulb that will last.
Step-by-Step Replacement Instructions
First, park your Ford Focus on a flat surface and turn off the engine. Open the hood and locate the headlight assembly. It typically requires removing screws or clips, so keep a screwdriver or appropriate tool handy. Make sure to handle everything gently to avoid damage.
Once the headlight assembly is loose, find the bulb holder. Remove the faulty dipped beam bulb. Install the new bulb by aligning it correctly and securing it in place. Reassemble the headlight and test the new bulb by turning on the headlights to ensure everything is working smoothly.
Troubleshooting Other Related Issues
Addressing challenges with dipped beam bulbs can be tricky. It’s important to look into potential problems like faulty components, damaged bulbs, or system-wide issues.
Bulb Still Not Working After Replacement
After replacing a bulb, if it still doesn’t work, you might be facing other issues. First, check if the new bulb is compatible with your vehicle. Sometimes, bulbs can be damaged during installation or because of a defective ballast, which supplies power to the bulb.
Inspect the relay harness for any signs of wear or damage. If connections are loose or corroded, your bulb may not receive power. Additionally, consider checking for dirty lenses. Dust or grime can block light output, making it appear as if the bulb is not functioning.
Using a clean microfiber cloth, gently wipe the lens to improve visibility. If problems persist after these checks, it might be time to investigate further.
When to Seek Professional Help
Certain issues might be beyond a simple fix. If you’ve replaced the bulb and ensured all connections are secure but still face problems, it might be a problem with the BCM. The Body Control Module handles various electrical functions and needs to be in good shape for lights to work.
Another time to seek help is if you suspect the ballast is faulty. A mechanic can test this component properly. Also, if troubleshooting involves electrical testing or if you’re uncomfortable with car electronics, professional assistance is recommended.
Professionals have the right tools and expertise to diagnose and fix complex issues safely, helping you get back on the road with confidence.
Preventive Measures and Maintenance Tips
Keeping your dipped beam bulb in good shape helps you drive safely, especially at night. Here are some tips to make sure your headlights work properly.
Regularly check your dipped beam bulb. Over time, bulbs can weaken and may need a replacement. Checking them weekly can help avoid sudden outages on the road.
Clean your headlight lenses to prevent dirt and grime build-up. Dirty lenses can dim your lights, reducing visibility at night. A simple wipe with a cloth and mild cleaner once a month can do wonders.
Make sure the power supply to your headlights is working well. Loose or corroded connections can cause flickering or complete power loss. Regularly inspecting and cleaning the connections is a good habit.
Carry extra bulbs and fuses in your car. If a bulb blows or a fuse fails, having spare parts handy means you won’t be stuck in the dark.
Regular maintenance checks should include headlight alignment. Misaligned headlights can cause poor road visibility and might blind oncoming drivers.
Keep your headlights free from moisture. Water inside the light casing can shorten the lifespan of the bulb. If you notice any moisture, dry it out immediately.
Noticing any flickering lights or dimness early can help you address issues before they lead to failure.
Taking these simple steps can ensure your dipped beam bulb works effectively when you need it the most.

