That clicking sound behind your dashboard isn’t your imagination — and neither is the cold air blasting when you want heat. Your Ford’s blend door actuator is likely the culprit. This guide walks you through diagnosing the problem, tackling the replacement yourself, and resetting the system properly so the fix actually sticks.
What Does a Blend Door Actuator Actually Do?
Think of it as the traffic cop for your cabin air. Inside your HVAC box, there’s a door that controls how much air flows across the heater core versus bypassing it. The blend door actuator is the small electric motor that physically moves that door to your commanded temperature.
When you twist the dial from 65°F to 80°F, the HVAC module sends a signal to the actuator. It rotates, the door shifts, and warmer air mixes in. Simple in theory — but the plastic gears inside take a beating from years of temperature swings.
Dual-zone systems use two separate actuators — one for the driver’s side and one for the passenger’s side. That’s why your wife can be sweating while you’re freezing.
The Real Reasons Ford Blend Door Actuators Fail
Stripped Plastic Gears
This is the most common failure mode. Ford uses multi-stage plastic gear trains inside the actuator to amplify the motor’s torque. Over time, those gear teeth crack or strip. When the motor spins but the gears slip, you hear that unmistakable clicking or knocking sound — like a tiny plastic machine gun behind your radio.
Worn Potentiometer Track
The actuator reports its position back to the HVAC module using a small potentiometer — a sliding contact on a resistive track. After millions of cycles, that track wears down. The module loses confidence in the position reading and starts hunting back and forth trying to find the door. You’ll notice erratic temperature swings or a faint droning from the dash.
The Blend Door Itself Is Broken
Here’s a mistake that wastes a lot of money: replacing a perfectly good actuator when the door it drives is the actual problem. The blend doors have foam seals that can delaminate and jam the door. The plastic hinge can snap entirely, leaving the door disconnected. When the door breaks free, it falls to full heat or full cold and stays there — no matter what the actuator does.
Always confirm the door moves before buying a new actuator.
How to Diagnose the Problem Before Buying Parts
The Listen and Feel Test
Start the engine, let it warm up fully, and cycle the temperature from max cold to max heat. A clicking or tapping noise from behind the center stack points to the main blend door actuator. Sounds near the driver’s footwell usually mean a mode door or driver-side temperature actuator.
Then check your heater hoses under the hood. If both hoses are hot but your vents blow cold air, the blend door is stuck in the bypass position.
Use a Scan Tool to Confirm
Generic OBD2 readers won’t cut it here. You need a bidirectional scan tool that can access the HVAC module. Look for codes like B1080 or B1081, which point directly to motor malfunction or position sensor failure.
Better yet, pull up live data. Watch the commanded position versus the reported position. If the module commands 50% open and the feedback stays at 0%, you’ve confirmed the fault. You can also run a sweep test — command the actuator through its full range and watch the voltage. If it drops out mid-sweep, the potentiometer is failing.
The Quick Physical Check
Unplug and remove the actuator. Reach in and manually rotate the blend door hinge by hand. It should turn smoothly from stop to stop with no grinding or binding. If it moves freely, the actuator is your problem. If it’s stiff or stuck, investigate the door first.
| Diagnostic Method | What It Reveals | Tools Needed |
|---|---|---|
| Acoustic test (clicking) | Stripped internal gears | Just your ears |
| Vent temperature check | Door stuck in bypass position | Infrared thermometer |
| Scan tool live data | Motor vs. sensor failure | Bidirectional scan tool |
| Manual door rotation | Broken door vs. bad actuator | Your hands |
| 9V battery bench test | Verifies motor function outside car | 9V battery + jumper wires |
Ford Blend Door Actuator Replacement by Model
Ford F-150 (2009–2023)
The F-150 has the highest volume of actuator replacements of any Ford platform. Your difficulty level depends entirely on which actuator you’re replacing.
The mode door actuator near the gas pedal is the easiest — 30 minutes, minimal tools. The main blend door actuator behind the radio takes about an hour. You’ll remove the center bezel, slide the radio out, and reach in to access the unit mounted on top of the HVAC case.
The driver-side temperature actuator on dual-zone trucks is a completely different story. The official service manual calls for removing the entire instrument panel — 10 to 13 hours of labor at a dealership. Experienced techs sometimes shortcut this by pulling the center console rearward to create just enough clearance. It’s tight, the connector faces the firewall, and there’s almost no wire slack. Plan for a few hours of frustration either way.
| F-150 Actuator | Motorcraft Part | Location | Difficulty |
|---|---|---|---|
| Main Blend Door | YH-1933 | Behind radio | Moderate |
| Mode Door | YH-1881 | Near gas pedal | Easy |
| Driver-Side Temp | Model specific | Center console/floor | Very Hard |
| Recirculation | YH-1770 | Behind glove box | Easy |
Ford Explorer (2011–2019)
The Explorer’s dashboard is more cramped than the F-150’s, and the passenger-side actuator sits directly behind the airbag module. That means you can’t rush this job.
Here’s the sequence that works:
- Disconnect the battery and wait at least 15 minutes for the airbag capacitor to discharge
- Drop the glove box by squeezing the side tabs and disconnecting the damper rope
- Remove the four 8mm bolts from the airbag module and carefully unplug the yellow connector
- Remove the secondary dash frame panel (7mm and 8mm bolts) to expose the actuator
Watch out for the hidden mounting screw on the actuator itself. One is obvious — the others hide in notches behind structural brackets. A magnetized socket or the paper towel trick (wedging the screw into the socket with a thin strip of paper) will save you from losing a fastener inside the dash forever.
Ford Fusion (2013–2020)
The Fusion is the most DIY-friendly of the three. The passenger-side actuator sits right behind the glove box — drop the box, swap the part, done in under 30 minutes.
The driver-side actuator lives high up in the driver’s footwell on the left side of the center stack. You don’t need to pull the whole dash, but you will be working in a contorted position. Many techs unbolt the accelerator pedal assembly for more hand clearance. If your Fusion has knee airbags, disconnect the battery first and wait the full 15 minutes before reaching up in there.
Getting the Alignment Right Before You Bolt It In
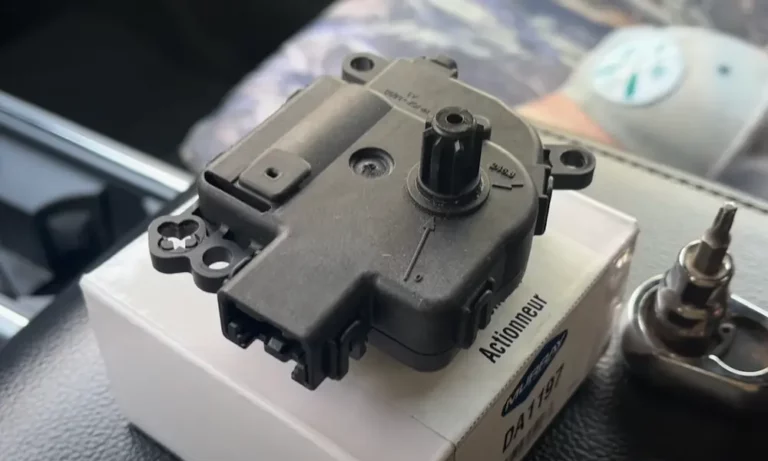
This step trips up a lot of DIYers. If the new actuator’s output shaft isn’t aligned with the blend door hinge before you mount it, you’ll shatter the new gears the moment you power the system on.
Match the position of the old actuator before you remove it. If the old unit still moves, command it to a neutral (center) position, then remove it. If it’s seized, look at where the door hinge is sitting inside the dash — then set the new actuator to match that angle.
The simplest method: plug the new actuator into the harness before bolting it in. Use the temperature knob to jog the motor to the correct position, then mount it. Alternatively, use a 9V battery with jumper wires on the workbench to manually drive the shaft to the right angle first.
Most Motorcraft replacement actuators ship from the factory indexed to a neutral center position — often marked with a line at the 3 o’clock position on the casing. Move your blend door hinge to its middle position before sliding the actuator into place. The splines will mate cleanly.
Resetting and Calibrating After Ford Blend Door Actuator Replacement
Installing the new part is only step one. The HVAC module needs to relearn the actuator’s travel limits, or it’ll try to drive the door past its physical stops and destroy the gears you just installed.
During calibration, the module drives the door to each hard stop, records the feedback voltages at both ends, and stores those as the new travel limits. Every temperature request is then calculated as a percentage of that range.
The Fuse Pull Method (Best for F-150)
This is the most reliable reset method for Ford trucks:
- Turn the ignition fully off
- Open the passenger kick panel fuse box
- Pull Fuse No. 15 or No. 42 (check your year — it varies)
- Wait at least 60 seconds
- Reinsert the fuse and turn the key to the ON position — don’t start the engine
- Sit still for 90 seconds. Don’t touch any climate controls
- You’ll hear the actuators sweep — that’s the calibration running
Battery Disconnect Method (Works on All Ford Models)
Disconnect the negative battery terminal and wait 15 minutes. This clears the entire vehicle network and forces a fresh calibration on reconnect. It’s the preferred DIY method when the fuse box feels like a puzzle.
Button Sequence for Digital Climate Controls
If your Ford has a digital climate panel, try this:
- Turn the ignition to ON
- Hold “OFF” and “DEFROST” simultaneously for two seconds
- Release, then press “AUTO” or “CLIMATE”
- The system enters a self-test mode — actuators cycle and any fault codes display on screen
| Reset Method | Steps | Best For |
|---|---|---|
| Fuse pull | Remove fuse 60s, wait 90s after reinsertion | F-150 and Expedition |
| Battery disconnect | Remove negative terminal 15 min | All Ford models |
| Button sequence | OFF + DEFROST → AUTO | Digital dual-zone systems |
| Scan tool reset | Command module reset via OBD2 | Professional shop use |
OEM vs. Aftermarket: Don’t Cheap Out Here
Labor is what makes this decision critical. An accessible actuator might cost $250 total at a shop. The driver-side F-150 actuator? You’re looking at over $1,800 in labor alone.
If a budget aftermarket unit fails in 18 months, you pay that labor bill again. Motorcraft parts use higher-grade plastic and more durable potentiometer tracks. Field data from professional forums shows Motorcraft actuators regularly lasting 8 to 10 years, while some value-brand alternatives start clicking well under two years.
For any high-labor actuator location, always use Motorcraft. The part costs $20 to $40 more. The labor differential if it fails early is in the hundreds.
One more tip: replace your cabin air filter on schedule. A clogged filter lets debris into the HVAC case, which can gum up the blend door’s foam seals and force the actuator to work much harder than it should.