Hearing a clunk every time you hit a pothole? Your ball joints might be trying to tell you something. Worn ball joints cause everything from sloppy steering to complete wheel detachment — yes, really. This guide walks you through exactly how to check ball joints yourself, step by step, so you catch problems before they become disasters. Stick around — the diagnostic tricks at the end are genuinely useful.
What a Ball Joint Actually Does (And Why It Fails)
A ball joint connects your suspension control arm to your steering knuckle. Think of it as your wheel’s hip socket. It lets the wheel move up and down over bumps while still pivoting left and right for steering.
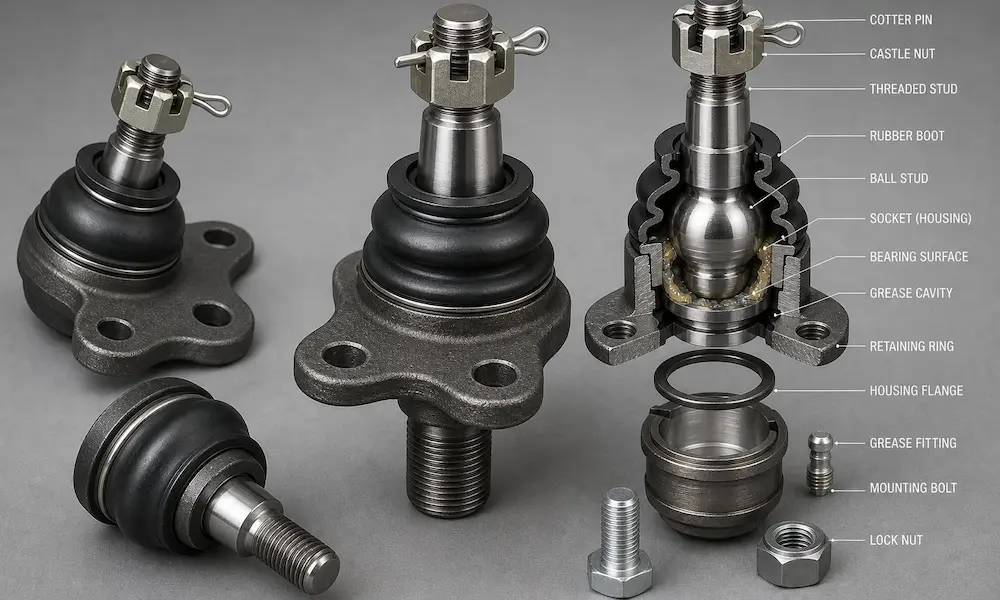
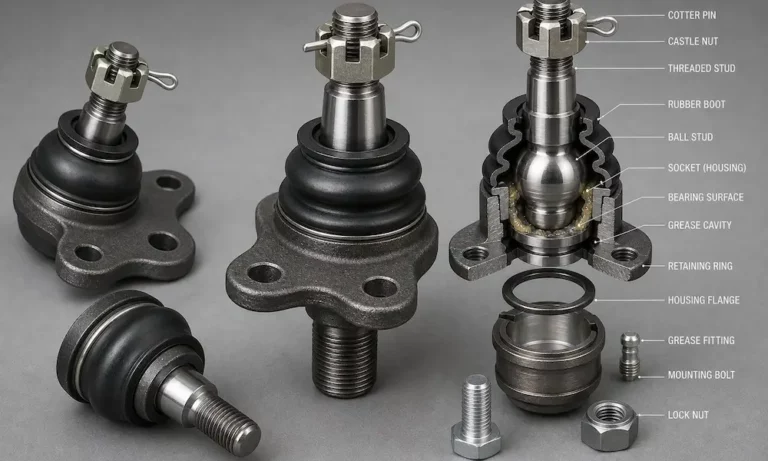
Inside, it’s a hardened steel ball locked in a lubricated socket. Every pothole, hard corner, and emergency stop hammers that socket. Over time, the internal bearing surfaces wear down, creating looseness — and that’s where trouble starts.
A worn ball joint doesn’t just clunk. It throws off your wheel alignment, chews through tires unevenly, and in severe cases, can cause a complete wheel separation at highway speed.
Load-Carrying vs. Follower Ball Joints: Why It Matters Before You Test
Before you grab a pry bar, you need to understand which type of ball joint you’re dealing with. This single piece of knowledge determines how you jack the vehicle. Test it wrong, and you’ll miss a dangerous failure every time.
Load-carrying joints sit directly in the path of the suspension spring’s force. The spring constantly pushes thousands of pounds through this joint. If you test it while it’s still loaded, the spring pressure locks the ball stud tight against the socket — masking even severe wear. It’ll feel rock solid, and you’ll drive away thinking everything’s fine when it isn’t.
Follower joints live outside that load path. They only handle lateral forces during cornering and braking. These are easier to test and generally last longer.
AlignmentSpecs.com explains the load path concept clearly: follow the route from the frame, through the spring, to the steering knuckle. Whichever joint sits in that path is your load carrier.
How to Jack the Vehicle Based on Suspension Type
Different suspensions require completely different jacking procedures. Here’s a quick reference:
| Suspension Type | Load-Carrying Joint | Where to Place the Jack | Key Requirement |
|---|---|---|---|
| SLA Type 1 (double wishbone, spring on lower arm) | Lower ball joint | Under the lower control arm | Confirm visible air gap at upper jounce bumper |
| SLA Type 2 (spring on upper arm) | Upper ball joint | Under the vehicle frame | Insert a wedge block above the upper control arm |
| MacPherson Strut | None — strut bears the load | Under the frame or cross-member | Suspension must hang at full droop |
| Solid Front Axle | Lower ball joint | Under the solid axle tube | Use dial indicators — hand force isn’t enough |
| Multi-Link | Varies by design | Both loaded and unloaded positions | May need hydraulic shaker plates |
MacPherson strut owners: never jack under the lower control arm during a ball joint test. That compresses the suspension and hides any looseness. Always lift by the frame and let the suspension hang completely free.
How to Check Ball Joints: The Visual Inspection First
Start here before touching any tools. A quick visual often tells you everything you need to know.
Check the Dust Boot
The rubber dust boot seals grease inside the joint and keeps water, salt, and grit out. A torn boot is one of the most common causes of premature failure.
Look for:
- Cracking, tearing, or complete absence of the boot
- A dry, shrunken appearance instead of plump and greasy
- Any visible grit embedded in old grease around the joint
If the boot is torn, the joint is on borrowed time — even if it passes a physical test today. Road salt and sand have already started working on the bearing surface. Replace it.
Check the Wear Indicator (If Your Vehicle Has One)
Many trucks and SUVs have a built-in wear indicator built right into the grease fitting at the bottom of the joint. The base of the fitting (called the boss) should protrude noticeably from the housing.
Here’s how to read it:
- Boss clearly protrudes: Joint is serviceable
- Boss is flush with the housing: Joint is at its wear limit — replace it now
- Boss is recessed inside the housing: Critically worn, immediate replacement required
- Grease gun won’t connect because the fitting recessed too far in: Also a failure sign
This check works with the vehicle sitting normally on its tires under full weight. Don’t lift it for this part.
Listen Before You Wrench: Auditory Warning Signs
Your car communicates through sound. Here’s what different noises mean:
Metallic clunking over bumps — The classic sign. The worn ball stud slams against the socket walls every time the suspension loads and unloads. The clunk gets louder as wear worsens.
Squeaking or creaking during slow turns — This typically means the joint has lost its lubrication entirely. Metal-on-metal grinding is happening inside the socket right now.
Vague, wandering steering — The loose knuckle shifts slightly under load, making the car drift left or right. Drivers constantly make small steering corrections without realizing it.
Steering wheel vibration at highway speed — Often misdiagnosed as a wheel balance issue. A loose joint lets the wheel assembly oscillate under aerodynamic forces.
The 12 and 6 O’Clock Wheel Rock Test
This is the foundational physical test for ball joint play. We recommend this as the starting point for any hands-on check.
Here’s exactly how to do it:
- Jack the vehicle correctly for your suspension type (see the table above)
- Support it securely on jack stands — never work under a car held only by a floor jack
- Place one hand at the top of the tire (12 o’clock) and one at the bottom (6 o’clock)
- Push the top in while pulling the bottom out, then reverse — rock it firmly
- Feel for any shifting, clunking, or loose movement
A healthy joint feels completely rigid. The only flex you’ll notice is the slight give of the rubber control arm bushings — that’s normal.
If you feel the tire shift before the control arm moves, or hear a mechanical clunk, you’ve found your problem.
The Pry Bar Test for Vertical Play
The 12/6 test catches radial (horizontal) play well. But adding a pry bar test to check for axial (vertical) play — especially on heavy trucks where hand force alone won’t reveal anything.
Steps:
- With the vehicle elevated and suspension properly unloaded, slide a sturdy pry bar or long lever under the center of the tire tread
- Use the floor as a fulcrum and gently lever upward, lifting the wheel slightly
- Watch the lower ball joint closely with a flashlight — have an assistant do this while you operate the bar
- Look for any separation between the steering knuckle and the control arm
If the knuckle moves upward independently before the arm follows — even a fraction of an inch — the joint has excessive axial play. That’s a failed joint.
Important: Don’t pry directly at the dust boot. You’ll tear it and ruin a joint that might otherwise be fine.
Using a Dial Indicator for Precise Measurement
Manual tests work well for severe failures. But 1A Auto’s diagnostic guide points out that some manufacturers specify maximum play limits as small as 0.030 inches — far too small for your hands to reliably detect.
A dial indicator measures movement in 0.001-inch increments. It’s the only tool that gives you a definitive pass/fail answer against factory specs.
Setting it up correctly:
- Mount the magnetic base on a stationary part of the control arm — not on anything that moves
- Position the plunger tip against a flat surface on the steering knuckle or spindle
- Preload the plunger by depressing it about 0.050 inches before locking the arm down
That preload step is critical. Without it, the indicator can only read movement in one direction and will miss half the play.
Avoiding cosine error: Keep the plunger as parallel as possible to the direction of expected movement. An angled plunger reads artificially low, which means a bad joint looks good on paper.
| Measurement Type | Plunger Direction | Physical Action | What to Look For |
|---|---|---|---|
| Axial (vertical) play | Vertical, parallel to the ball stud | Lever up with pry bar under tire | Knuckle moves up before control arm |
| Radial (horizontal) play | Horizontal, perpendicular to stud | Rock tire at 12 and 6 o’clock | Total sweep = push reading + pull reading |
Compare your Total Indicator Reading (TIR) against the manufacturer’s specification in your service manual. Exceeding the limit means replacing the joint — no debate.
Heads up for Dodge, Ram, and Jeep owners: Certain solid axle upper ball joints are intentionally designed to telescope. They can show up to 0.060 inches of play straight from the factory. Always check your OEM specs before condemning a joint on these trucks.
How to Tell if It’s the Ball Joint or Something Else
Loose, clunking suspension doesn’t always mean a bad ball joint. These three tests separate the actual problem from the lookalikes.
Wheel Bearing Test: The Brake Lock Method
A failing wheel bearing mimics a bad ball joint almost perfectly. Here’s the fix: have someone hold the brake pedal firmly while you rock the wheel at 12 and 6 o’clock.
- Movement disappears with brakes applied: Wheel bearing is the culprit
- Movement persists with brakes locked: The entire knuckle is shifting — suspect the ball joint or control arm bushings
Tie Rod Test: The 3 and 9 O’Clock Rock
Grasp the tire at the very front (3 o’clock) and very back (9 o’clock). Push and pull horizontally.
This axis bypasses the ball joints and loads the tie rod ends directly. Clunking here points to tie rods, not ball joints. You can also place your hand over the tie rod boot — a failing joint transmits its clicking directly through the metal into your palm.
Control Arm Bushing Test
During the pry bar test, watch the entire control arm from end to end. If the arm shifts, twists, or clunks at the inboard chassis mount points rather than at the steering knuckle, the rubber bushings have failed. Shine a flashlight at the inboard mounting hardware to confirm cracking or separation.
When Static Tests Still Won’t Find It
Sometimes a car clunks badly on the road but everything feels tight on the lift. This happens because even a strong technician can’t replicate highway-speed suspension forces.
That’s where electronic acoustic tools like the ChassisEAR diagnostic kit come in. You clip color-coded piezoelectric microphone sensors directly to suspect components — the ball joint housing, the tie rod, the sway bar link. Then you drive the car normally while listening through headphones to each channel individually.
When the suspension hits the exact condition that causes the noise, the sensor closest to the source will broadcast it loudest. You cycle through channels until one screams louder than the rest. It removes the guesswork from the nastiest intermittent noises completely.
What the Law Says About Ball Joint Play
If you’re in the US, state inspections have teeth. Virginia’s safety inspection code gives a clear picture of the legal limits:
| Wheel Size | Maximum Allowable Play |
|---|---|
| 16 inches or less | 1/4 inch |
| 17 to 18 inches | 3/8 inch |
| Over 18 inches | 1/2 inch |
Power steering vehicles also fail if the steering wheel moves more than 2 inches before the road wheels respond. Manual steering allows up to 3 inches.
The NHTSA tracks vehicle safety complaints related to suspension failures, including ball joints — and ball joint separation has been linked to serious crashes. The consequences of ignoring wear indicators aren’t just mechanical. They’re legal and life-safety issues.
Your Ball Joint Inspection Checklist
Run through this in order every time you inspect:
- Identify suspension type and correct jacking location
- Check dust boot condition — cracked or torn means imminent failure
- Check mechanical wear indicator — flush or recessed means replace now
- Listen for clunking over bumps and squeaking during slow turns
- Perform 12 and 6 o’clock wheel rock test
- Perform pry bar axial play test
- Use a dial indicator if manual tests are inconclusive
- Isolate wheel bearing and tie rod play before condemning the joint
- Check control arm bushings at the chassis mount points
- Compare all measurements against OEM specifications
Catching a bad ball joint early is a $150 repair. Missing one and driving on it until it fails completely is a towing bill, a bent fender, a snapped axle shaft — and potentially much worse. Check them regularly, check them correctly, and your front end will stay where it belongs.