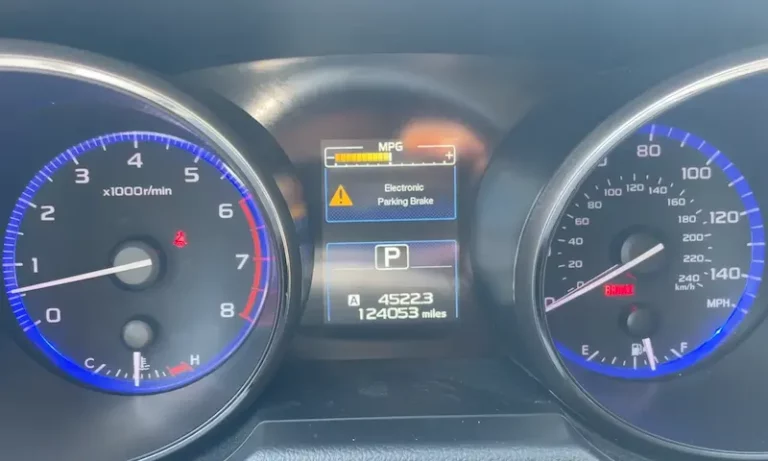
Your Subaru’s electronic parking brake (EPB) flashing warning light just lit up your dashboard like a Christmas tree. Or maybe you’re staring at your rear brakes, wondering how you’ll change those pads without the right scanner. Either way, you’re about to learn exactly how to handle a Subaru electronic parking brake reset without breaking anything—or your wallet.
What’s Different About Subaru’s Electronic Parking Brake?
Modern Subarus don’t use cables anymore. If you’ve got a 2015+ Outback, Legacy, 2019+ Forester, or Crosstrek, you’ve got Motor-on-Caliper (MoC) actuators bolted directly to your rear brake calipers.
Here’s the deal: inside each caliper sits a tiny electric motor with a spindle mechanism. When you hit that parking brake switch, the motor spins a threaded rod that pushes the brake piston against the rotor. No cables. No drums. Just motors and gears.
Why this matters for you: You can’t just compress those rear pistons with a C-clamp like the old days. There’s a mechanical drive nut sitting right where the piston needs to go. Force it, and you’ll destroy a $300+ caliper assembly.
The Three Types of “Reset” You Need to Know
People use “reset” to mean three totally different things:
Service Mode (Maintenance Reset): Retracting the internal mechanism before you replace brake pads. This is preventative—you’re making room for the new, thicker pads.
System Initialization (Calibration): Teaching the computer where the new pads are after installation. The EPB module needs to learn the new contact point.
Fault Clearing: Erasing error codes after you’ve fixed something (like that broken connector tab Subaru’s been dealing with).
The Scanner Method: How to Reset EPB Electronically
This is the safest way to perform a Subaru electronic parking brake reset. It’s what dealerships use, and you can do it at home with the right tool.
What You’ll Need
Grab a bi-directional scan tool that talks to Subaru’s parking brake module. The Foxwell NT710, Autel MX808, or Innova 5610 all work great. You’ll also need a battery maintainer—voltage drops mid-reset can brick your EPB module.
Step-by-Step Electronic Reset
Prep your vehicle: Park on level ground. Transmission in Park (CVT) or Neutral (manual). Hook up your battery maintainer. Turn the ignition to ON, but don’t start the engine.
Connect your scanner: Plug it into the OBDII port under your dash. Navigate to Diagnosis → Control Unit → Parking Brake → Work Support. Look for “Brake Maintenance Mode” or “Pad Replacement Mode.”
Enter service mode: Hit “Enter Maintenance Mode.” You’ll hear the rear motors whirring for 3-5 seconds—way longer than normal. That’s the actuator rewinding the drive nut all the way back to its home position.
Do your brake work: Turn off the ignition. Remove the wheels and calipers. Now you can compress the piston with a standard brake spreader or C-clamp. It’ll slide back with zero resistance (just hydraulic fluid pushing back through the lines).
Install your new pads and hardware. Bolt everything back together.
Exit and calibrate: Turn the ignition back ON. Return to your scanner menu and select “Exit Maintenance Mode.” The motors will whir again as they extend to contact your new pads. The system runs a pressure test to verify everything’s good.
This whole process protects your actuator’s planetary gears and preserves the O-ring seals. It’s worth the scanner investment if you’re doing your own brake jobs.
The Manual Method: Resetting EPB Without a Scanner
Don’t have a scanner? You can physically remove the actuator motor and manually retract the spindle. It’s more involved, but it works every time.
Tools You’ll Need
Here’s your shopping list:
| Tool | Size | What It’s For |
|---|---|---|
| Hex bit socket | 5mm | Motor mounting bolts |
| Torx or E-Torx socket | T45, T50, or E12 | Spindle retraction |
| Battery maintainer | 12V | Voltage support |
| Brake cleaner | — | Cleaning O-ring groove |
| Silicone grease | — | O-ring lubrication |
The Torx size varies slightly by year—T45 and E12 are most common. Grab both if you’re not sure.
Manual Reset Procedure
Access the actuator: Lift your Subaru and remove the rear wheels. You’ll see a black plastic box on the back of each caliper—that’s your EPB actuator.
Disconnect power: Unplug the electrical connector. Press the locking tab firmly, but be gentle—these tabs are brittle and prone to breaking on 2015-2018 models.
Remove the motor: Use your 5mm hex bit to remove the two bolts holding the motor to the caliper. If they’re corroded, hit them with penetrant oil first. Don’t strip those hex heads.
Wiggle the motor housing gently to break the O-ring seal, then pull straight off.
Retract the spindle: Look into the hole on the caliper’s backside. You’ll see the splined or Torx-shaped end of the spindle shaft.
Insert your T45 or E12 bit and turn clockwise. You’re manually screwing the drive nut backward up the shaft. Keep turning until it hits a hard stop—that’s the fully retracted position.
Compress and install: Now compress the hydraulic piston with your brake tool. It should move freely. If it doesn’t, you didn’t turn the spindle enough.
Install your new brake pads and reassemble the caliper.
Reinstall the motor: Apply a thin film of silicone grease to the O-ring. Slide the motor back on (you might need to rotate it slightly to mesh the gears with the spindle). Torque those 5mm bolts to 44-60 in-lbs. Don’t overtighten—the housing is plastic.
Reconnect the electrical harness.
Calibrating the System After Brake Work
Your physical work is done, but the EPB module doesn’t know where your new pads are yet. Time for the calibration “dance.”
The Button Sequence Reset
This works on most 2015+ models without a scanner:
Prime the hydraulics: Start the engine. Pump the brake pedal firmly 3-5 times. This pushes hydraulic fluid and removes any slack in the system.
Engage the brake: Pull the EPB switch UP and hold it. The motors will run—they might sound different as they search for the contact point. Wait until the BRAKE light on your dash turns solid red.
Release: Press the brake pedal with your foot. Push the EPB switch DOWN and hold until the BRAKE light turns off.
Repeat the cycle: Do this apply/release sequence 3-5 times. Each cycle lets the module refine its settings and learn exactly how much motor power it needs to generate proper clamping force.
You’ll know it’s done when the actuation sound becomes short (about 1 second) and consistent, and the dash light responds instantly.
Don’t Skip the Bed-In Process
New pads on old rotors (or vice versa) have terrible friction until properly bedded. Your EPB relies on specific friction coefficients to hold your Subaru on hills.
Here’s the proper bedding procedure:
Find a safe, straight road with minimal traffic. Accelerate to 40 mph, then apply moderate-to-heavy braking to slow to 10 mph. Don’t stop completely—that can imprint pad material onto hot rotors and cause pulsation.
Repeat this 5 times. Then drive at moderate speed for 5-10 minutes to cool everything down.
This transfers a thin layer of pad material to the rotor surface, stabilizing the friction levels your EPB needs to function properly.
Fixing That Flashing Brake Light
That flashing BRAKE light freaking you out? Before you assume the worst, understand what it’s actually telling you.
Decoding Your Dashboard
Solid BRAKE or PARK light: The parking brake is engaged. That’s normal.
Flashing BRAKE or EPB light: Critical fault detected. The system’s in fail-safe mode and might not engage or release properly.
The “Christmas tree” effect: If your Check Engine Light is on (maybe a loose gas cap or O2 sensor), Subaru’s computer automatically disables Vehicle Dynamics Control and certain EPB features. Your EPB light might just be a sympathetic shutdown, not the actual problem.
Fix the engine code first, then see if the EPB light clears on its own after a few ignition cycles.
The Infamous Connector Tab Failure
The most common EPB “failure” isn’t actually a motor problem—it’s a broken plastic locking tab on the wiring harness connector.
Subaru issued Technical Service Bulletin 06-87-22R for 2015-2018 Legacy and Outback models, extending warranty coverage to 15 years/unlimited miles for this specific defect. The connector sits on the suspension, subjected to constant vibration and heat cycles from the brakes. The plastic gets brittle and cracks.
Symptoms: Intermittent flashing BRAKE light, disabled EyeSight, Check Engine light. You’ll see code C1956 (EPB Motor Circuit Open) stored in the computer.
The quick fix: A UV-resistant zip tie. Thread it through the connector body and around a feature on the motor housing to physically secure the connection. This restores circuit integrity and clears the code. It’s not pretty, but it works.
The dealership fix involves installing a retainer clip or splicing in a new pigtail connector—both covered under that extended warranty.
Clearing Fault Codes After Repairs
Once you’ve fixed the physical problem, you need to clear the computer’s memory.
Soft vs. Hard Resets
Many EPB codes like C1956 are “self-healing.” Once you restore the circuit (plug the connector back in securely), the system will recheck itself over a few ignition cycles. The code moves to “History” and the dash light turns off automatically.
For stubborn codes, do a hard reset: disconnect the negative battery terminal for 15-30 minutes. This forces a cold boot of all control modules and clears volatile memory. When you reconnect, the system starts fresh.
Just remember—you’ll need to go through the calibration button sequence again after any battery disconnect to teach the EPB where the pads are.
Critical Safety Warnings
The MoC system creates hazards that old cable systems didn’t have:
Crush hazard: That motor engages with thousands of pounds of force. Never put your fingers between the piston and rotor housing if the connector’s plugged in. Someone opening a door could trigger an accidental actuation.
Piston ejection: Never apply power to the motor or turn the ignition if the caliper’s off the rotor but the motor’s still attached. The piston will shoot out of the bore like a rocket, destroying seals and dumping brake fluid everywhere. You’ll need a new caliper.
Rolling hazard: When you enter Service Mode, the parking brake is completely disabled. Your vehicle’s only held by the transmission parking pawl (on automatics/CVTs) or wheel chocks (on manuals). Always chock your front wheels before lifting the rear.
Why the “Power Probe” Method Is Dangerous
You’ll see forum posts about using jumper wires or a Power Probe to apply 12V directly to the motor pins. Don’t do it.
The motor’s a simple DC bi-directional design. Reverse the polarity, reverse the direction. Without a wiring diagram, it’s a 50/50 guess which way it’ll turn.
Guess wrong and you’ll extend the piston instead of retracting it. If the caliper’s off the rotor when this happens, you’ll blow out the piston, destroy the seals, and need a new caliper.
Stick with the scanner method or the manual motor removal method. Both give you tactile confirmation of what’s happening.
Tools You Actually Need
Here’s what belongs in your toolbox for Subaru EPB work:
For electronic reset: Bi-directional scanner (Foxwell NT710, Autel MK808, or similar) and a 12V battery maintainer.
For manual reset: 5mm hex socket (motor bolts), T45/T50/E12 Torx socket (spindle), brake pad spreader or C-clamp, brake cleaner, and silicone grease.
For general brake work: 7mm hex socket (caliper slide pins—different from the 5mm motor bolts), torque wrench, and jack stands rated for your Subaru’s weight.
Don’t cheap out on the battery maintainer. Voltage sags during the reset process can corrupt the EPB module’s position memory, potentially requiring dealer-level reprogramming to fix.
Making Sense of Different Model Years
Not all Subaru EPBs are created equal. The reset procedure you need depends on your model year.
Pre-2010 models: Traditional mechanical cable system. No reset needed—just adjust the star wheel as pads wear.
2010-2014 Legacy/Outback: “Cable-puller” hybrid system. Uses a central motor that pulls cables to engage drum shoes inside the rear rotors. Reset procedures for these are completely different and incompatible with newer models.
2015+ Outback/Legacy, 2019+ Forester/Crosstrek: Modern Motor-on-Caliper system. This is what we’ve been discussing—requires either scanner reset or manual spindle retraction.
Don’t mix procedures between generations. Using a 2012 reset method on a 2018 won’t work and might damage components.
What About Warranty Coverage?
If you’ve got a 2015-2018 Legacy or Outback showing EPB faults, check if you’re covered under TSB 06-87-22R before you start throwing parts at it.
The bulletin extends coverage for the connector tab failure to 15 years with no mileage limit. Even if you’re past your original warranty, this specific defect might still be covered. Call your dealer with your VIN before you pay for repairs.
For other EPB issues outside this bulletin, you’re looking at standard warranty terms—3 years/36,000 miles bumper-to-bumper, or 5 years/60,000 miles powertrain.
Wrapping Up Your Subaru Electronic Parking Brake Reset
You’ve got three paths for a Subaru electronic parking brake reset: the scanner method (safest), the manual motor removal method (most accessible), or the post-service calibration sequence (simplest for minor work).
Whichever route you take, remember the golden rule: never force that piston back without first retracting the internal drive nut. That’s how $60 brake jobs turn into $600 caliper replacements.
Check your connector tabs while you’re back there—especially on 2015-2018 models. A $0.10 zip tie might save you a tow truck call and a flashing dashboard.
And don’t skip the bed-in procedure. Your EPB’s holding power depends on proper friction between those pads and rotors. Five minutes of controlled stops makes the difference between parking confidently on San Francisco hills or rolling backward into someone’s bumper.