Thinking about tackling a Chevy 350 engine rebuild? It’s one of the most rewarding projects you can take on — but only if you do it right. One wrong measurement or skipped step can turn a weekend build into an expensive disaster. Stick with this guide and you’ll know exactly what to do, what to avoid, and how to get your small block running better than ever.
Why the Chevy 350 Is Still Worth Rebuilding
The small block Chevy 350 is arguably the most versatile V8 engine ever built. It’s been powering everything from muscle cars to pickup trucks since the late 1960s. Parts are cheap, support is everywhere, and the aftermarket is massive.
Whether you’re chasing 300 horsepower for a weekend cruiser or pushing toward 500+ for a track build, the 350 platform can handle it. That’s why a Chevy 350 engine rebuild is still one of the most popular projects in the DIY automotive world.
Know Your Block Before You Start
Not all 350 blocks are the same. Before you buy a single part, figure out what you’re working with.
The most important distinction is the rear main seal design:
- Pre-1986 blocks use a two-piece rear main seal
- 1986 and later blocks use a one-piece rear main seal
The one-piece rear main seal block is the better choice for most street builds. It’s more leak-resistant and comes ready for hydraulic roller camshafts from the factory.
You can identify your block using these key markings:
| Block Feature | Where to Find It | What It Tells You |
|---|---|---|
| Casting Number | Driver-side rear, near bellhousing | Year, displacement, main cap type |
| Rear Main Seal Type | Crankshaft flange area | 2-piece vs. 1-piece design |
| Lifter Valley Fixtures | Inside the block valley | Roller cam capability (look for “spider” holes) |
| Suffix Code | Front passenger-side engine pad | Original vehicle application and factory HP rating |
| Main Cap Style | Bottom of block | 2-bolt standard vs. 4-bolt performance |
Plan Your Build Around a Power Target
Your target horsepower shapes every decision you make. Here’s a simple breakdown straight from real SBC 350 build combinations:
| Power Target | Recommended Parts |
|---|---|
| 300 HP (Stock+) | Cast crank, reconditioned rods, cast pistons |
| 400 HP (Street) | Cast or forged crank, 5.7″ rods, hypereutectic pistons |
| 500+ HP (Race/Forced Induction) | Forged 4340 crank, H-beam rods, forged pistons |
Don’t buy race parts for a street engine. It’s a waste of money and can actually hurt streetability.
Get the Right Tools First
Skipping proper tooling is the fastest way to ruin a rebuild. Precision on a Chevy 350 engine rebuild means working in ten-thousandths of an inch.
Here’s what you actually need:
- Dial bore gauge — measures cylinder bore size and bearing clearances
- Outside micrometer set — checks crankshaft journals and piston diameters
- Piston ring filer — adjusts ring end gaps
- Torque wrench (½” drive) — non-negotiable for fastener accuracy
- Cam bearing driver — installs cam bearings without damage
- Deck bridge and dial indicator — measures piston-to-deck height at TDC
- Oil pump primer — pressurizes the oiling system before first startup
You can find engine building tool kits that include most of what you need in one package. Don’t cut corners here.
One thing most people miss: measure your parts in a climate-controlled space. Metal expands and contracts with temperature, and that throws off your readings.
Teardown Is a Forensic Investigation
Don’t just yank parts off and toss them in a pile. Teardown gives you critical information about why your engine failed in the first place.
Label everything. Lifters, pushrods, and rocker arms develop a mechanical relationship with their matching cam lobes and valve stems. If you’re doing a “freshen-up” rebuild, keep them in order and put them back exactly where they came from.
When you pull the cylinder heads, inspect the head gaskets closely. Tracking or breach between cylinders signals warping or incorrect torque from the previous build.
Before you push the pistons out, check for a ridge at the top of each bore. That ridge builds up where the top ring stops traveling. If it’s significant, remove it with a ridge reamer first — otherwise you’ll crack the piston ring lands.
Main caps are NOT interchangeable. Each one gets line-bored at the factory. If yours don’t have factory stamps, mark them (1-5 for mains, 1-8 for rods) before you pull them off. Installing a cap backwards or in the wrong position will seize your crankshaft.
Machining: Where the Real Rebuild Happens
Once the block is bare and clean, it goes to the machine shop. This is where a Chevy 350 engine rebuild actually becomes a rebuild.
Here’s what a typical machine job costs:
| Service | Typical Cost (USD) |
|---|---|
| Hot tank cleaning | $100–$130 |
| Cylinder boring (V8) | $280–$450 |
| Torque plate hone | $100–$195 add-on |
| Surface decking | $200–$330 |
| Align honing | $250–$300 |
| Cam bearing install | $45–$160 |
Torque Plate Honing — Don’t Skip It
Here’s a detail most beginners miss: when cylinder heads bolt down onto the block, the clamping force distorts the bore slightly. If you hone without a torque plate simulating that stress, your cylinders will measure round on the bench but go oval once the heads are installed. That kills ring seal and causes oil consumption from day one.
Zero Decking for Better Compression
Decking the block mills the head mating surfaces flat. “Zero decking” brings the pistons flush with the deck surface at TDC. This tightens the quench area, promotes combustion turbulence, and reduces detonation sensitivity — a smart move for any performance build.
Bearings, Pistons, and the Rotating Assembly
Your crank, rods, and pistons are the heart of the engine. Get these wrong and nothing else matters.
Bearing Clearance
The industry standard for bearing clearance is roughly 0.001 inch per inch of journal diameter. For the 350’s main journals, you’re targeting around 0.002–0.0025 inches. Rod bearings run slightly tighter.
Use a dial bore gauge zeroed with a micrometer. Plastigage works as a final check, but don’t rely on it alone.
Piston Ring End Gap
Rings expand when they heat up. If the end gap is too tight, the ends butt together and the ring explodes outward — destroying your cylinder wall or the ring itself.
For a standard street 350 with a 4.030″ bore, your top ring gap should land around 0.018–0.020 inches. Nitrous and boosted applications need significantly more gap — up to 0.028″ or more.
File your rings to fit using a proper ring filer. Never assume out-of-the-box fit is correct.
Head Gaskets: Pick the Right One
The head gasket you choose depends on your surface finish and power level. This is a decision that matters more than most people realize.
| Gasket Type | Max Surface Roughness | Best For |
|---|---|---|
| Composite | 80–100 Ra | Stock rebuilds, cast iron heads |
| Multi-Layer Steel (MLS) | 30 Ra or smoother | High compression, aluminum heads, boost |
| Graphite | 60–80 Ra | Heavy-duty, forgiving seal |
| Copper | Specialized | Racing with O-ringed blocks |
For more detail on choosing the right head gasket material, your surface finish drives the decision. MLS gaskets need a freshly decked, mirror-smooth surface to seal properly.
Also: if you’re running 350 heads on a 400 SBC block, you need to drill steam holes in the heads. Skip this and you’ll cook the engine between the siamesed cylinders.
Critical Torque Specs You Need to Know
Every fastener on a Chevy 350 engine rebuild has a specific torque value. Here are the key ones:
| Fastener | Torque Spec |
|---|---|
| Main cap bolts (inner) | 70 ft-lbs |
| Main cap bolts (outer) | 65 ft-lbs |
| Connecting rod bolts | 45 ft-lbs |
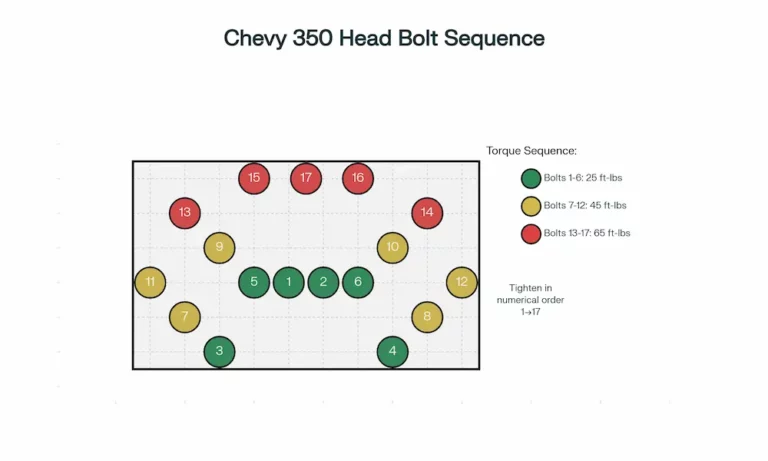
| Cylinder head bolts | 65 ft-lbs |
| Intake manifold bolts | 25 ft-lbs |
| Harmonic balancer bolt | 85 ft-lbs |
| Oil pump to block | 65 ft-lbs |
Important: Most SBC head bolt holes pass through the water jacket. Coat every head bolt thread with ARP thread sealer before installation. Skip this and coolant wicks up the threads into your oil.
Use the 17-bolt spiral torque sequence starting from the center outward. Do it in three steps — never crank them down in one pass.
Setting the Valvetrain Correctly
Most 350 rebuilds use hydraulic lifters. To set them properly, use the EO/IC method — it works regardless of firing order or cam profile:
- To adjust the intake valve: rotate the engine until the exhaust valve just starts to open
- To adjust the exhaust valve: rotate the engine until the intake valve is closing (halfway down from full lift)
Once you find zero lash — the point where all slack disappears — tighten the rocker nut an additional ¾ to 1 full turn. This pushes the lifter plunger down into its operating range. For a detailed step-by-step on SBC valve lash adjustment, Speedway Motors has a clean walkthrough.
Oil System Priming and Break-In
Never start a freshly rebuilt engine dry. Use an oil priming tool — a distributor shaft without gears — connected to a high-torque drill. Drop it into the distributor hole to engage the oil pump directly. Spin the pump while rotating the crank by hand.
You’re done priming when oil flows from every rocker arm. That confirms oil has reached every gallery and every lifter.
Flat Tappet Cam Break-In
If you’re running a flat-tappet cam, this is critical:
- Bring the engine immediately to 2,000–2,500 RPM on first startup
- Hold it there for 20–30 minutes — no idling
- Use a high-zinc (ZDDP) break-in oil — this is non-negotiable
Letting a flat-tappet engine idle during break-in kills cam lobes. The crankshaft splash doesn’t reach the lobes at idle speed, and without ZDDP protection, the lobes wipe flat in minutes.
For roller cams, the high-RPM break-in isn’t needed. Focus instead on seating the rings with varied load driving — alternating hard acceleration with engine braking — during the first 50–100 miles.
Rookie Mistakes That Destroy Engines
These errors show up constantly in engine building communities:
- Forgetting oil gallery plugs behind the timing cover — you’ll have zero oil pressure at the top end
- Distributor 180° out — the engine fires on the exhaust stroke and backfires through the carb
- Shop rag left in an intake port — causes a mystery dead cylinder when the manifold goes on
- Dry bearing installation — bearing faces need assembly lube; the backs stay bone dry so they don’t spin in the housing
- Skipping the ring gap check — manufacturers don’t always ship rings pre-gapped to your bore size
A complete beginner’s guide to engine rebuilding covers the fundamentals if you want a solid foundation before diving into SBC-specific details.
The Payoff Is Worth It
A properly executed Chevy 350 engine rebuild produces an engine that’s tighter, stronger, and more reliable than it was from the factory. The 350 small block has earned its legendary status because it responds well to precision — clean it right, bore it right, gap the rings, prime the oil system, and break it in properly. Do those things and this engine will run strong for another 100,000 miles.