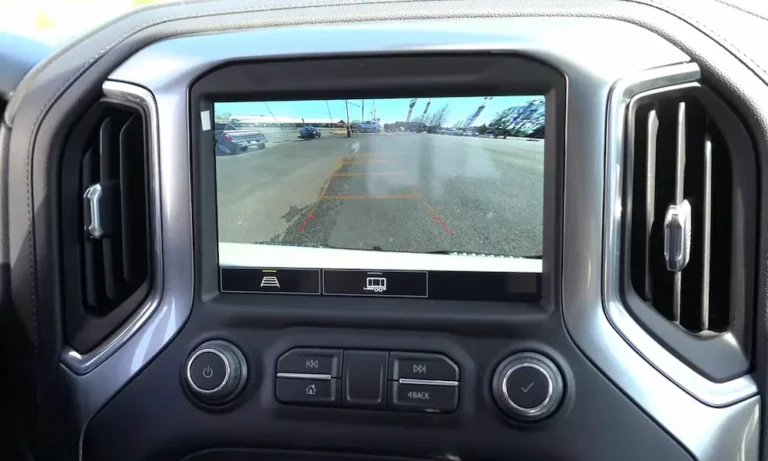
You rely on your backup camera every day, but now you’re staring at a blank screen or distorted image when shifting into reverse. Don’t worry – most Chevy backup camera issues have straightforward solutions you can tackle yourself. This guide walks you through common problems and fixes, from simple cleaning to more complex troubleshooting steps.
Quick Facts About Chevy Backup Camera Issues
- Most backup camera problems stem from dirty lenses, electrical issues, or software glitches
- Federal safety standards require all vehicles made after May 2018 to have functioning backup cameras
- DIY fixes can save you $50-$1,200 in repair costs depending on the issue
- Backup cameras prevent approximately 15,000 injuries annually from backup accidents
Common Causes of Chevy Backup Camera Failures
Dirty or Obstructed Camera Lens
The simplest and most common reason your Chevy backup camera shows a blurry image is physical obstruction. Your camera lens is exposed to all the elements – dirt, mud, snow, and road grime.
How to fix it:
- Locate your camera (typically near the license plate or tailgate handle)
- Clean the lens with water and a soft, non-abrasive cloth
- Avoid harsh cleaners that could damage the lens coating
For stubborn dirt, use a mild soap solution. If your Chevy has a lens washer feature, you can activate it through your infotainment system. Persistent fog inside the lens indicates a seal failure, which might require professional help.
Electrical System Problems
Blown Fuses
When your backup camera shows nothing at all, a blown fuse is often the culprit. Different Chevy models have different fuse locations and ratings:
| Model | Fuse Location | Fuse Number | Rating |
|---|---|---|---|
| Silverado Trail Boss | Passenger-side dash panel | #23 | 10A |
| Equinox | Under-hood junction box | #54 | 5A |
| Tahoe/Suburban | Under-hood box | #34 and #49 | Varies |
How to fix it:
- Locate your fuse box using your owner’s manual
- Identify the backup camera fuse
- Check if it’s blown (the metal strip inside will be broken)
- Replace with a new fuse of the same amperage rating
Wiring Issues
Intermittent camera operation often points to damaged wiring. The cables running through moving parts like tailgates are especially vulnerable to wear.
How to check for wiring problems:
- Look for pinched, frayed, or disconnected wires between the camera and display
- Pay special attention to hinge areas where wires bend frequently
- Check for loose connections at both the camera and behind the display unit
Software Glitches and Control Module Problems
Reset Your System
Just like computers, your vehicle’s electronics sometimes need a reboot:
- Turn off your vehicle completely
- Disconnect the negative battery terminal
- Wait 10-15 minutes (this clears the system memory)
- Reconnect the battery and start your vehicle
This simple reset fixes many camera glitches in 2017-2020 Chevy models.
Software Updates
Your Chevy’s Video Processing Module (VPM) may need a software update. The 2019-2020 Silverado and Sierra models had known issues with their camera systems that were addressed through software updates.
Check if your vehicle has any pending updates or recalls by entering your VIN at the NHTSA’s safety issues and recalls page.
Step-by-Step Diagnostic Process
When simple fixes don’t work, follow this systematic approach:
1. Verify the Problem
First, make sure you’re giving the camera enough time to activate when shifting to reverse. Some systems take a moment to display the image.
2. Check for Obvious Issues
- Is the lens clean?
- Are there any visible signs of damage to the camera?
- Does the problem happen all the time or only sometimes?
3. Test the Power Supply
If you’re comfortable with basic electrical testing:
- Locate the camera connector
- Use a multimeter to check for 12V power when in reverse
- Verify ground connection
No power indicates a fuse problem or wiring issue upstream.
4. Inspect Connections
Examine all accessible connectors for:
- Corrosion on pins
- Loose connections
- Bent pins
- Water intrusion
Pay special attention to Fakra-style coaxial connectors, which are common in Chevy backup camera systems and susceptible to damage.
Advanced Troubleshooting
Water Intrusion Issues
The 2019-2020 Silverado and GMC Sierra trucks had a known issue with water getting into the camera housing through poorly sealed third brake light assemblies. Look for signs of water damage or corrosion in the camera housing.
Signal Problems
If your camera shows static, flickering images, or color distortion:
- Check the integrity of the coaxial cable running from the camera
- Look for interference from aftermarket accessories
- Verify that all grounds are secure
Weather-Related Camera Problems
Winter Issues
Cold weather can affect your backup camera in several ways:
- Condensation forming inside the lens
- Snow or ice buildup on the camera
- Slower electronics response time
Cold weather tips:
- Warm up your vehicle before expecting perfect camera operation
- Gently brush snow away from the camera lens
- Avoid spraying hot water on a frozen camera (thermal shock can crack the lens)
Summer Heat Concerns
Extreme heat can also cause problems:
- Electronic components may overheat
- LCD displays can temporarily fail in direct sunlight
- Thermal expansion can loosen connections
If your camera works intermittently on hot days, try using your vehicle’s air conditioning to cool the dashboard area where the display module is located.
Model-Specific Chevy Backup Camera Problems
Silverado Issues
The Silverado, especially 2019-2021 models, has several known camera issues:
- Missing guide lines after battery disconnection
- Black screen after software updates
- Intermittent operation in wet conditions
Some Silverado owners report success with a specific reset procedure: press and hold the home and fast-forward buttons simultaneously for 10 seconds.
Equinox Camera Failures
Common problems in Chevy Equinox backup cameras include:
- Delayed image display
- Poor night vision
- Complete failure after car washes
Many Equinox owners find that the fuse #54 (5A) in the under-hood junction box is the culprit.
Tahoe and Suburban Camera Troubles
For these larger SUVs, check:
- Fuses #34 and #49 under the hood
- Connections at the liftgate hinge areas
- Settings in the infotainment system that might disable the camera
When DIY Isn’t Enough: Professional Repair Options
If you’ve tried the above solutions without success, it’s time to consider professional help:
Dealership Service
Your Chevy dealership has:
- Access to manufacturer-specific diagnostic tools
- The latest software updates
- Trained technicians familiar with your model’s common issues
Expect to pay $100-150 for diagnostics, plus repair costs.
Independent Mechanics
A good independent shop can handle most backup camera issues at potentially lower rates than dealerships. Make sure they have experience with automotive electronics.
Mobile Electronics Specialists
These experts focus specifically on car electronics and often have specialized tools for diagnosing camera problems.
Preventing Future Backup Camera Problems
Regular Maintenance
- Clean your camera lens monthly or whenever it gets visibly dirty
- Inspect visible wiring during routine maintenance
- Apply dielectric grease to camera connectors if you live in a humid climate
Software Updates
Check for available updates every 6-12 months by:
- Visiting your dealer
- Checking the myChevrolet app
- Monitoring recall notices from NHTSA
Protect Your Camera
- Be careful with pressure washers around the camera area
- Consider a camera cover for severe weather conditions
- Park under shelter when possible to limit exposure to elements
Upgrade Options for Older Chevys
If you have a pre-2018 Chevy without a backup camera or with an outdated system, consider these upgrade options:
Factory-Style Retrofits
Several companies offer OEM-looking backup cameras specifically designed for older Chevy models. These integrate with your existing display or come with a new display that matches your dashboard.
Wireless Systems
Wireless backup camera systems offer easier installation without running wires through the vehicle. However, they may suffer from interference issues and typically require recharging or battery replacement.
Cost Comparison: DIY vs. Professional Repair
| Repair Type | DIY Cost | Professional Cost |
|---|---|---|
| Lens Cleaning | $0-5 | $50-100 |
| Fuse Replacement | $2-10 | $50-100 |
| Wiring Repair | $15-50 | $200-500 |
| Camera Replacement | $75-200 | $300-600 |
| VPM Replacement | Not recommended | $600-1,200 |
Real-World Case Study: 2019 Silverado Backup Camera Failure
A 2019 Silverado owner experienced a completely black screen when shifting to reverse. After following our troubleshooting steps, they discovered that:
- The lens was clean
- The fuse was good
- A system reset didn’t help
- Inspection revealed water damage at the camera connector
The solution was cleaning the connections, applying dielectric grease, and wrapping the connector with self-fusing silicone tape. Total cost: under $10 and one hour of time.
The Legal Importance of a Working Backup Camera
Since May 2018, federal law requires all new vehicles to have working backup cameras. This isn’t just a convenience feature—it’s a critical safety system.
The National Highway Traffic Safety Administration (NHTSA) estimates that backup cameras prevent thousands of injuries each year. Driving with a non-functioning camera could potentially:
- Increase your liability in an accident
- Create safety risks, especially for children and pets
- Lead to parking lot collisions
Advanced Camera Features You Might Be Missing
Modern Chevy backup cameras offer more than just a rear view:
- Dynamic guide lines that turn with the steering wheel
- Trailer hitch view for easier hookups
- 360-degree surround view (on premium models)
- Cross-traffic alerts integrated with the camera display
If your camera is working but missing some features, check your vehicle settings menu for options that might have been disabled.
By following this guide, you can diagnose and fix most Chevy backup camera issues without an expensive trip to the dealership. Remember to start with the simplest solutions—often a good cleaning or system reset is all your camera needs to start working perfectly again.

