Is your Chevy Cruze blowing warm air instead of the refreshing cold you desperately need? You’re facing one of the most common problems that plague these vehicles. When your Chevy Cruze air conditioning isn’t working, it can turn a simple commute into a sweltering ordeal.
Hot air from your vents could signal anything from a minor electrical glitch to a major component failure. Let’s dive into the most likely culprits behind your AC troubles and the steps you can take to get cool again.
Most Common Reasons Your Chevy Cruze AC Isn’t Working
When your Chevy Cruze air conditioning isn’t working, several key issues are typically to blame. Here’s what you should check first:
1. Low Refrigerant Levels
The most frequent culprit behind a malfunctioning AC is simply not having enough refrigerant in the system. This happens when:
- Tiny leaks develop in hoses or connections
- Seals deteriorate over time
- Components crack or get damaged
The 2016-2019 Chevrolet Cruze models are especially prone to refrigerant leaks from the AC condenser plug area, as documented in GM Technical Service Bulletin 18-NA-260. When refrigerant levels drop too low, safety mechanisms prevent the compressor from engaging, leaving you with warm air.
Signs of low refrigerant include:
- AC that works initially but then blows warm
- Hissing sounds from the dashboard or engine bay
- Oil spots under the vehicle (refrigerant often leaks with compressor oil)
2. Electrical System Problems
Your Chevy Cruze AC depends on properly functioning electrical components. When these fail, your AC stops working regardless of the mechanical parts’ condition.
Common electrical issues include:
- Blown fuse for the AC compressor clutch (Fuse #62, 10A)
- Failed AC compressor clutch relay (Relay #1)
- Bad wiring connections to the compressor
- Faulty pressure switches
Both the critical fuse and relay are located in the main engine compartment fuse box. When these components fail, the compressor can’t engage, and refrigerant won’t circulate.
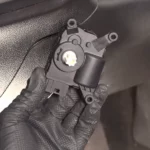
3. Compressor Failure
The compressor is the heart of your AC system. When it fails, your Chevy Cruze air conditioning stops working completely.
Signs of compressor problems include:
- Grinding noise when the AC is turned on
- AC clutch not engaging (doesn’t spin with the belt)
- Complete lack of cooling
Compressor issues often stem from:
- Internal mechanical failure
- Clutch coil burnout
- Seizing due to lack of lubrication
- Age and normal wear
4. Pressure Switch Malfunctions
AC pressure switches monitor refrigerant pressure and protect the system. These switches are particularly problematic in Chevy Cruze models.
The high-pressure sensor in the condenser fails frequently in these vehicles. When it malfunctions, it can:
- Prevent compressor engagement
- Cause intermittent cooling
- Trigger system shutdowns even when refrigerant levels are normal
5. Cooling Fan Problems
Your AC system relies on the engine cooling fan to help dissipate heat. When this fan fails, your AC can’t work properly even if all other components are fine.
Common cooling fan issues in the Chevy Cruze include:
- Failed cooling fan resistor or control module
- Damaged fan motors
- Broken fan blades
- Electrical faults preventing proper operation
How to Diagnose Your Chevy Cruze AC Problems
Before spending money on repairs, try these diagnostic steps to narrow down what’s wrong with your AC system.
Check the Basics First
- Inspect the fuses: Look specifically at Fuse #62 (AC Compressor Clutch, 10A) in the engine compartment fuse box. You can often see if it’s blown through its transparent housing.
- Test the relay: You can swap the AC compressor clutch relay (Relay #1) with an identical relay from the same fuse box. If the AC starts working after the swap, you need a new relay.
- Look for obvious leaks: Inspect around hoses, connections, and the compressor itself for oily residue that indicates refrigerant leaks.
- Check cabin air filter: A clogged filter can restrict airflow. This is located behind the glove box in most Cruze models and should be replaced every 15,000-20,000 miles.
Test Compressor Engagement
When your car is running, turn the AC to max and watch the compressor at the front of the engine:
- The center part of the pulley (clutch plate) should move inward and spin with the pulley when the AC is on
- If the clutch doesn’t engage but the pulley spins, you may have an electrical issue or low refrigerant
- If you hear clicking but no engagement, the clutch gap may need adjustment or the clutch is failing
Pressure Testing
This requires specialized equipment but provides definitive answers:
Normal pressure readings should be:
- Low-side: 25-40 PSI
- High-side: 200-350 PSI (varies with ambient temperature)
Abnormal readings indicate:
- Very low readings on both sides = major refrigerant leak or empty system
- Low on low side, normal/high on high side = restriction or expansion valve problem
- Low on both sides but not empty = partial refrigerant loss
- High on both sides = overcharge or airflow issues (dirty condenser or fan problems)
AC Repair Costs for Your Chevy Cruze
Repair costs vary significantly depending on the component that’s failed. Here’s what you can expect to pay:
| Repair Type | DIY Cost | Professional Cost | Difficulty Level |
|---|---|---|---|
| Fuse replacement | $5-10 | $50-100 | Easy |
| Relay replacement | $10-20 | $75-150 | Easy |
| Recharge refrigerant | $40-60 | $150-250 | Moderate* |
| Cabin air filter | $15-30 | $50-100 | Easy |
| Pressure switch | $30-50 | $150-250 | Moderate |
| Cooling fan assembly | $100-200 | $300-500 | Moderate |
| AC compressor | $200-300 | $800-1,400 | Difficult |
| Complete system overhaul | N/A | $1,200-2,000+ | Professional only |
*Note: Refrigerant handling requires EPA certification and special equipment. DIY is technically possible with pre-charged cans but not recommended for proper system service.
DIY Fixes You Can Try
Some AC problems can be tackled by a confident DIYer. Here are repairs you might consider:
Replacing a Fuse
- Locate the engine compartment fuse box (typically near the battery)
- Remove the cover and find Fuse #62 (10A)
- Extract the old fuse using the provided plastic tweezers
- Insert a new 10A fuse of the same type
- Replace the cover and test the AC
Changing a Relay
- Find the engine compartment fuse box
- Identify the AC compressor clutch relay (Relay #1)
- Pull the old relay straight up to remove it
- Insert the new relay, ensuring it’s fully seated
- Test the AC system
Replacing the Cabin Air Filter
- Open the glove box and remove the limiting stops on each side
- Lower the glove box completely
- Remove the filter cover by squeezing the tabs
- Extract the old filter, noting its orientation
- Install the new filter in the same orientation
- Replace the cover and return the glove box to its position
Prevention and Maintenance
To avoid future Chevy Cruze air conditioning problems:
- Run your AC regularly – Even in winter, run it for 10 minutes weekly to keep seals lubricated
- Replace cabin air filters – Every 15,000-20,000 miles or sooner if you drive in dusty conditions
- Keep the condenser clean – Clear debris, leaves, and bugs from the front of the radiator/condenser
- Get annual AC system checks – Professional inspection can catch small leaks before they become major problems
- Address strange noises immediately – Unusual sounds from the AC system often signal impending failures
Special Considerations for Turbocharged Cruze Models
Turbocharged Chevy Cruze models have an additional complication: charge air cooler icing can affect overall system performance in extremely cold weather. This issue can persist even when temperatures rise, affecting your AC system’s effectiveness.
If your turbocharged Cruze has AC problems after extreme cold weather, have the charge air cooler system inspected as part of your diagnosis.
Most Common AC Problems by Chevy Cruze Model Year
Different model years have their own typical issues:
- 2011-2015: Compressor clutch failures and refrigerant leaks from hoses
- 2016-2019: Condenser plug leaks (covered by TSB 18-NA-260)
- 2017-2019: Cooling fan control module failures
Knowing these model-specific tendencies can help you or your mechanic target the most likely causes for your particular vehicle.
When your Chevy Cruze air conditioning isn’t working, the root cause is usually identifiable with systematic diagnosis. While some repairs are DIY-friendly, refrigerant system work typically requires professional service due to environmental regulations and specialized equipment needs. By understanding the most common issues and their symptoms, you can make informed decisions about repairs and potentially save money by targeting the actual problem rather than replacing parts unnecessarily.