That clicking noise behind your dash? That’s your Dodge Ram telling you something’s wrong with the blend door actuator. This guide covers diagnosis, replacement, and calibration — so you can skip the $800 dealer bill and fix it yourself.
What Is a Blend Door Actuator (And Why Should You Care)?
The blend door actuator is a small electric motor that controls the temperature flaps inside your HVAC system. It mixes hot air from the heater core with cold air from the A/C evaporator. When it works, you don’t think about it. When it fails, you’re either sweating in January or freezing in July.
Higher-trim Ram models — Laramie, Limited, Longhorn — use dual-zone systems with two actuators. One controls the driver’s side. The other controls the passenger side. If your driver gets heat but your passenger freezes, you’ve likely got a driver-side blend actuator failure.
Signs Your Dodge Ram Blend Door Actuator Is Failing
Don’t guess. Here’s what a bad actuator actually looks and sounds like:
- Clicking or knocking noise right after you start the truck — the HVAC module runs a self-test at startup
- Stuck on hot or cold — the blend door can’t move to mix temperatures
- Air only blows from defrost vents — this points to a mode door actuator failure instead
- Erratic temperature swings — the actuator’s internal sensor is worn out
- Grinding sound near the glove box — the recirculation door may have fallen into the blower fan
A clicking sound that lasts 10–30 seconds after ignition is the most common early symptom. Don’t ignore it. A $30 actuator now beats a $1,200 dash-pull later.
According to CarParts.com’s blend door actuator guide, if the system produces hot air but won’t switch to cold (or vice versa), the blend door is almost certainly stuck.
Why Dodge Ram Actuators Fail So Often
Here’s the dirty truth: the gear teeth are plastic. Every time your HVAC module calibrates itself, it drives the actuator until the door physically hits a hard stop. That constant stall-torque cracks and shears the plastic gears over time.
This is calls the “stall-point” problem. The system detects the motor stalling to find its limit — which means max torque gets applied to plastic gears repeatedly, for years.
Here’s a breakdown of what fails and how:
| Actuator Component | Material | How It Fails | What You’ll Notice |
|---|---|---|---|
| DC Motor | Brushed 12V | Burns out or brushes wear down | No movement at all |
| Reduction Gears | ABS/Nylon Plastic | Teeth shear from stall torque | Clicking noise |
| Potentiometer | Variable Resistor | Surface wear or corrosion | Erratic positioning |
| Housing Case | Molded Plastic | Tabs snap or warp | Actuator misaligns |
Generation-by-Generation Breakdown
Your fix depends heavily on which Ram you own. Each generation has its own weak points and access challenges.
3rd Gen Ram (2002–2009): The Worst Offender
This is where most Dodge Ram blend door actuator replacement stories get painful. The plastic HVAC doors often fail before the actuator does — especially the recirculation door above the blower motor.
HeaterTreater documents a specific design flaw: the factory door hinge has no proper stop point, so the actuator keeps pushing against it until it snaps. Then the door drops directly into the blower fan cage. You’ll hear a dramatic grinding sound and lose most of your airflow instantly.
Quick check: Swing your glove box down and reach into the air grate. If the door is loose or missing, that’s your problem.
The 3rd Gen blend door uses a “clam-shell” design — upper and lower doors cover the heater core. The upper door connects directly to the actuator and is the first to break. A full factory repair means removing the entire dashboard — often over $800 in labor at a shop.
Actuator locations on 3rd Gen:
- Recirculation actuator — behind the glove box, two screws, easiest to reach
- Mode/defrost actuator — near the accelerator pedal, driver’s side
- Main blend actuator — bottom of the HVAC unit, near the center hump
4th Gen Ram (2009–2018): Better Access, Same Gears
The 4th Gen improved interior access but kept the same vulnerable plastic components. The good news: you can often reach the passenger-side blend actuator and recirculation actuator by simply removing the upper and lower glove boxes — sometimes in under an hour.
The driver-side blend actuator is still tucked behind center console trim near your right knee. Budget extra time for that one.
One important note: the 4th Gen HVAC system ties into the Body Control Module (BCM). Fuses F10, F12, and F23 control HVAC functions. A blown fuse can make a bad actuator look like a dead system. Check your fuses first.
5th Gen Ram (2019–2025): Smart Actuators, Tight Spaces
The 5th Gen DT chassis is a different beast. These actuators run on a LIN bus — they receive digital commands, not just 12V power. Slap in a cheap generic actuator and you might get communication errors that affect other systems.
Reddit users with 5th Gen Rams report that blend door access requires removing the center console, lower dash trim, and sometimes the steering column shroud. It’s tight. Give yourself a full afternoon.
What Tools You Actually Need
Standard ratchets won’t fit in most of these spaces. The gap between the HVAC box and the firewall or console support is sometimes barely an inch wide.
| Tool | Spec | Why You Need It |
|---|---|---|
| Actuator wrench | Ultra-thin, ratcheting | Fits in the 1-inch gap near the housing |
| Metric sockets | 5.5mm, 7mm, 8mm | 5.5mm fits most Chrysler/Dodge actuator screws |
| Torx bits | T-15 | Some model years use these on trim |
| Magnetic pickup tool | Telescoping | Rescues dropped screws from deep dash voids |
| Trim pry tools | Nylon/plastic | Removes panels without gouging |
| Work light | LED or headlamp | You can’t fix what you can’t see |
The 5.5mm actuator socket set on eBay is purpose-built for this job. It’s worth every penny.
Step-by-Step Dodge Ram Blend Door Actuator Replacement
Before You Touch Anything
Disconnect the negative battery cable. Wait two full minutes before working near the dash. The airbag system’s capacitor holds a charge — you don’t want to find that out the hard way.
If your repair requires removing the full HVAC housing (not just swapping the actuator), the A/C refrigerant must be professionally recovered first. This is federally regulated in the US. Don’t vent it.
Step 1: Remove the Faulty Actuator
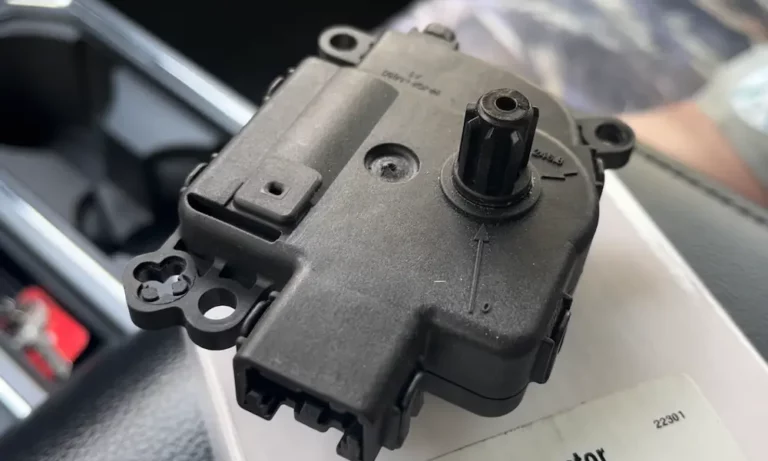
Press the locking tab on the electrical connector and pull it straight off — never yank by the wires. Remove the two or three mounting screws with your 5.5mm wrench. Pull the actuator straight off the door shaft.
Step 2: Test the Door Shaft First
This step saves you from buying a new actuator you don’t need. Use your fingers to turn the door shaft manually. It should move smoothly from stop to stop with almost no resistance.
If the shaft spins freely with no stop points, the internal door is broken — and a new actuator won’t fix that. You’ll need a door repair kit before you can proceed.
Step 3: Align the New Actuator (Don’t Skip This)
New actuators often ship in a neutral position that doesn’t match where your door currently sits. Forcing a misaligned actuator onto the shaft will strip the gears immediately.
You’ve got three options to align it:
- Method A: Plug the new actuator in temporarily, reconnect the battery, and use your dash controls to move the actuator shaft to match the door position
- Method B: Manually rotate the door shaft until it matches the new actuator’s output position
- Method C: Use a 9V battery with two jumper wires on the motor pins to manually spin the shaft to the right position
This alignment step — sometimes called “clocking” the actuator — is one of the most common mistakes DIYers make.
Step 4: Mount and Tighten
Slide the actuator onto the shaft until it sits flush. Reinstall the screws and stop at approximately 2.2 Nm (20 inch-pounds). The plastic mounting ears on the HVAC housing crack easily. Snug is enough.
Calibrating Your New Actuator
A new actuator needs calibration. Without it, the HVAC module doesn’t know where the new stop points are — and it’ll over-drive the motor straight into gear failure. Skipping calibration is how you break a brand-new actuator on day one.
Fuse-pull method (2002–2018 Rams):
- Turn ignition to “On” — don’t start the engine
- Set the fan to Speed 1 or 2
- Pull the HVAC fuse from the engine compartment PDC
- Wait 60 seconds
- Reinstall the fuse — you’ll hear the doors sweep as the module relearns its limits
Battery reset method: Disconnect the negative battery cable for 10–30 minutes. The module resets and auto-calibrates on the next key cycle.
Scan tool method (2019+ — mandatory): Use the “Actuator Calibration” function on a professional scanner. This is the only reliable method for 5th Gen trucks. It verifies the feedback voltage is in range and confirms the repair worked.
Aftermarket Upgrade Options Worth Knowing
If your 3rd Gen Ram has a broken plastic door — not just a bad actuator — you’ve got two solid alternatives to a full dash-pull:
HeaterTreater cuts a repair window into the plastic HVAC housing from the footwell. You remove the broken door through the opening and install a steel replacement — no dashboard removal required. It attacks the root cause of failure (weak plastic) while avoiding the most expensive part of the job (labor).
Blend Door USA offers billet aluminum doors — virtually indestructible and better-sealing than factory plastic. These are best installed during a full housing removal, like when you’re already replacing a heater core or evaporator.
What This Repair Actually Costs
Here’s the honest breakdown:
| Who Does the Work | Part Cost | Labor | Total |
|---|---|---|---|
| DIY | $15–$40 | 1–4 hours of your time | $15–$50 |
| Independent shop | $30–$60 | 2–5 hours | $320–$550 |
| Ram dealership | $60–$120 | 3–8 hours | $600–$950 |
If the internal plastic door is also broken (common on 3rd Gen), RepairPal estimates total repair costs can exceed $1,200 at dealer rates for the full dash-pull procedure.
The DIY route is genuinely doable here — especially on 4th Gen trucks where the glove box access point makes the job straightforward. The 3rd Gen takes more patience, but the HeaterTreater shortcut method keeps it manageable without pulling the whole dashboard.